Chapter 6: Packages
Packages
Applications can often contain a series of optional components that extend the functionality of the main application. Since these components are not always required, it's often desirable to allow the user the choice of what components they would like to install. While this type of design can be accomplished with a series of file conditions, it can be very tedious. Packages are designed as a grouping mechanism that allows components to be managed in an easier and more efficient way, both at design time and run time.
In this chapter, you'll learn about:
• What packages are and how they can be used
• Defining packages
• Assigning files to packages
• Adding a Select Packages screen to your project
• Advanced package actions
Packages are special categories that you can define in order to group related files together. They're usually used to give users the ability to choose which parts of an application they want to install. Here’s a basic overview of packages:
• Each package consists of a unique package ID, a localized display name, and localized description.
• You can assign file or folder references to packages by using the File Properties or Folder Reference Properties dialog.
• You can have as many packages in a Setup Factory project as you want.
• You can assign as many files to a package as you want.
• You can assign the same file to more than one package.
• You can let your users select packages by adding a Select Package screen to your installer.
• Selecting a package sets its "install" property to true. Deselecting a package sets its "install" property to false. The state of this property affects whether or not all of the files assigned to the package will be installed.
• The "install" property of the package is what determines whether files are installed.
• Files assigned to multiple packages are installed when at least one of the packages' "install" properties is set to true.
• Setup Factory automatically calculates the total size of the files in each package. These package sizes can optionally be displayed on the Select Packages screen. You can also set an optional value for each package that will be added to the package size calculation.
• The name and description of a package can be localized so they will appear in the user's chosen language.
• Packages can be disabled so that they cannot be modified if used on the Select Packages screen.
Using packages in your Setup Factory project involves four simple steps:
1. Create the packages.
2. Localize (translate) the package's properties (only if creating a multilingual installation).
3. Assign files to the packages.
4. Add a Select Packages screen to your project so users can select the packages.
For example, let's say you include a set of tutorials with your application in the form of very large video files. Because these files are so large, you want your users to be able to choose whether or not to install them at run time. This is a situation where packages should be used.
Any files in your installation that you know will always be installed should not be assigned to a package. Packages should only be used for groups of files that are conditionally installed.
In order to group files into packages, they must first be added and configured in the project. This is done using the package manager.
The management of each package in your project can be done through the package manager. This configuration tool is located on the Packages dialog and can be accessed by choosing Project > Packages from the program menu.
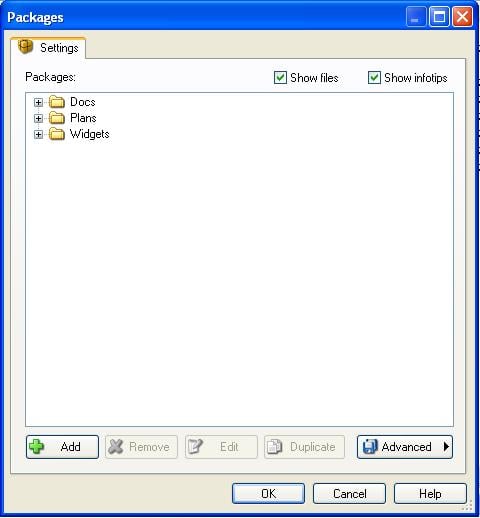
The Packages dialog contains a visual representation of the packages currently in the project, as well as their contents. Packages can be added, removed, or edited from this dialog.
Here is an example of the Packages dialog for a project containing three packages:
Other features of the dialog include the "Show files" and "Show infotips" check boxes, both located in the top right hand corner of the dialog. The Show files option is used to show or hide the contents of each package in the list. The Show infotips option controls whether or not to display a pop-up tooltip showing the properties of the package under the mouse pointer. When this option is checked, a summary of the properties will appear whenever the mouse pointer hovers over a package ID on the Packages dialog.
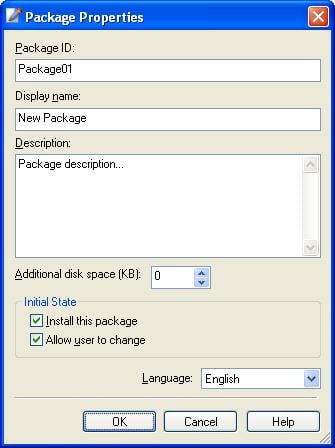
Adding a package to your project provides you with a category that can later be used to group any related files that you wish to optionally install. Adding packages can be accomplished through the Packages dialog. As mentioned earlier, the Packages dialog can be opened by choosing Project > Packages from the program menu. To add a new package to your project, click the Add button. This will open the Package Properties dialog as seen below:
The Packages dialog contains all of the necessary settings to create a new package in your project.
1. The first step is to enter the Package ID value. The package ID is a unique string that is used to identify the current package. It is best to use an ID that is descriptive, for example, "Bonus_Images."
2. The second piece of information to enter is the package's display name. This is the name that will be seen by the user if the package is available on the Select Packages screen.
3. The Description field can be filled with additional information to help describe the contents of the package. This information is also displayed on the Select Packages screen and is designed to help the user decide whether or not it is wanted.
4. There may be occasions when the contents of a package are within another setup, or not even within the install itself. In this situation, Setup Factory would not have access to the amount of disk space required for the files. In these cases, the Additional disk space setting is available so you can manually populate the anticipated size of the content. When each package's size is calculated at run time, this value will be added to the current size value.
5. The next step is to configure the initial states of the package. Two settings are available in this category: "Install this package" and "Allow user to change." Checking the Install this package check box tells Setup Factory that its "install" property should be initially set to true and that all of its files should be installed. Unchecking this box sets the property to false, saying that none of the package's files should be installed. The Allow user to change check box controls how this package's check box will appear in the packages tree on the Select Packages screen. If this option is checked, the user will be able to select or deselect the package. Unchecking this option greys out the package, preventing the user from changing its install state.
6. The next step is to localize the package's display name and description. This is only necessary if you are creating a multilingual installation. See the Localizing Packages topic for further information on this feature.
After the above properties have been set and you click the OK button, the package will be added to the list on the dialog.
Similar to adding packages to your project, packages can also be removed. Removing a package from your project simply removes that category. No files in your project will be removed.
To remove a package, locate the one you want to remove and click on its package ID so it is highlighted. Once highlighted, you can either click the Remove button or press the Delete key. This results in the removal of the package from the list.
After creating your package, you may need to update or edit some of its properties. The editing of packages can be done on the Packages dialog. To edit a package’s properties, locate the desired package ID in the list and click on it so it is highlighted. Next click the Edit button to display its settings on the Package Properties dialog.
Tip: Instead of clicking the Edit button, you can double click on the package ID to open its Package Properties dialog.
When creating multilingual installations containing packages, it's not only necessary to localize screens. Since the properties of a package such as its display name and description are visible on the Select Packages screen, those properties must also be localized so that their text is displayed in the language detected on that machine. These two properties can be localized from the Packages dialog. By localizing we mean translating the text into a specific language that is supported by the install.
In order for a package to be localized, the languages must first be configured in the project. (See Chapter 7 for more information on adding languages.) Each package can be localized from its Properties dialog. To open the package's properties, click on the package's ID in the list and click the Edit button.
At the bottom of the Package Properties dialog you will find a drop-down list containing all of the available languages that the current package's properties can be translated to. This is the language selector. When you change the value in the language selector, the Display Name and Description text values can be translated for the chosen language. For example, if English, French and German are supported by your setup, you would first select English from the dropdown and translate the two strings. Then you could select French in the dropdown and translate the two strings to their equivalent French translation. The same procedure would be used to translate the package to German.
When the package is displayed on the Select Packages screen, its display name and description will appear in the correct language—the appropriate text will be chosen according to the language that is running on the user's system.
When a file is assigned to a package it means that it is now part of a collection of files that can be selected at run time. If that package is selected, all files that have been assigned to it will be installed.
Assigning a file to a package can be done through each file's Properties dialog. The following steps can be taken to add a file to a package:
1. Find a file in the main file list that you want to assign to a package.
2. Right click on the target file and select "File Properties…" from the context menu to open the file's Properties dialog. You can also double click the file to accomplish the same result.
3. Click on the Packages tab.
The packages tab will look similar to the example below:
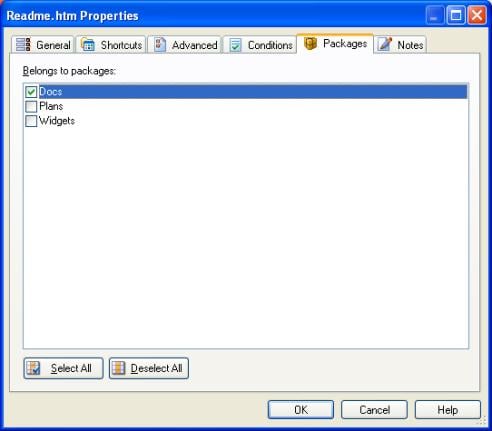
The packages tab lists all of the current packages defined in the project, each by their package ID. Each package will also contain a check box used to determine whether or not the current file belongs to that package. A file can belong to zero or more packages.
Tip: Multiple files can be assigned to a package at once using the Multiple File Properties dialog. Once a group of files is selected, choosing File Properties from the right-click context menu will open the Multiple File Properties dialog. When checking a package on the Packages tab, each file that has been initially selected will belong to the selected package.
If you were to go back to the package manager, each package will optionally display the files that have been assigned to them.
After each package has been created and all of the desired files have been assigned to them, it is time to add a Select Packages screen to the install. While there are other methods of interacting with packages, the select packages screen was designed to present a user-friendly interface for selecting packages.
The Select Packages screen is normally placed before the Select Install Folder screen, located on the Before Installing screen stage. This will allow the selected package to be part of the file size that is calculated on the Select Install Folder screen. The following steps can be taken to add a Select Packages screen:
1. Choose Project > Screens from the program menu to open the Screens dialog.
2. Click on the Before Installing tab.
3. Click the Add button to open the Screen Gallery dialog.
4. The screen gallery contains an alphabetic list of all of the screens that can be added to your install. Locate the Select Packages screen, highlight it, and click the Ok button. This will add the selected screen to the screen list.
5. While the Select Packages screen is highlighted, keep clicking the up arrow button to move the screen one position up in the list until it is before the Select Install Folder screen.
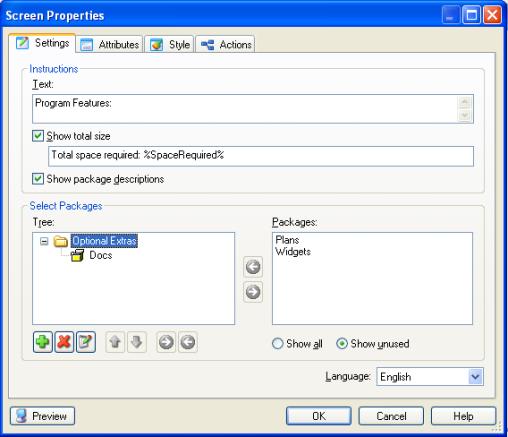
The Select Package screen's Properties dialog can be opened by highlighting it in the Before Installing list and clicking the Edit button. The settings that are used to configure the displaying of packages can be found on the Settings tab. An example of the dialog can be found below:
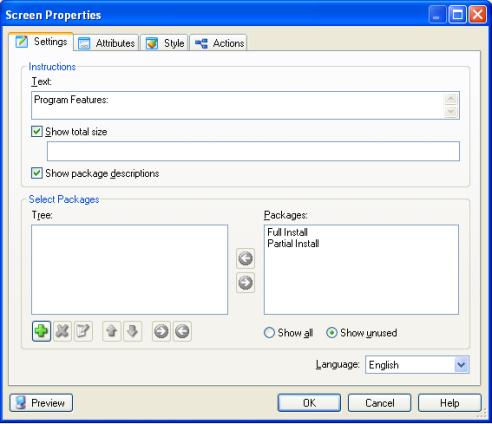
The Show total size check box controls whether or not Setup Factory will automatically calculate and display the amount of disk space the installation requires for the selected package, along with a text description.
Note: By default the text used is "Space required by setup: %SpaceRequired%." %SpaceRequired% is a custom session variable defined on this screen which will be replaced by the actual required space value at run time.
The Select Packages section of the dialog contains the settings that are used to determine what the user will see at run time. The area in the bottom right labeled "Packages:" contains the list of packages that are currently being used in the install; you will most likely want to make this visible to the user.
On the left is a section labeled "Tree:" This section is the framework for a selectable tree structure that will be used to represent the packages in your install.
Tip: You can also open the screen's Properties dialog by double-clicking it.
Any packages that you want to make available on the screen at run time must first be added to the tree. To add a package to the tree, highlight its package ID in the Packages section on the right-hand side and then click the Add button (represented by an arrow pointing to the left). This will add the package to the tree on the left.
This procedure can be replicated for each package that you want to display in the tree.
Since packages can only contain files, there must be another element if the goal is to present a hierarchy of selectable options. The element that accomplishes this type of design is called a "category."
A category is designed to group a number of packages and/or other categories together in a select package tree. If a parent category is selected by the user, all of the packages and categories within it will be selected as well.
To add a category to the package tree, click the Add button to display the Category Properties dialog. The Category Properties dialog contains several settings that control its appearance and functionality in the tree, such as the category’s display name and description.
The defaults section of the properties is similar to those of a package's properties. The Install check box controls its initial state. If it is checked, all of its contents will be checked and if unchecked, all of its contents will be unchecked. The Enabled check box controls whether or not it can be changed by the user. The Expanded check box controls whether or not the category's contents will initially appear expanded.
Once the desired packages and categories have been added to the tree, you will then need to organize them into the structure you want your users to see. As mentioned earlier, a category can contain packages or other categories. Both packages and categories can be moved up and down using the up arrow and down arrow buttons.
In order to add a package to a category, you would move the package so it is below the target category. Then while it is still highlighted, click the button with the arrow pointing right. To remove a package from a category, you would instead click the button with the arrow pointing to the left.
Below is a sample of how the tree will look after a package has been added to a category:
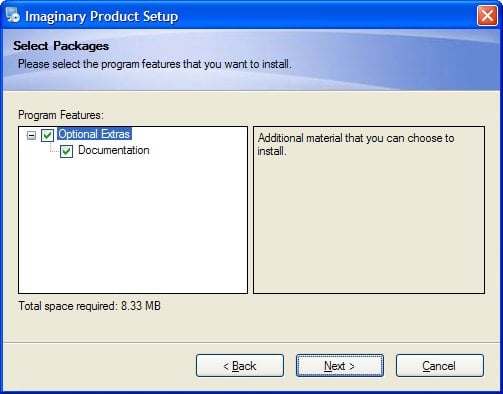
Here is a sample of how the above settings would appear to the user at run time:
You can remove a package or category from the tree by clicking the Remove button. Removing a package from the tree only removes its representation in the tree. The package itself will not be removed from your install.
While the Select Packages screen handles the normal situation while working with packages, there may be occasions where you wish to handle things in a highly customized way. For this reason there are a few actions that are available for getting and setting package properties.
This action enables you to get a list of all package IDs in the setup. When called, it returns a numerically indexed table of the package IDs.
This action allows you to get all of the available information about a particular package, which is stored in a table. For example, let's say that you need to know whether a certain package is set to be installed at a certain point during the install. The following action script could be used to gather this information:
tbMyTable = SetupData.GetPackageProperties(My_PackageID);
bIsInstalled = My_PackageID.Install;
In the above script, the variable bIsInstalled will contain true if the package is set to be installed, or false if it is not. Other properties that are available are its display name, description, additional disk space value and enabled state.
This action is similar to Setup.GetPackageProperties. However instead of retrieving information about a package, you can set its properties at runtime. For example, if you wanted to explicitly set a package so its contents will be installed, you could use the following action script:
tbMyTable = {Install=true};
SetupData.SetPackageProperties(My_PackageID, tbMyTable);
The above action script first creates a table with the desired index value. The next action takes that table and merges its values with the specified package's current settings.
These types of actions may be useful in cases where the install states of packages are not controlled by user interaction, but rather a series of queries of the user's system.
Tip: Another use for these actions could be to control the tree in a custom way when the user selects a particular option. For example, you could automatically turn a specific package on whenever another specific package was turned off.