Chapter 7: Languages
Languages
The Internet has opened many new markets to software developers whose past products would have usually only supported their own local language. Today, even smaller software development and data distribution companies have realized the need to provide multilingual software to meet existing and newly emerging international software markets.
One of Setup Factory's strongest features is its support for creating foreign language installations. You can use Setup Factory to create an installer that will automatically display messages and prompts in your user's native language.
Setup Factory ships with display messages and prompts in many of the world's most commonly used languages. It also makes it very easy to modify existing translations at any time.
In this chapter, you'll learn about:
• Internationalizing your installer
• How run-time language detection works
• The language manager
• Language files
• Setting the default language
• Adding and removing languages
• The language selector
• Localizing screens, packages, the uninstaller, and actions
• Customizing error messages and prompts
• Advanced techniques, such as using actions to determine the current language and "changing" the current language for testing purposes
Setup Factory has the ability to automatically detect the user's system's language and to display messages and screens in that language. The developer has full control over what languages are supported in their setup and the content that they would like to present to the user.
Language text is mainly used for messages generated throughout the install and on screens, both of which can be easily translated for multilingual installs.
Setup Factory allows you to localize your setup application in three areas:
· Error messages, status messages and prompts that are common to all setups.
· Screens that appear as the main GUI of the installation that are usually application-specific.
· Packages used by the setup to organize files into logical units.
The following sections of this chapter will look more closely at how to provide international support to all of these areas of the install.
At run time, the language that Setup Factory detects is based on the user's regional and language settings. These settings allow Windows users to configure which language is displayed, which input locale is used and which keyboard layout is supported in the Windows operating system environment. These settings are usually configured when Windows is installed and can usually be changed from the Windows Control Panel. For example, in Windows XP, a user can select Start > Settings > Control Panel and start the Regional and Language Settings control panel application.
Each language in Windows has a constant language identifier. A language identifier is a standard international numeric abbreviation for the language in a country or geographical region made up of a primary and secondary language ID (there is a complete list of primary and secondary language IDs in the Setup Factory help file). Setup Factory maps all known languages and sub-languages according to the language identifier used for that language by Windows.
Tip: Setup Factory maps language identifiers to language names in a file called language_map.xml located in Setup Factory's Language folder (usually "C:\Program Files\Setup Factory 9\Languages"). You can look at this file to see which primary and secondary language IDs are mapped to which languages. It is NOT recommended that you modify this file unless you have a very specific reason to do so.
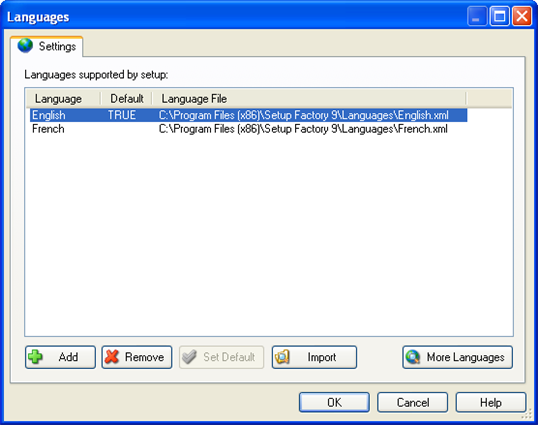
The languages that are supported by your setup are all configured from the Language Manager. You can access the language manager by selecting Project > Languages from the menu.
Although you can localize messages in several areas of the design environment, the Language Manager is the only place where you can control the setup's default language as well as which languages are or are not supported by your setup. For example, if you are editing one of your screens and decide that you would like to add German support to your setup, you will have to use the Language Manager to do so. Once you add German support here, it will also be available to all other areas of the setup.
When you add a language to your project, you are indicating that you want the setup to recognize that particular language identifier on a user's system and use specific messages for that language when identified. Conversely, if a language is not represented in the languages list, it does not mean that the setup will not run on a system that uses that language; it simply means that it will use the default language in that case.
Every setup must have a default language. The default language is the one that will be used whether the user happens to be using the default language or any other language not represented in the languages list.
For example, let's suppose that you have English, French and German support in your setup with English as the default language. If your user runs the setup on a Greek system, the user will see the English messages since you did not specifically include support for the Greek language.
Note that the default language must be one that has a corresponding language file (see the next section).
A language file is an XML file that contains all error messages, status messages and prompts that are used internally by the setup. Language files do not contain setup-specific messages such as those used on screens and packages. Note that not all languages have a pre-configured language file.
Language files are located in Setup Factory's Languages folder (usually "C:\Program Files\Setup Factory 9\Languages"). They are named according to the English name for the language they represent. Each file contains a language map that identifies which language the file is responsible for and all of the built-in messages that will be used for that language.
If you add a language to your project that does not have a language file, that language will use the same messages as the default language.
If you need a language file that is not shipped with Setup Factory, please visit the Indigo Rose Web site (www.indigorose.com) and user forums (www.indigorose.com/forums/) where new language files are made available from time to time.
If after consulting the Indigo Rose web site you still can't find the language file you need, you can always make one yourself. To make a new language file, simply make a copy of the existing language file that you want to translate from, rename it to the new language name, change the language map in the file accordingly and then translate the messages.
To clarify this process, here is an example of how to create a French language file (this is for demonstration purposes only and is unnecessary since French already ships with Setup Factory):
1. Open Windows Explorer to Setup Factory's Languages folder (usually "C:\Program Files\Setup Factory 9\Languages".)
2. Make a copy of English.xml and name it French.xml.
3. Open French.xml in a text editor such as Notepad.
4. Open language_map.xml from the Languages folder in a text editor such as Notepad.
5. Locate the section that maps French in the language_map.xml file. It should look like this:
<Language>
<Name>French</Name>
<Primary>12</Primary>
<Secondary>
<ID>1</ID>
<ID>2</ID>
<ID>3</ID>
<ID>4</ID>
<ID>5</ID>
<ID>6</ID>
</Secondary>
</Language>
6. Copy the above section from language_map.xml and paste it in place of the <Language></Language> section of the French.xml file. This will allow Setup Factory to recognize this file as a language file for the French language.
7. Translate all messages in the <Messages></Messages> section to French. Do not change any actual XML tags. For example:
<MSG_SUCCESS>Success</MSG_SUCCESS>
becomes:
<MSG_SUCCESS>Succès</MSG_SUCCESS>
8. Save the file and re-open Setup Factory. The new language will now be available.
9. Share the file with others!
To add a new language to your setup, click the Add button in the Language Manager. This will open the Add New Language dialog. Simply select the language that you want to add and click OK. You will then see the language appear in the languages list.
When you add a new language to your setup, the following happens automatically:
• Setup Factory searches the Languages folder for an appropriate language file for the language. If one is not found, the new language is set to use the default language's language file.
• The newly added language is added to all screens. That is, all screens have messages added to them for the new language. If a translated language file for that particular screen already exists, it will be used. Otherwise, the messages from the default language will be replicated for the new language.
• The newly added language is added to all packages. That is, all packages have names and descriptions added to them for the new language. The default messages for the new language will be replicated from the project's default language.
• The language is added to the list of languages that you can select from in the language selectors throughout the design environment.
Of course, you will still need to go into the Packages and Screens dialogs to verify and/or translate the text for the new language.
To remove a language from the setup, select the language in the Language Manager's list and click the Remove button. Note that the default language cannot be removed. You will have to make a different language the default language before deleting the original default language.
When you remove a language from the setup, all translations in that language are removed from all screens and packages in your project. Therefore, use caution when removing languages.
Once a language is added to your setup project, it will be available for translation when editing screens and packages via the language selector. The language selector is simply a combo box that lets you choose the language you will be entering text for in the screen or package.
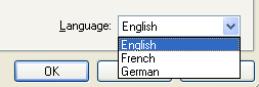
If you want to work on a language that is not in the list, you will first have to add it through the Language Manager.
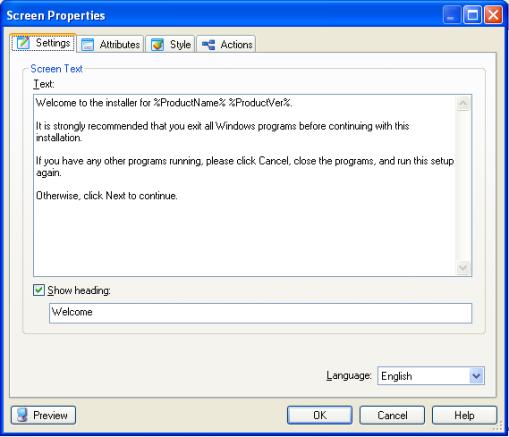
To localize a screen, open the Screens dialog (Project > Screens) and double-click a screen to open the screen's properties. Next, select the language that you want to enter text for in the language selector. Then, simply type the text that you want for the various fields in the language that you are currently working in.
Note that the Screen ID field on the Attributes tab cannot be translated. The screen ID is a unique identifier for the screen and is never displayed to the end user.
Here is an example of a Welcome screen with English text:
And here is the same screen with French text:
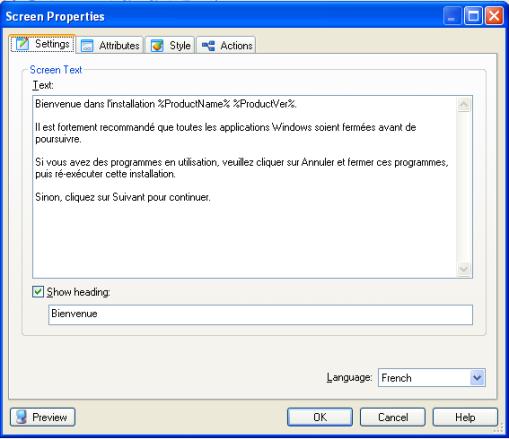
Notice that in the second screenshot, "French" has been selected in the language selector near the bottom of the dialog. The text that you enter always corresponds to the language that is selected in the language selector.
Tip: If the language that you want to translate to doesn't appear in the language selector, you need to add support for that language to your project. This is done by adding the language in the language manager. For more information, see The Language Manager and Adding Languages.
There may be times when you want to have your screens translated by a third party translator. If the translator owns a copy of Setup Factory, you can simply send them your project file, have them translate the screens using the method explained above, and then have them send the project file back to you.
However, it may be that the translator does not own Setup Factory or that you need to work with the project in other ways while the translation is taking place. Setup Factory has a solution for this situation. You must:
1. Open the Screens dialog (Project > Screens).
2. Select the screen that you want to have translated in the Screens list.
3. Click the Advanced button (this will open a popup menu).
4. Select Export Language and then the language that you want to export to.
5. Choose a location to save the file to.
6. Send the exported file to your translator.
7. When you receive the file back, select the screen in the Screens list.
8. Click the Advanced button and then choose Import Language from the popup menu.
9. Locate the translated file and select Open.
10. You will now have the new translated strings in your screen.
To localize a package, open the Packages dialog (Project > Packages) and double-click a package to open the package's properties. Next, select the language that you want to enter text for in the language selector. Then, simply type the text that you want for the various fields in the language that you are currently working in.
Note that the Package ID field cannot be translated. The package ID is a unique identifier for the package and is never displayed to the end user.
Here is an example showing the properties of a package that has been localized in English:
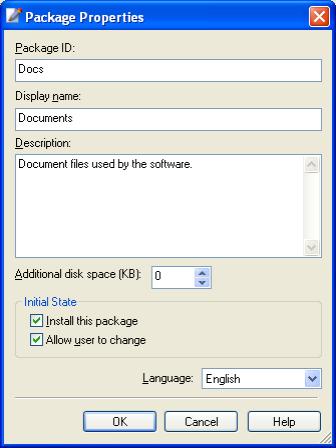
And here are the properties of the same package translated into French:

Packages can be exported and imported for translation in the same manner that screens are. Please refer to "Importing and Exporting Screen Translations" above for specific instructions on how to do this.
The uninstaller uses the same language file that was used by the installer. Setup Factory language files contain all messages needed by the installer and the uninstaller.
The uninstall screens can be translated in the same manner as the installation screens. To work on the uninstall screens, choose Uninstall > Screens from the menu.
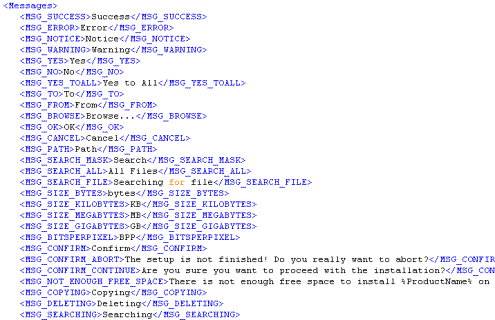
If you want to change the default error messages, prompts or status messages used in the setup, you can simply edit the appropriate XML file in the Languages folder using a text editor such as Notepad. Note however that this is not generally recommended; the messages that you change will be propagated to all projects that are built after the changes are made. However, if this is the desired effect, you can certainly do this.
Note also that if you choose to change default messages, the file may be overwritten by a future update to Setup Factory. To avoid this problem, you may want to modify your XML file's name. For example, from english.xml to my_english.xml.
Below is an excerpt from english.xml:
There are a number of advanced techniques that you can use to manipulate the language and the translated language strings in your setup at run time. Most of these methods are accomplished using actions. This section covers a few of these advanced techniques.
There are two actions that can be used to retrieve information about the user's language ID: System.GetDefaultLangID and Application.GetInstallLanguage. Although both actions return a table of information containing language IDs, it is important to know the difference between the two.
System.GetDefaultLangID is used to get the primary and secondary language ID that the user employs in Windows. This is absolute and cannot be changed with any other actions. For example, if this action returns 10 as the primary ID and 13 as the secondary ID you will know that the user's Windows system is configured for Spanish (Chile). There is a complete list of primary and secondary language IDs in the Setup Factory help file.
The information returned by this action can be used in cases where you want to make specific choices about what to do based on the user's absolute system language. For example, if you have a Web site that is translated into several different languages, you might want to make a series of File.OpenURL actions surrounded by if…then statements to jump to the appropriate site:
-- Determine absolute system language
local tblSysLang = System.GetDefaultLangID();
-- Set a default
local strURL = "http://www.yourcompany.com/english");
-- see if we should jump to a different site
if (tblSysLang.Primary == 7) then
strURL = "http://www.yourcompany.com/german");
elseif (tblSysLang.Primary == 10) then
strURL = "http://www.yourcompany.com/spanish");
elseif(tblSysLang.Primary == 16) then
strURL = "http://www.yourcompany.com/italian");
end
-- jump to the Web site
File.OpenURL(strURL);
Application.GetInstallLanguage is used to retrieve the primary and secondary language ID that is actually being used by the setup. Note that Application.GetInstallLanguage may return a different result than System.GetDefaultLangID if the language being used by the setup differs from the language your user employs in Windows.
For example, let's say that you have three languages in your setup: English (default language), French and German. Suppose a user from Chile runs the setup on their system. Even though their system uses primary ID 10 and secondary ID 13 (which would be returned by System.GetDefaultLangID), Application.GetInstallLanguage will return a primary ID of 9 and a secondary ID of 1 which is the setup's default language (English) since Spanish was not added to the setup at design time.
The value returned by Application.GetInstallLanguage will always be a value for a language that you added to your project using the Language Manager. It will never contain values for languages that were not explicitly included in the setup.
You can change the setup's language at run time at any point using the action Application.SetInstallLanguage. This action will allow you to set the primary and secondary language ID used by the setup. When you call this action, it will actually change all error and status messages as well as the language used by screens and packages "on-the-fly."
One common reason to use this action might be because you want to use a language other than the default if certain other languages cannot be located. Being able to change the language that your setup uses from script allows you can handle certain specific cases in any way you want.
For example, let's say that your setup supports two languages: English (which is the default language) and Simplified Chinese. Since English is the default language, it will be used whenever the setup is run on anything other than Simplified Chinese.
However, you might prefer that the setup use Simplified Chinese if the user runs the setup on a system configured to use Traditional Chinese.
In other words, you want to override the default language rule and force your installer to use Simplified Chinese whenever Traditional Chinese is detected. You can do so easily by placing the following short script in your project's On Startup event:
-- Determine absolute system language
local tblSysLang = System.GetDefaultLangID();
if (tblSysLang.Primary == 4) and (tblSysLang.Secondary == 1) then
-- Traditional Chinese on user's system,
-- so use Simplified instead
Application.SetInstallLanguage(4, 2);
end
You may also want to use the Application.SetInstallLanguage action for testing purposes. For example, if you are running an English version of Windows, you might want to see how your setup will look on an Italian system. Because your system is running in English, the setup will always choose English as the language to display whenever you run it on your system. However, you could force the setup to use Italian by putting the following script in your On Startup event:
Application.SetInstallLanguage(16, 1);
You could even do the above in response to a custom command line option that you handle so that your setup can be forced to use a different language at any time.
You may have noticed that there is no language selector when editing scripts in Setup Factory. This means that any text you enter into a script will not be translated for you. However, by using the Application.GetInstallLanguage action you can use if…then statements to do something different based on the language being used.
For example, let's say that your setup supports English and French and you want to show a dialog box using actions that will be localized according to those languages. The following script first determines the language that the setup is using, and then displays one of two possible greetings:
local tblSysLang = Application.GetInstallLanguage();
if (tblSysLang.Primary == 9) then
Dialog.Message("Welcome",
"Welcome to the installer");
end
if (tblSysLang.Primary == 12) then
Dialog.Message("Bienvenue",
"Bienvenue au programme d’installation");
end
Setup Factory allows you to get and set translated messages for general messages (from the language files), screens, and packages at run time. This is done through several actions.
This action allows you to retrieve the localized text for a general message from the language files at run time. The message will be returned in the current install language. For example, the default language files provide messages to confirm if the user wants to abort the setup. Here is a way to show a dialog that confirms if the user wants to abort the setup in the current language:
local strTitle = SetupData.GetLocalizedString("MSG_CONFIRM");
local strPrompt = SetupData.GetLocalizedString("MSG_CONFIRM_ABORT");
local nResult = Dialog.Message( strTitle
, strPrompt
, MB_YESNO
, MB_ICONQUESTION
, MB_DEFBUTTON2 );
if(nResult == IDYES)then
Application.Exit();
end
This action allows you to change the value of a localized string at run time. This could be useful if you want to override the default value of an error message at run time so that you don't have to permanently change your language file at design time. For example, let's say that you want to change the message that is displayed if the user tries to cancel the setup. By default it is "The setup is not finished! Do you really want to abort?", but you want to change it to: "Stopping now is not a good idea. Are you sure?"
SetupData.SetLocalizedString("MSG_CONFIRM_ABORT",
"Stopping now is not a good idea. Are you sure?");
These actions are used to get and set the localized string for the current language of the currently displayed screen at run time. They work the same way that SetupData.GetLocalizedString and SetupData.SetLocalizedString do except that they will only access strings used on a screen.
These two actions can be used to get and set the translated string for a package's display name and description at run time. In this case, you will want to work with the table's DisplayName and Description indexes to get and set the text. For example, to display a package named "Documents" display name and description in a dialog box:
local tblPackageProps = SetupData.GetPackageProperties("Documents");
Dialog.Message( tblPackageProps.DisplayName
, tblPackageProps.Description );
If you do translate a language file or even screens for common use, please feel free to share them in the Indigo Rose forums (www.indigorose.com/forums/). There is a forum in the Setup Factory section where you can find, share and collaborate on translations for setups. You might even be able to trade translation services with other users.