Chapter 4: Actions, Scripts and Plugins
Actions, Scripts and Plugins
Actions are one of the most important features in Setup Factory. They are what you use to accomplish the specific tasks that make your installation unique. Each action is a specific command that tells your installer to do something, such as retrieving a value from the Registry.
Actions also allow your installation to react to different situations in different ways. Does the user already have the evaluation version of your software installed? Is an Internet connection available? You can use actions to answer these types of questions and have your installer respond accordingly.
Scripts are essentially sequences of actions that work together to perform a specific task. Plugins allow you to extend the built-in actions with additional libraries of commands.
Together, actions, scripts and plugins allow you to extend
the default functionality of a Setup Factory installation with virtually
limitless possibilities.
In this chapter, you'll learn about:
• Actions—what they are and what they’re good for
• The action editor (including features such as syntax highlighting, intellisense, quickhelp, and context-sensitive help)
• Project, screen, and uninstall events
• Adding and removing actions
• Scripting basics, such as using a variable, adding an if statement, testing a numeric value, using a for loop, and creating functions
• Global functions
• Plugins
• External script files
Actions are what you use in Setup Factory when you want to get something done. Actions are specialized commands that your installer can perform at runtime. Each action is a short text instruction that tells the installer to do something—whether it's to open a document, download a file from the web, create a shortcut, or modify a registry key.
Actions are grouped into categories like "File" and "Registry." The category and the name of the command are joined by a decimal point, or "dot," like so: File.Run, Registry.GetValue. The text "File.Run" essentially tells Setup Factory that you want to perform a "Run" command from the "File" category…a.k.a. the "File.Run" action.
Tip: The period in an action name is either pronounced "dot," as in "File-dot-Open," or it isn't pronounced at all, as in "File Open."
By default Setup Factory handles the most common installation needs without you ever having to add additional actions. As a result you will only need to use actions when you want to supplement the basic behavior and handle advanced installation tasks. Actions let you customize what Setup Factory does for you automatically so that you can meet your installation needs exactly.
In other words, actions let you customize your installation to perform any task that it does not already perform by default. You can use actions to call functions from DLLs, submit data to a website, start and stop programs, get the amount of free space on a drive, and much more.
Note: You can find a complete list of actions in the Setup Factory help file under Program Reference > Actions.
It's worth noting that the pre-made screens in Setup Factory actually use actions to accomplish their tasks! As a result, if a screen does not accomplish some additional task and you would like to modify its build-in functionality, you can do so simply by editing the screen's actions. The power is in your hands!
The action editor is where you create and edit your actions in the Setup Factory design environment. In general you can expect to find an action editor for every event in Setup Factory.
Essentially the action editor functions like a text editor by allowing you to type the actions that you want to use.
However, while it may function like a text editor, the action editor has powerful features that make it closer to a full-fledged programming environment. Some of these features include syntax highlighting, intellisense, quickhelp and context-sensitive help.
One of the most important features of the action editor is the action wizard. The action wizard provides an easy dialog-based way to select, create and edit actions without ever having to type a line of script.
The action editor gives you the best of both worlds: pure scripting capabilities for advanced users and programmers, and the easy-to-use action wizard interface for those who'd rather not use free form scripting.
As mentioned briefly above, the action editor provides some powerful features that make it a useful and accessible tool for programmers and non-programmers alike. Along with the action wizard (covered later under Adding Actions), the four most important features of the action editor are: syntax highlighting, intellisense, quickhelp and context-sensitive help.
Syntax highlighting colors text differently depending upon syntax. This allows you to identify script in the action editor as an operator, keyword, or comment with a quick glance.
Note: You can customize the colors used for syntax highlighting via the action editor settings. The action editor settings are accessed via the advanced button: Advanced > Editor Settings.
Intellisense is a feature of advanced programming environments that refers to the surrounding script and the position of the cursor at a given moment to provide intelligent, contextual help to the programmer.
Intellisense is a term that has been used differently by different programs. In Setup Factory, intellisense manifests itself as two features: autocomplete, and the autocomplete dropdown.
Autocomplete is the editor's ability to automatically complete keywords for you when you press Tab. As you type the first few letters of a keyword into the action editor, a black tooltip will appear nearby displaying the whole keyword. This is the intellisense feature at work. Whenever you type something that the intellisense recognizes as a keyword, it will display its best guess at what you are typing in one of those little black tooltips. Whenever one of these tooltips is visible, you can press the Tab key to automatically type the rest of the word.
Another feature of intellisense is the autocomplete dropdown. By pressing Ctrl+Space while your cursor is in the code window, a drop-down list will appear containing the names of all of actions, constants and global variables. You can choose one of the listed items and then press Tab or Enter to have it automatically typed.
Note: This dropdown cannot be accessed if your cursor is inside a set of quotes (a string).
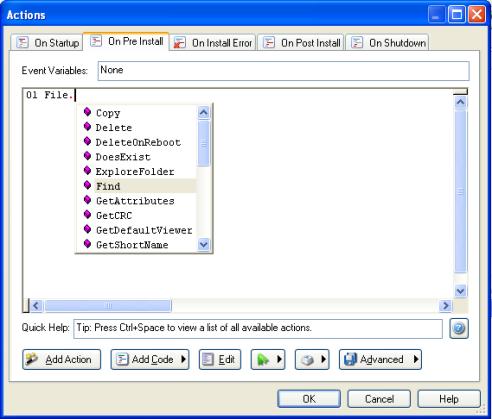
The autocomplete dropdown is also available for completing action names after the category has been typed. For example, when you type a period after the word File, the intellisense recognizes what you've typed as the beginning of an action name and presents you with a drop-down list of all the actions that begin with "File."
The word will automatically be typed for you if you choose it and then press Tab or Enter. However, you don't have to make use of the dropdown list; if you prefer, you can continue typing the rest of the action manually.
Once you've typed something that the action editor recognizes as the name of an action, the quickhelp feature appears near the bottom of the window.
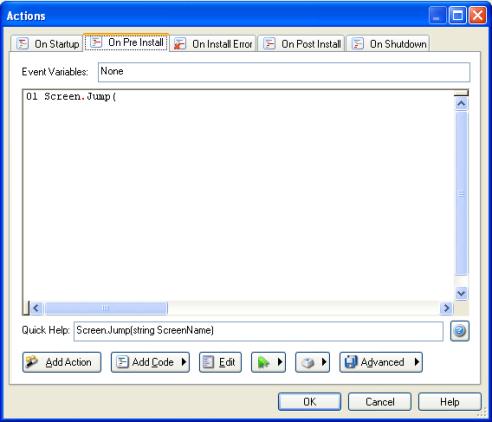
Quickhelp is essentially a "blueprint" for the action that lists the names of the action's parameters and indicates what type of value is expected for each one. In the case of our Screen.Jump action, the quickhelp looks like this:
Screen.Jump(string ScreenName)
The quickhelp above indicates that the action Screen.Jump takes a single parameter called ScreenName, and that this parameter needs to be a string.
Remember, strings need to be quoted, so if we wanted to jump to a screen named Finish, the full action would have to be typed exactly like this:
Screen.Jump("Finish");
From this brief example, you can see how useful the quickhelp feature will be when you are working on your scripts.
Context sensitive help, as its name suggests, provides help for you based upon what you are currently doing. In the action editor, the context sensitive help lets you jump directly to the current action's topic help file.
For instance, if you are typing an action into the action editor and the quickhelp feature isn't giving you enough information (perhaps you would like to see an example), press the F1 key and the help file will open directly to that action's help topic.
Note: The context sensitive feature is only available when the action editor recognizes the action that the cursor is on. It is easy to know when this is the case since the action will appear in the quickhelp.
Tip: You can also click the Help button to trigger the context sensitive help feature.
Events are simply things that can happen when your installation is running. For example, all screens have an On Preload event, which is triggered just before the screen is displayed. To make something happen just before the screen is displayed, you simply add an action to its On Preload event.
When an event is triggered, the actions (or "script") associated with that event will be executed. By adding actions to different events, you can control when those actions occur during the installation.
In Setup Factory there is an action editor for every event. When you add an action in an action editor, you are adding that action to the event. At run time, when that event is triggered, the action that you added will be performed.
Every installation has five main project events: On Startup, On Pre Install, On Install Error, On Post Install, and On Shutdown. These events can be thought of as bookends to the main phases of the install. There are also project uninstall events, which are identical to the project events except that they occur during the uninstall. The remainder of the events in Setup Factory are triggered by the screens.
There are five project events. They are the main events or your installation and will be triggered before or after important stages of the installation. The project events can be found under Project > Actions.
The four project events are:
• On Startup
• On Pre Install
• On Install Error
• On Post Install
• On Shutdown
The On Startup event is the first event triggered in Setup Factory and thus occurs before any screens are displayed. This is a good place to perform pre-installation tasks, such as making sure the end user has a previous version of your installation installed, or that they haven't already run the installation once before.
The On Pre Install event is triggered just before the installation enters the install phase and begins installing files onto the end user's computer. This event is fired right after the last screen in the Before Installing screen stage is displayed.
The On Install Error event is fired when an error occurs during the setup, allowing you to handle it in a custom way. If you would like to ignore the error that just occurred, you can call the Application.IgnoreLastError action on this event to ignore the last error that occurred.
Note: This event will NOT be fired if the setup is exited through script or if the user aborted the setup.
The On Post Install event is triggered after the install phase of the installation has been completed, right before the first screen of the After Installing screen stage is displayed.
The On Shutdown event is the last event that will be triggered in your installation. It occurs after all screens in your installation have been displayed. It is your last chance to accomplish any action in your installation.
As covered in Chapter 3, the settings for each screen can be configured in the screen properties dialog. The screen events can be found on the Actions tab of the screen properties dialog.
Screen events are events that are triggered either by the controls on the screen or by the screen itself. Screen events are used for screen navigation (e.g. moving to the next screen), to change what is displayed on the screen (e.g. updating progress text), and to perform the task required of the screen (e.g. set the installation folder).
There are two main types of screens in Setup Factory: progress screens and non-progress screens. The majority of screens are non-progress screens, which basically means that these screens are not used to show progress.
Progress screens are used to show progress in your installation. They can be further broken down into two types of progress screens: those used in the Before Installing and After Installing screen stages, and those used in the While Installing stage. In general progress screens used in the Before and After Installing screen stages show progress that arises from actions. Progress screens that are used during the While Installing screen stage are used to show the progress of the main installation phase.
There are six events associated with non-progress screens:
• On Preload – triggered just before the screen is going to be displayed.
• On Back – when the back button is clicked.
• On Next – when the next button is clicked.
• On Cancel – when the cancel button is clicked.
• On Help – when the help button is clicked.
• On Ctrl Message – Triggered when a control on the screen fires a control message. Every time a control message event is fired, there will be event variables passed to the event to describe the message and which control fired it.
The On Ctrl Message event is where you will interact with the controls on the screens via script. For example, if you choose to add a Button screen to your setup, the On Ctrl Message event is where you will specify what each button does.
On the Buttons screen, each button will fire a control message when it has been clicked, basically saying "Hey I've been clicked!" You will then have a script in the On Ctrl Message event that will check the event variables to see which button has been clicked and the corresponding actions will be performed.
There are four events associated with progress screens used in the Before and After Installing screen stages:
• On Preload – triggered just before the screen is going to be displayed.
• On Start – fired as soon as the screen is displayed. This is where you will put all of the actions that are to occur while the progress screen is visible. The actions placed here are what will cause the progress that the progress screen is going to display.
• On Finish – triggered as soon as all of the On Start's event actions have finished executing. This will usually be used to move to the next screen.
• On Cancel – triggered when the cancel button is pressed.
There are three events associated with progress screens used in the While Installing screen stage:
• On Preload – triggered just before the screen is going to be displayed.
• On Progress – fired as progress is made during the installation phase. Event variables are passed to this event to describe which stage is triggering the progress event and other information.
• On Cancel – triggered when the cancel button is pressed.
Uninstall events are identical to the project events except that they occur during the uninstallation. You can find the uninstall events in the Setup Factory design environment under Uninstall > Actions.
The five uninstall events are:
• On Startup – the first event in the uninstallation, triggered when the uninstallation starts.
• On Pre Uninstall –right before your files are uninstalled from the end user's computer.
• On Uninstall Error - triggered when an error occurs during the setup's uninstall, allowing you to handle it in a custom way. If you would like to ignore the error that just occurred, you can call the Application.IgnoreLastError action on this event to ignore the last error that occurred.
Note: This event will NOT be fired if the setup is exited through script or if the user aborted the setup.
• On Post Uninstall – triggered right after all your files have been uninstalled from the end user's computer.
• On Shutdown – the final event in the uninstallation, fired right before the uninstallation finishes. This is your last chance to perform any actions during the uninstallation.
Note: For more information on the uninstall events, please read the project events section as though it were describing events occurring during the uninstall.
In order to have an action performed when an event is triggered, you must add it to that event using the action editor.
Actions can either be typed directly, or you can use the Add Action button to start the action wizard. The action wizard is a dialog-based way for you to add actions in the action editor. It will guide you through the process of selecting your action and configuring its parameters.
Note: As you type an action, you can use the intellisense and code completion features to simplify this process.
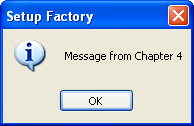
Here is a brief example that shows how easy it is to add an action. It will explain how to add a Dialog.Message action to the On Startup event of your installation. The Dialog.Message action pops up a dialog with a message on it.
Start a new project and then bring up the Actions dialog by choosing Project > Actions. On the actions dialog select the On Startup tab so that you are editing the On Startup event.
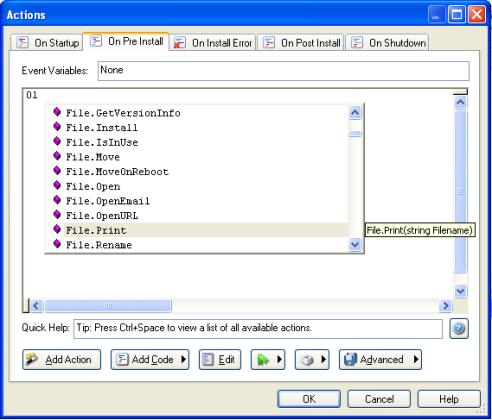
The action wizard will walk you through the process of adding an action to the action editor. The first step is to choose a category using the drop-down list.
When you choose the "Dialog" category from the drop-down list, all of the actions in that category will appear in the list below.
To select an action from the list, just click on it. When you select an action in the list, a short description appears in the area below the list. In this description, the name of the action will appear in blue. You can click on this blue text to get more information about the action from the online help.
Parameters are just values that get "passed" to an action. They tell the action what to do. For instance, in the case of our Dialog.Message action, the action needs to know what the title of the dialog and the message should be. The first parameter lets you specify the title of the dialog and the second parameter lets you specify the text that will be displayed on the dialog. For now the other parameters are not important but you should take some time to look at them and their options. By default Setup Factory will fill most parameters with defaults.
For now change the title to:
"Setup Factory"
and the text to:
"Message from Chapter 4"
Note: Be sure to include the quotes on either side of both parameters. These are string parameters and the quotes are needed for Setup Factory to properly interpret them.
Once you've set the action's parameters, click the Finish button to close the action wizard. The Dialog.Message action will appear in the action editor. Note that the parameters you provided are listed between parentheses after the action's name, in the same order they appeared in the Action wizard, separated by a comma.
Start the publish wizard by selecting Publish > Build from the menu, choose Web (Single File) as your distribution method and click the Next button. Build your installation to whichever folder you want and using whichever name you like. Once the build has completed successfully, make sure that you check the open output folder checkbox and then click the Finish button.
Once the folder where you built your installation appears, double-click on your setup executable to launch it. You should see the following dialog message appear:
Often you will want to change a few of your actions' settings after you add them; to do this you need to edit the action. You can edit the action by typing directly into the action editor or by using the actions properties dialog.
The easiest way to bring up the actions properties dialog is by double-clicking on the action. If you prefer you can bring it up by placing the cursor in the action and then pressing the edit action button. (You can tell that the cursor is in an action when the actions function prototype appears in the quickhelp.)
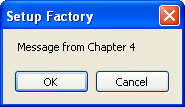
Here is a quick example illustrating how to edit the Dialog.Message action that we created in the previous section.
Open the Actions dialog by choosing Project > Actions. Make sure that you are on the On Startup tab and that you see the Dialog.Message action created in the previous topic.
To edit the action, just double-click on it. Double-clicking on the action opens the Action Properties dialog, where you can modify the action's current parameters.
Tip: You can also edit the action’s text directly in the action editor, just like you would edit text in a word processor. For example, you can select the text that you want to replace, and then simply type some new text in.
Click on the Type parameter, click the select button, and choose MB_OKCANCEL from the drop-down list.
Then click on the Icon parameter, click the select button, and choose MB_ICONNONE from the drop-down list.
This will add a cancel button to the dialog (MB_OKCANCEL) and get rid of the icon (MB_ICONNONE).
Finally, click OK to finish editing the action. Notice that the changes that you made now appear in the action editor.
When you run your setup, a dialog will pop up. The dialog is created by the Dialog.Message action on the On Startup event of your installation. Notice that there is no icon and that a cancel button is now part of the dialog.
You can get help on actions in a variety of different ways in Setup Factory. As previously mentioned, when using the action wizard some text will be displayed in the bottom of the dialog describing the current action or parameter selected. You can also select the text displayed in blue text in the action wizard to receive context sensitive help.
The same holds true for the action editor itself. The quickhelp will display the current action’s function prototype. The help button to the right of the quickhelp will open the Help file directly to that action's help topic if there is a current action (as with the F1 key). The current action is simply the action that the cursor is in. If the cursor is not in an action, then there is no current action.
Note: For more information on the quickhelp, please see the Action Editor Features section above.
The Help button on the action editor can be clicked at any time to open the Setup Factory help file. Here you can view more information on the event that the actions are being added to.
The help file contains detailed information for each action available to you in Setup Factory. It is divided into two topics for each action: Overview and Examples. The overview section provides detailed information about the action while the examples section provides one or more working examples of that action.
In the overview topic, the help file will provide you with the function prototype, which serves as a definition of the action, showing what (if anything) the action returns, and the parameters and their types.
A function prototype is the definition of the action. It defines the types of all of the parameters, the type of the return value (if any), and whether or not any of the parameters have defaults.

The help file also describes each parameter in detail and what its purpose is.
If the action returns a value, then the help file will describe the return value and what it might be.
A script can be thought of as a sequence of actions. Scripting, therefore, is basically the creation of a sequence of actions. A script can contain one action or as many actions as you can type.
Although you can accomplish a lot in Setup Factory without any scripting knowledge, even a little bit of scripting practice can make a big difference. You can accomplish far more in a project with a little bit of scripting than you ever could without it. Scripting opens the door to all sorts of advanced techniques, from actions that are only performed when specific conditions are met, to functions that you can define, name and then call from somewhere else.
One of the most powerful features of scripting is the ability to make use of variables. Variables are essentially just "nicknames" or "placeholders" for values that may need to be modified or re-used in the future. Each variable is given a name that you can use to access its current value in your script.
We say that values are "assigned to" or "stored in" variables. If you picture a variable as a container that can hold a value, assigning a value to a variable is like "placing" that value into a container.
You place a value into a variable by assigning the value to it with an equals sign. For example, the following script assigns the value 10 to a variable called "amount."
amount = 10;
Note: The semi-colon at the end of the line tells Setup Factory where the end of the statement is. It acts as a terminator. (No relation to Arnold, though.) Although technically it's optional—Setup Factory can usually figure out where the end of the statement is on its own—it's a good idea to get in the habit of including it, to avoid any potential confusion.
You can change the value in a variable at any time by assigning a different value to it. (The new value simply replaces the old one.) For example, the following script assigns 45 to the amount variable, replacing the number 10:
amount = 45;
...and the following script assigns the string "Woohoo!" to the variable, replacing the number 45:
amount = "Woohoo!";
Note that you can easily replace a numeric value with a string in a variable. Having a number or a string in a variable doesn't "lock" it into only accepting that type of value—variables don't care what kind of data they hold.
This ability to hold changeable information is what makes variables so useful.
Here is an example that demonstrates how variables work:
Start a new Setup Factory project by selecting File > New Project from the menu. If you have any unsaved changes in your current project, Setup Factory will prompt you to save them. If the project wizard dialog comes up, simply hit cancel to get rid of it for now.
Once you have a brand new project, follow along with the three steps in the Adding an Action example.
Just edit the script on the On Startup event so that it looks like this instead:
Dialog.Message("Setup Factory", strMsg);
This will make the Dialog.Message action display the current value of the strMsg variable when it is performed. Before we try it out, though, we need to assign a value to that variable somewhere.
Note: A common practice among programmers is to give their variables names with prefixes that help them remember what the variables are supposed to contain. This practice is often referred to as Hungarian notation. One such prefix is "str," which is used to indicate a variable that contains a string. Other common prefixes are "n" for a numeric value (e.g. nCount, nTotal) and "b" for a Boolean true/false value (e.g. bLoaded, bReadyToStart).
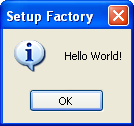
strMsg = "Hello World!";
Remember to press Enter at the end of the line to move the Dialog.Message action to the next line. The script should look like this when you’re done:
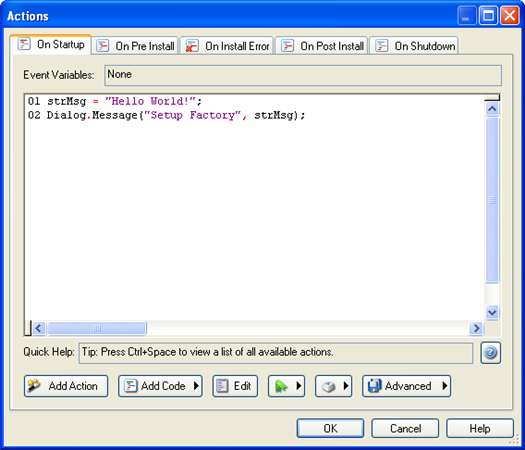
This will assign the string "Hello World!" to the variable named strMsg before the Dialog.Message action is executed.
The On Startup event is triggered as soon as the installation begins, just before the first screen is displayed. This makes it a good place to put any initialization script, such as setting up default values or preparing variables that will be used in the installation. Another good location is the Global Functions section that will be described later.
Note that the variable's name, strMsg, is nowhere to be found. Instead, the value that is currently in the variable is displayed. In this case, it's the value that was assigned to the variable in the page's On Preload event.
Edit the On Startup script so it looks like this instead:
strMsg = "Good Morning!";
Dialog.Message("Setup Factory", strMsg);
This time, the message looks like this:
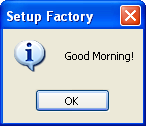
As you can see, you've just changed the message without even touching the Dialog.Message action.
Now imagine if you had the same or similar Dialog.Message actions on fifty different events throughout your project, and you decided you wanted to change the text. With variables and a little planning, such changes are a piece of cake.
The if statement gives your scripts the ability to make decisions, and do one thing or another in different circumstances.
Each if statement consists of a condition (or "test"), followed by a block of script that will only be performed if the condition is found to be true.
The basic syntax is:
if condition then
do something here
end
For example:
if age < 18 then
Dialog.Message("Sorry!", "You must be
18 to access this CD.");
Application.Exit();
end
The above script checks to see if the value in a variable named "age" is less than 18. If it is, it puts up a message saying "You must be 18 to access this CD," and then immediately exits from the application.
For example, if we set age to 17 first:
age = 17;
if age < 18 then
Dialog.Message("Sorry!", "You must be
18 to access this CD.");
Application.Exit();
end
...the block of script between the "then" and "end" keywords will be performed, because 17 is less than 18. In this case, we say that the if statement’s condition "passed."
However, if we set age to 20:
age = 20;
if age < 18 then
Dialog.Message("Sorry!", "You must be
18 to access this CD.");
Application.Exit();
end
...the block of script between the "then" and the "end" isn't performed, because 20 isn't less than 18. This time, we say that the if statement's condition "failed."
Note: An if statement's condition can be any expression that evaluates to true or false.
Let's modify the script on our project's On Startup event to only display the message if it is "Hello world!"
strMsg = "Good Morning!";
if strMsg == "Hello World!" then
Dialog.Message("Setup Factory", strMsg);
end
The double equals compares for absolute equality, so this if statement's condition will only be true if strMsg contains "Hello World!" with the exact same capitalization and spelling.
Tip: An easy way to add an if statement on the action editor is to highlight the line of text that you want to put "inside" the if, click the Add Code button, and then choose "if statement" from the menu. An if statement "template" will be added around the line that you highlighted. You can then edit the template to fit your needs.
This time nothing happens because strMsg is still set to "Good Morning!" in the first line of the On Startup event. "Good Morning!" doesn't equal "Hello World!" so the if condition fails, and the block of code between the "then" and "end" keywords is skipped entirely.
The script should look like this when it's done:
strMsg = "Good Morning!";
if strMsg ~= "Hello World!" then
Dialog.Message("Setup Factory", strMsg);
end
The tilde equals (~=) compares for inequality (does not equal), so this if statement's condition will only be true if strMsg contains anything but "Hello World!" with the exact same capitalization and spelling.
This time, because strMsg contains "Good Morning!", which is definitely not equal to "Hello World!", the message will appear.
The == and ~= operators are fine when you want to check strings for an exact match. But what if you're not sure of the capitalization? What if the variable contains a string that the user typed in, and you don't care if they capitalized everything correctly?
One solution is to use an old programmer’s trick: just convert the contents of the unknown string to all lowercase (or all uppercase), and do the same to the string you want to match.
Let's modify our script to ask the user for a message, and then display what they typed, but only if they typed the words "hello world" followed by an exclamation mark.
strMsg = Dialog.Input("", "Enter your message:");
if String.Upper(strMsg) == "HELLO WORLD!" then
Dialog.Message("Setup Factory", strMsg);
else
Dialog.Message("Um...", "You didn't type
Hello World!");
end
The first line uses a Dialog.Input action to pop up a message dialog with an input field that the user can type into. Whatever the user types is then assigned to the strMsg variable.
In the if statement's condition, we used a String.Upper action to convert the contents of strMsg to all uppercase characters, and then compare that to "HELLO WORLD!".
We've added an "else" keyword after the first Dialog.Message action. It basically divides the if statement into two parts: the "then" part, that only happens if the condition is true; and the "else" part, that only happens if the condition is false. In this case, the else part uses a Dialog.Message action to tell the user that they didn't type the right message.
Depending on what you type, you'll either see the "hello world!" message, or "You didn't type Hello World!".
Note that if you type some variation of "hello world!", such as "hello world!", or "hEllO WorlD!", the capitalization that you type will be preserved in the message that appears. Even though we used a String.Upper action to convert the message string to all uppercase letters in the if statement's condition, the actual contents of the variable remain unchanged. When the String.Upper action converts a value to all uppercase letters, it doesn't change the value in the variable...it just retrieves it, converts it, and passes it along.
Now you know how to compare two strings without being picky about capitalization.
Note: Programmers call this a case-insensitive comparison, whereas a comparison that only matches perfect capitalization is considered case-sensitive.
Tip: You can also use a String.CompareNoCase action to perform a case-insensitive comparison.
Another common use of the if statement is to test a numeric value to see if it has reached a certain amount. To demonstrate this, let's create another script that will stop your installation from running after it has been run on the same system more then 5 times.
nRuns = Application.LoadValue("SUFUsersGuide",
"Chapter4");
if nRuns == "" then
nRuns = 0;
end
nRuns = nRuns + 1;
Application.SaveValue("SUFUsersGuide", "Chapter4",
nRuns);
if nRuns>5 then
Dialog.Message("Sorry!", "Setup has been
run: ".. nRuns
.. " times and will exit");
Application.Exit();
end
The first line tries to read an application value using the Application.LoadValue action. It stores the result in a variable named nRuns.
The second line tests the return value of the Application.LoadValue action. If a blank string has been returned ("") then this is the first time that the setup has been executed on this computer. As a result the third line then assigns a value of 0 to nRuns. The fourth line simply completes the if statement.
The fifth line adds 1 to the current value contained in the variable nRuns, and the sixth line saves that number using the Application.SaveValue action.
The rest of the script is just an if statement that tests whether the value of nRuns is greater than 5, displays a message when that's true, and then exits the installation.
We used the concatenation operator to join the current value of nRuns to the end of the string "Setup has been run: " and then used them again to add the string " times and will exit" to the end. Note that this string has a space at the end of it, so there will be a space between the colon and the value of nRuns. (The resulting string just looks better that way.)
The concatenation operator consists of two periods, or dots (..). In fact, it's often referred to as the "dot-dot" operator. It is used to join two strings together to form a new, combined string. It's kind of like string glue.
Note: Technically, the value inside nRuns isn't a string—it's a number. That doesn't really matter, though. When you're doing concatenation, Setup Factory will automatically convert a number into the equivalent string, as required.
Each time you run the project the value of nRuns will be loaded, incremented by one, and then saved again. After you have run the setup six times (and all times after that) the message will appear and the installation will stop.
There you go. You've just created a pretty sophisticated little program.
Sometimes it's helpful to be able to repeat a bunch of actions several times, without having to type them over and over and over again. One way to accomplish this is by using a for loop.
The basic syntax of the for loop is:
for variable
= start,end,step
do
do
something here
end
For example:
for n = 10,100,10 do
Dialog.Message("", n);
end
The above script simply counts from 10 to 100, going up by 10 at a time, displaying the current value of the variable n in a dialog message box. This accomplishes the same thing as typing:
Dialog.Message("", 10);
Dialog.Message("", 20);
Dialog.Message("", 30);
Dialog.Message("", 40);
Dialog.Message("", 50);
Dialog.Message("", 60);
Dialog.Message("", 70);
Dialog.Message("", 80);
Dialog.Message("", 90);
Dialog.Message("", 100);
Obviously, the for loop makes repeating similar actions much easier.
Note: If the step is missing from the for loop, it will default to 1.
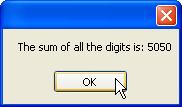
Let's use a simple for loop to add all of the digits between 1 and 100, and display the result.
n = 0;
for i = 1, 100 do
n = n + i;
end
Dialog.Message("", "The sum of all the digits is: "
.. n);
The first line creates a variable called n and sets it to 0. The next line tells the for loop to count from 1 to 100, storing the current "count" in a variable named i.
During each "pass" through the loop, the script between the "do" and the "end" will be performed. In this case, this consists of a single line that adds the current values of n and i together, and then stores the result back into n. In other words, it adds i to the current value of n.
This for loop is the same as typing out:
n = n + 1;
n = n + 2;
n = n + 3;
n = n + 4;
...all the way up to 100.
The last line of our script displays only the result of the calculation to the user in a dialog message box.
Tip: You can use the Add Code button to insert an example for loop, complete with comments explaining the syntax. You can then edit the example to fit your own needs.
When you run the setup, the for loop will blaze through the calculation 100 times, and then the Dialog.Message action will display the result.
It all happens very fast.
You probably won't find yourself using for loops as often as you'll use if statements, but it's definitely worth knowing how to use them. When you need to repeat steps, they can save you a lot of effort.
Of course, when it comes to saving you effort, the real champions are functions.
A function is just a portion of script that you can define, name and then call from somewhere else.
You can use functions to avoid repeating the same script in different places, essentially creating your own custom "actions"—complete with parameters and return values if you want.
In general, functions are defined like this:
function function_name
(arguments)
function
script here
return return_value;
end
The "function" keyword tells Setup Factory that what follows is a function definition. The function_name is simply a unique name for the function. The arguments part is the list of parameters that can be passed to the function when it is called. It's essentially a list of variable names that will receive the values that are passed. (The resulting variables are local to the function, and only have meaning within it.) A function can have as many arguments as you want, even none at all.
The "return" keyword tells the function to return one or more values back to the script that called it.
The easiest way to learn about functions is to try some examples, so let's dive right in.
This opens the resources dialog to the global functions tab.
The global functions section is a convenient place to put any functions or variables that you want to make available throughout your project. Any script that you add to this section will be performed when your application is launched, right before the project's On Startup event is triggered.
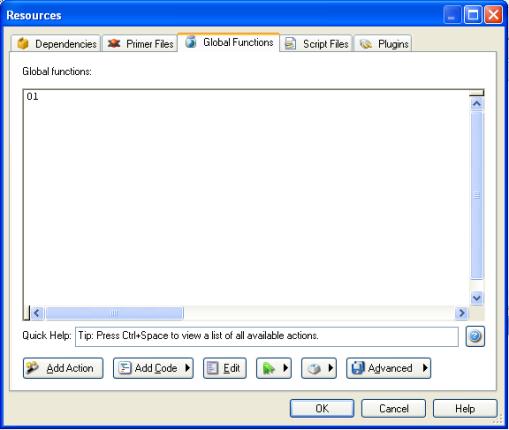
function SayHello(name)
Dialog.Message("", "Hello " .. name);
end
This script defines a function named SayHello that takes a single argument (which we've named "name") and displays a simple message.
Note that this only defines the function. When this script is performed, it will "load" the function into memory, but it won't actually display the message until the function is called.
Once you've entered the function definition, click OK to close the Global Functions dialog.
SayHello("Mr. Anderson");
This script calls the SayHello function that we defined on the global functions section, passing the string "Mr. Anderson" as the value for the function's "name" parameter.
When you run the setup, the script on the On Startup event calls the SayHello function, which then displays its message.
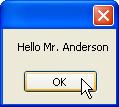
Note that the SayHello function was able to use the string that we passed to it as the message it displayed.
function GetName()
local name = Dialog.Input("", "What is
your name:");
return name;
end
This script defines a function called GetName that does not take any parameters. The first line inside the function uses a Dialog.Input action to display a message dialog with an input field on it asking the user to type in their name. The value returned from this action (i.e., the text that the user entered) is then stored in a local variable called name.
The "local" keyword makes the variable only exist inside this function. It's essentially like saying, "for the rest of this function, whenever I use 'name' I'm referring to a temporary local variable, and not any global one." Using local variables inside functions is a good idea—it prevents you from changing the value of a global variable without meaning to. Of course, there are times when you want to change the value of a global variable, in which case you just won't use the "local" keyword the first time you assign anything to the variable.
The second line inside the function returns the current value of the local "name" variable to the script that called the function.
Tip: We could actually make this function's script fit on a single line, by getting rid of the variable completely. Instead of storing the return value from the Dialog.Input action in a variable, and then returning the contents of that variable, we could just put those two statements together, like so:
function
GetName()
return Dialog.Input("", "What is your
name:");
end
This would make the GetName function return the value that was returned from the Dialog.Input action, without storing it in a variable first.
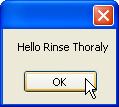
strName = GetName();
SayHello(strName);
The first line calls our GetName function to ask the user for their name, and then stores the value returned from GetName in a variable called strName.
The second line passes the value in strName to our SayHello function.
When the setup begins the On Startup script will automatically be executed and the input dialog will appear, asking you to enter your name.
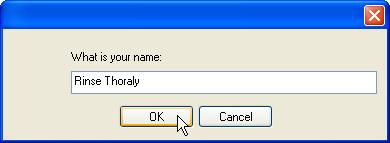
After you type in your name and click OK (or press Enter), a second dialog box will appear, greeting you by the name you entered.
Pretty neat, huh?
SayHello(GetName());
This version of the script does away with the strName variable altogether. Instead, it uses the return value from our GetName function as the argument for the SayHello function.
In other words, it passes the GetName function's return value directly to the SayHello function.
Whenever a function returns a value, you can use a call to the function in the same way you would use the value, or a variable containing the value. This allows you to use the return value from a function without having to come up with a unique name for a temporary variable.
The script should work exactly the same as before: you'll be asked for your name, and then greeted with it.
This is just a simple example, but it should give you an idea of what an incredibly powerful feature functions are. With them, you can condense large pieces of script into simple function calls that are much easier to type and give you a single, central location to make changes to that script. They also let you create flexible "subroutines" that accept different parameters and return results, just like the built-in Setup Factory actions.
And despite all that power, they are really quite simple to use.
There are three additional resources at your disposal that can be useful when you are working with actions in Setup Factory: Global Functions, Plugins, and Script Files.
The Global Functions resource in Setup Factory can be found in the design environment under Resources > Global Functions. The Global Functions resource is an action editor that will let you enter script.
The script in the global functions section will be loaded into the installation before the On Startup event is executed. This makes it a great place to create any functions that you want to have available during your install and a great place to initialize any global variables.
Note that any script in the Global Functions resource will be executed, so it is generally best to only use it for variable initialization and function declarations. It is a good idea to place all other scripts on events within your setup.
Note: Since the global function section is normally used to create global functions and initialize global variables, the script that is contained there is sometimes referred to as global script.
Plugins are actions that are external to the Setup Factory program. They are independently developed and distributed and can be integrated into your projects to extend their functionality. Some plugins may be developed by Indigo Rose, while others may be developed by third parties.
You can refer to the action plugin's documentation (click the About Plugin button after adding it) for information on what features it adds and how to use them.
Plugins can be added or removed from your project on the Plugins tab, which can be accessed by choosing Resources > Plugins in the Setup Factory design environment.
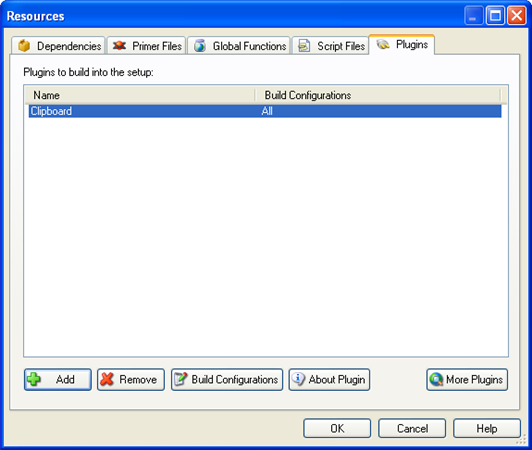
Note: Any action plugins that are located in Includes\Plugins within the Setup Factory program directory and that were created with version 2.0 (or higher) of the Plugin SDK will be available through the design environment by choosing Resources > Plugins... from the program menu and clicking the Add button.
Note: Action plugins may be available in either 32-bit or 64-bit. You must ensure you choose the version of the plugin that matches your intended setup platform (32-bit or 64-bit). The setup platform can be set on the Setup File tab of the Build Settings dialog (Publish > Settings).
The More Plugins button is an easy way to see what plugins are currently available on the Indigo Rose web site. Pressing this button will bring you to the Setup Factory plugins area of the Indigo Rose web site.
If a plugin has been added to the plugins tab, it will be included in your setup. Since there is some overhead in terms of file size, it is recommended that you only include plugins that are needed by your installer.
Once you have added the plugin to your project all of its actions will be available to you in the action editor and action wizard.
Note: Help for plugin actions can be accessed on the action editor in the same way that you would access help for built-in actions.
Script files are external text files that contain Lua script usually with the .lua file extension. Script files can be added to your project on the script files tab of the resources dialog which can be found under Resources > Script Files.
Note: All action editors in Setup Factory have the ability to export their script via the advanced button. Select Advanced > Save to save the script as an external file.
Script files are very similar to the global functions section of Setup Factory except that instead of the script being kept in the Global Functions resource, it is stored externally to your project on a text file.
Script files are very useful if you share important and complex code between a variety of different projects.
Here is a quick comparison of the differences between sharing script between projects using the Global Functions resource versus script files.
If you have some script that you want to share between many projects using the Global Functions resource, you have to copy and paste the script into each setup that needs it. Now each project has an exact copy of the script.
The method works fine until you discover a bug or want to change some of the code. Since each project contains a copy of the script, you will have to edit the script in each project in order to be sure that it is using the correct code.
If you were to use an external script file, you need to develop a working piece of script and then get that script into a text file. Then, include the script file in each project that needs it. Using this script file method, each project does not contain a copy of the script; rather, each project references the same piece of script.
If you find an error or want to change any of the script, you do not have to edit the script in each project; you simply have to edit the script in the text file. Since each project references the same script file, you know that the next time you build a project, it will be using the correct script.
Essentially, with the Global Functions resource, you have to maintain the script for each project that uses it. On the other hand, the script file method allows you to maintain your script in a single location, the script file. For this reason, it's a good idea to use script files when you want to share global script between several projects.