Chapter 2: Working with Files
Installing the right files to the right places is the key to performing a successful installation. The files that make up your software need to get from your development system to the appropriate locations on the user's computer. Regardless of whether you're distributing files on CD-ROMs, DVDs, or in a single, downloadable setup executable, Setup Factory allows you to install all of your files with the utmost precision.
In fact, the installation of files is the main purpose of an installer. As such, you are expected to be completely familiar with files and folder structures in order to use Setup Factory. If you need more information on the basics of files and hierarchical folder structures, please consult Windows Basics.
Note: Files are your software—and you are responsible for getting those files onto the users' systems without causing any harm. A solid understanding of files and folders is critical to building a professional installer.
In this chapter, you'll learn about:
• The project window
• The Archive and External file lists
• Filtering the file list
• Folder references
• Adding files and folder references
• Removing files and folder references
• File and folder reference properties
• What %AppFolder% is
• Working with multiple files
• Missing files
• Primer files
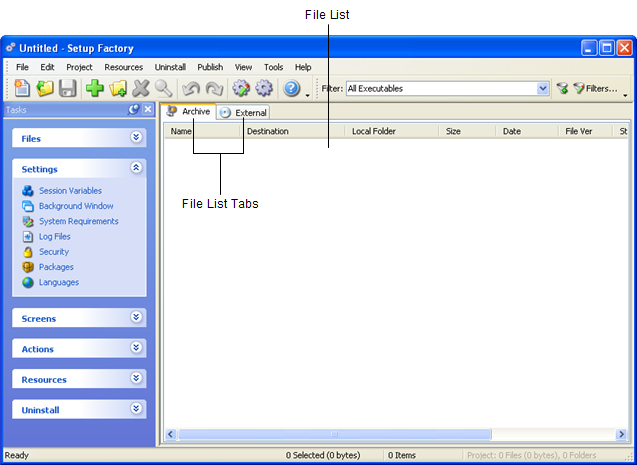
The project window takes up most of the main screen and contains a list of all the files that you have added to your project. From this list you can highlight specific files and view or edit their properties.
The file list tabs on the project window allow you to switch between the two separate file lists in Setup Factory: the Archive file list, and the External file list.
The Archive file list (or "Archive tab") is for files that you want compressed and stored in the setup executable. In other words, this list is for files that will be included in your installer.
When Setup Factory builds the setup executable, it compresses all the files in the Archive file list and packs them right into the setup executable file. The part of the setup executable where the files are stored is known as the setup archive. The Archive file list is where you add the files that you want to store in the setup archive.
The External file list (or "External tab") is for files that you don't want compressed and stored in the setup executable. In other words, this list is for files that will be distributed with your installer.
When Setup Factory builds the setup executable, it includes all the information it knows about the files on the External tab, such as where the files are expected to be at run time (the run-time source location), and where you want them to be installed to (the run-time destination folder). But it doesn't actually include the files in the setup executable. Instead, you're expected to make sure that those files will be where the installer expects them to be at run time. Usually this is done by distributing the files along with the setup executable on the same CD-ROM.
Note: In previous versions of Setup Factory, the External file list was known as the "CD-ROM tab."
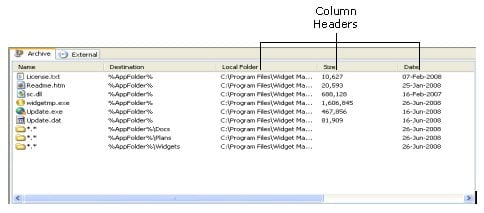
Both file lists have columns that display different information about each file in your project. You can sort the information along any of the columns by clicking on the header for that column. If you click on the same header again, the files will be sorted by that category in reverse order.
You can customize the columns by choosing View > Columns. This opens the Columns dialog, where you can choose which columns to display in the list, and change the order (left to right) that the columns are listed in.
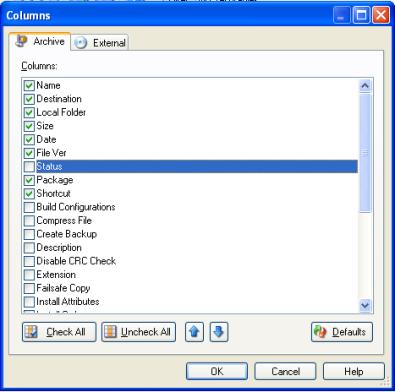
Tip: Moving a column up in the columns list moves it to the left in the file list; moving a column down in the columns list moves it to the right.
The items that appear in the Setup Factory file lists refer to files on your system. When you add a file to your project, the file is not copied into the project. It is only referenced by the project.
In other words, only the path to the file (and a few other properties, such as the size of the file) is stored in your project. If the original file is renamed, moved or deleted, Setup Factory won't be able to build it into the setup executable. (In fact, it will show up in the file list as a missing file.)
The file itself, however, is not part of the project. If you copy your project from one system to another, you will not be able to build it unless you also copy the files, and place them in the exact same folder structure—in other words, you must place the files where the project expects them to be located.
Note: The files that your project references are commonly referred to as source files.
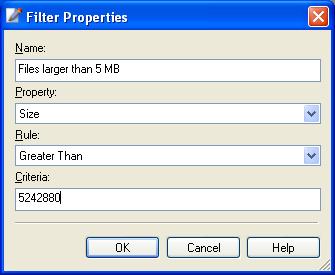
You can apply a filter to the file list so it only shows files that meet specific criteria. For example, you could filter the list to only show files that are larger than 5 MB, or files that will be installed to a specific location.
This is all done using the Filters toolbar.
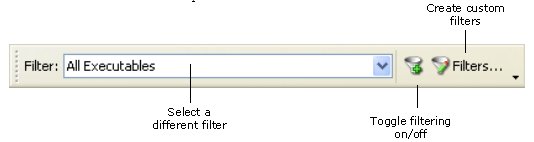
Clicking the Edit filters button on the toolbar opens the filters manager, where you can configure the list of filters that appear in the drop-down selector on the toolbar.
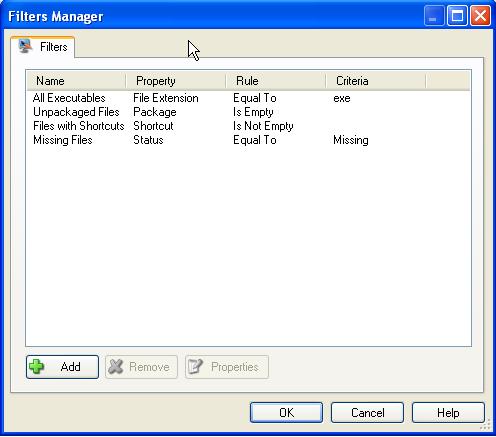
The filters manager allows you to define custom filters using a wide range of criteria.
Setting up a new filter is incredibly easy. After clicking on Add in the filters manager, you simply give the filter a name:
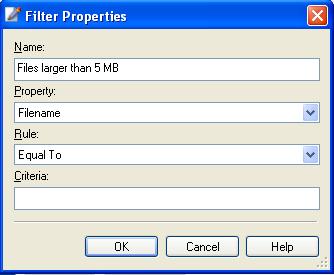
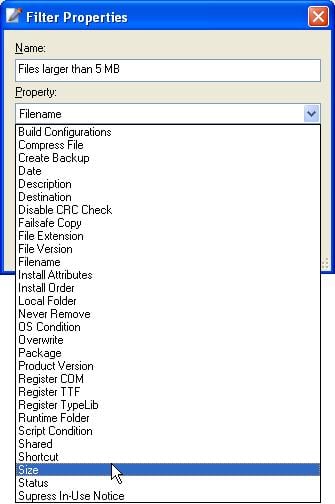
…then select the property you want to filter on:
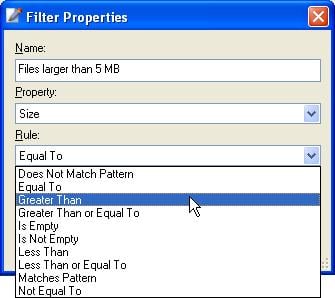
…select the rule that you want to use:
…and finally provide the criteria:
Once filters have been defined, you can easily switch between them using the drop-down selector. The filters are saved on a global basis, so they can be used in all of your projects.
Folder references are similar to files, but they reference a folder on your system instead of a single file. They're useful for including folders full of files without having to reference each file individually.
For example, if you have a folder full of images that you need to install, you can use a folder reference to add the entire folder to your project. This also lets you configure the settings for all of those files from a single item in the file list.
You can even choose whether or not to reference folders recursively. In other words, you can choose whether or not to include the files in any subfolders (and subfolders of subfolders, and so on) that may be in the selected folder. (This is in fact the default behavior of folder references; however, you can choose to only include the files in the immediate folder if you want by simply turning off the "Recurse subfolders" option.)
Each folder reference also has a File Mask setting that you can use to include only files that match a specific pattern. For instance, if you wanted to use different settings for the .jpg files and the .bmp files in your product's Images folder, you could use two folder references—one for each type. So, for example, you could set up one folder reference to add everything beneath C:\Program Files\GiddyApp\Images that matches "*.jpg" and another one to add everything in that same path that matches "*.bmp." You could then configure their settings differently—for example, you could turn off compression for the .jpg files so Setup Factory won't try to compress them when you build the project, which could shorten the build process if you have a lot of image files.
Note: During the build process Setup Factory performs a test compression on each file, and automatically turns compression off for any file that isn't reduced in size after it's compressed. JPEG files are already compressed, so normally Setup Factory ends up turning compression off for them anyway.
Tip: Folder references are one of the most powerful features in Setup Factory! Be sure to use them to your advantage.
There may be cases where you want to include a folder full of files, but you want to use different settings for some of the files in the folder. Setup Factory makes this incredibly easy to accomplish because you can override a folder reference with individual file items.
The rule is simple: the settings for individual file items always take precedence over folder references. So if you have a folder reference that happens to include files A, B, and C, and you also add file B to your project on its own, the settings for the standalone file item will be used for file B, and not the settings for the folder reference.
Note: It doesn't matter what order the files are in…individual file items always override folder references.
Before you start adding files to your project, make sure you have all of your files properly installed on your system. Your local directory structure affects the destination paths that Setup Factory assigns to files as they are added to your project, so it's important to have your application's directory structure laid out on your system the same way you want it to end up on the user's.
There are two ways to add files to your Setup Factory project: you can add files from within Setup Factory, or you can drag and drop files onto the project window.
To add files from within Setup Factory:
Use the Archive file list if you want the files to be included in the setup executable, or the External file list if the files will be distributed separately.
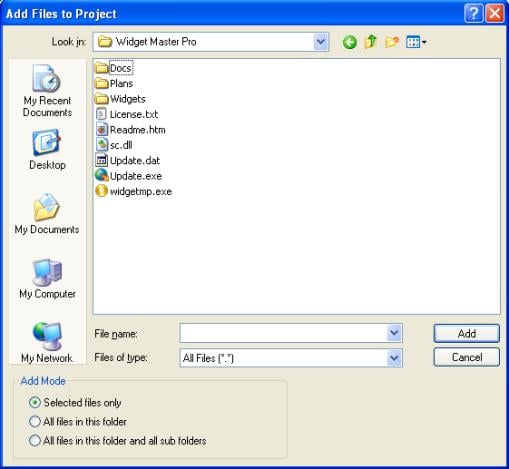
This will open the Add Files to Project dialog.
Tip: You can also click the Add Files button on the toolbar, press the Insert key, or right-click on the project window and select Add Files from the right-click menu.
The "Selected files only" option will only add the files that you select.
The "All files in this folder" option will add all of the files in the folder that the Add Files to Project dialog is currently displaying.
The "All files in this folder and all sub-folders" option will add all of the files in the current folder, and all of the files in any sub-folders as well.
Depending on the add mode you chose, you either need to select one or more individual files in the browse dialog, or navigate into the folder that you want to add files from.
Once you click the Add button, the files will appear in the file list.
To add files by dragging and dropping them:
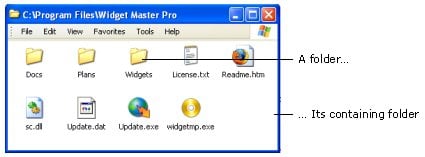
The "C:\Program Files\Widget Master Pro" folder in Windows:
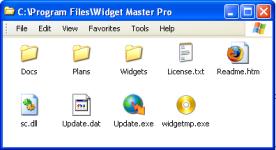
You can hold the Ctrl key down while clicking on files to select more than one file at a time.
This is just like dragging icons around on the desktop.
Once you drop the files onto the project window, they will appear in the file list.
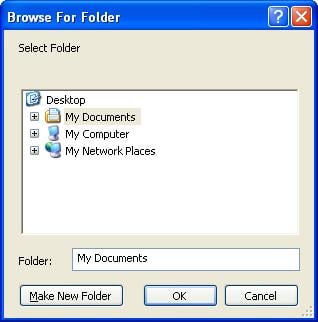
There are two ways to add folder references to your Setup Factory project: you can add them from within Setup Factory, or you can drag and drop folders onto the project window.
Use the Archive file list if you want the folders to be included in the setup executable, or the External file list if the folders will be distributed separately.
This will open the Browse For Folder dialog.
Tip: You can also click the Add Folder Reference button on the toolbar, press Ctrl+Insert, or right-click on the project window and select Add Folder Reference from the right-click menu.
Simply browse for the folder that you want to add. When you select a folder, its name will appear in the Folder field near the bottom of the dialog.
When you click the OK button, the folder reference will appear in the file list.
To add a folder reference by dragging and dropping a folder:
In other words, click once on the folder that you want to add. (But don't navigate into the folder, or you won't be able to drag it.)
This is just like dragging icons around on the desktop.
Once you drop the files onto the project window, the drag and drop assistant will appear, asking if you want to add the folder as a folder reference.
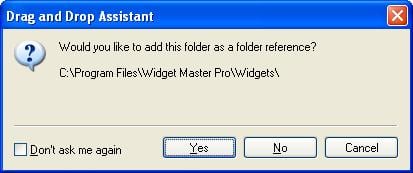
Clicking Yes on the drag and drop assistant will add the folder to your file list as a folder reference.
Note: Clicking No will add all of the files inside the folder as individual file items instead.
To remove files from your Setup Factory project:
Simply click on the file items that you want to remove.
Choosing Project > Remove Selected from the program menu will remove the selected file items.
Tip: You can also click the Remove Files button, press the Delete key, or right-click on the project window and select Remove from the context menu.
Note: Removing files from your project removes the file items from the file list, but does not delete the original files. The original files remain completely unaffected.
Removing folder references is exactly like removing files. Simply select the folder references that you want to remove and choose Project > Remove Selected (or press the Delete key, etc.).
You can use the File Properties dialog to view and edit the settings for any file in your project.
To access the File Properties dialog:
Simply select the file item that you want to edit.
This will open the File Properties dialog, where you can view and edit the properties of the file you selected.
Tip: There are several other ways to access the file properties as well. You can click the File Properties button, press Ctrl+Enter, right-click on the file item and select File Properties from the right-click menu, or simply double-click on a file in the list.
There are six tabs on the File Properties dialog: General, Shortcuts, Advanced, Conditions, Packages, and Notes.
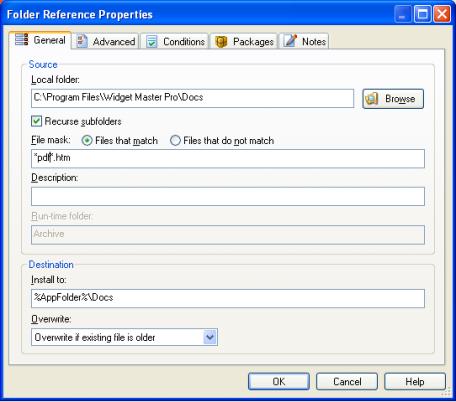
The General tab is where you will find information about the file itself, such as its name and location on your system. This is also where you can view or edit the destination path, and the overwrite settings for the file.
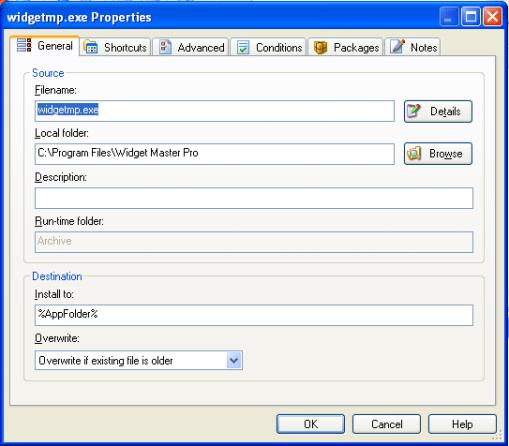
Since a Setup Factory project only contains references to files, each file has a property that specifies where the file is located. This location is known as the source folder.
There are two kinds of source folders: local folders, and run-time folders.
Local folders are folders that are located within local access of your system or LAN. These specify the current location of the file on your system.
Setup Factory uses the local folder to retrieve the file's information (e.g. when you open a project) and to locate the file when it builds the setup executable (i.e. when you build the project).
Files in the External file list have an additional property known as the "run-time folder." The run-time folder specifies the run-time location where the file will be when the user runs your setup file. In other words, it represents the location of an external file at the time of the installation.
Note: The run-time source path only applies to files on the External tab. The files on the Archive tab are always located in the setup executable archive at run time.
Destination paths specify where the files are intended to end up on the user's system. Though this seems simple enough, it is complicated by the fact that you can't predict the layout of the folder structure on the user's system. For instance, if you want to install a file in the user's "My Documents" folder, how do you know what the full path to that folder is? It could be anything from "C:\Documents and Settings\JoeUser\My Documents" to "F:\Joe’s Docs."
Setup Factory gets around this uncertainty by providing you with a number of built-in session variables for common system folders. These are essentially placeholders (like %MyDocumentsFolder%) that you can use in your file paths, and that will be replaced by the corresponding path on the user's system at run time. You simply use the appropriate placeholder, and Setup Factory will take care of investigating what the actual path is when your user runs the setup file.
For more information on session variables, see Chapter 5.
Most installations involve asking the user to confirm where they would like the software installed. In order to accommodate the user's choice in this matter, Setup Factory uses a session variable to represent the main folder that your software will be installed in. The name of this session variable is %AppFolder%, which is short for Application Folder, i.e. the folder where your software application is to be installed.
Tip: You can set a default path for %AppFolder% by choosing Project > Session Variables, and you can allow the user to change it (i.e. select a different path) by including a Select Install Folder screen in your project.
When files are added to a Setup Factory project, Setup Factory tries to set a "best guess" value for the destination folder of each file. It does this in two ways.
The first time you add any files to the Archive file list, Setup Factory assumes that you are adding files from the "main" folder where your application is installed on your system. It sets these files to be installed in %AppFolder%, or in sub-folders of %AppFolder% if the files were in subfolders of the main folder—in other words, it preserves the relative folder structure of the files that you add.
Once you already have files in the file list, Setup Factory goes even further when you add new files to the project. First, it compares the path of each file that you're adding to the local source path of each file in your project. If it finds another file in your project that was from the same source folder on your system, it uses that file's destination path to guess what the new file's destination path should be. (Normally, files that are located in the same place on your system will be installed to the same place on the user's system.)
In other words, Setup Factory tries to base each new file's destination path on the destination path of a file in your project that is in the same location on your system.
If there are no files in your system from the same source location, the new file is configured to simply use %AppFolder% as the destination folder path.
The Shortcuts tab is where you can configure the shortcut options for the selected file. You can use this tab to have Setup Factory automatically create a shortcut icon for the file in the user's Start menu or on the user's desktop at run time.
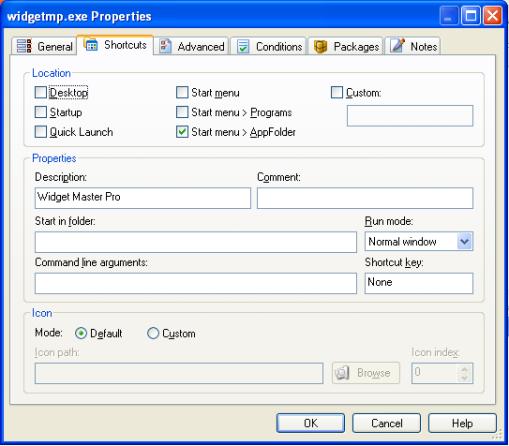
A nested shortcut is a shortcut file that is located in a sub-folder of a shortcut folder. In other words, it's a shortcut in a folder that is located or "nested" in another folder.
You can easily create nested shortcuts with Setup Factory by specifying a custom shortcut path. Simply include the nested folders in the path that you provide in the Custom field on the Shortcuts tab.
In other words, just enter the full path to where you want the shortcut file to end up, and if any of the folders in the path don't exist, Setup Factory will automatically create them for you.

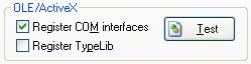
The Advanced tab is where you can configure advanced options for the selected file. This is where you can override certain default installation settings, such as whether the file will be compressed before storing it in the setup executable, whether it will be uninstalled automatically by your installer's uninstall routine, and what attributes will be assigned to the file after it's installed. You can also specify whether the file should be registered as a TrueType font, or even whether it should be registered as a shared OLE or ActiveX component using DLLRegisterServer.
There are two ways that you can register files (such as ActiveX controls) in Setup Factory. The easiest way is to simply select the "Register COM interfaces" check box on the Advanced tab of the File Properties dialog for the file you want to register.
The alternative method is to use a System.RegisterActiveX action to register a file after it has been installed.
For more information on the Register COM interfaces option and the System.RegisterActiveX action, please consult the program reference.
There are two ways that you can register TrueType fonts in Setup Factory. The easiest way is to select the "Register as TrueType font" check box on the Advanced tab of the File Properties dialog for the file you want to register. The file must be a valid Windows TrueType font (.ttf) file.

The alternative method is to use a System.RegisterFont action to register a .ttf file after it has been installed.
For more information on the Register as TrueType font option and the System.RegisterFont action, please consult the program reference.
The Conditions tab is where you can edit settings that affect whether the file will be included in the setup executable, and whether it will be installed. In other words, it is used to conditionally include or exclude a file from the setup at build time or run time.
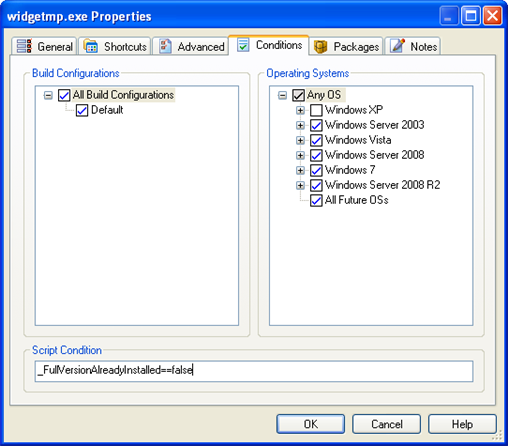
The list of build configurations allows you to select the build configurations that the file will be included in. The file will only be included in the setup executable if it is included in the build configuration that is in effect when you build the project.
The list of operating systems allows you to specify which operating systems the file will be installed on. The file will only be installed on an operating system if it is marked with a check in this list. So, for example, if you uncheck Windows XP for a file, it will not be installed on Windows XP.
The script condition is a short expression written in Lua script for the file. It must evaluate to a Boolean value of either true or false. At run time this result will determine whether or not the file will be installed.
The Packages tab is where you can select the packages that you want the selected file to belong to. The Packages tab lists all of the packages that have been configured in your project. You can add the currently selected file to one or more packages by clicking on the check boxes in this list.
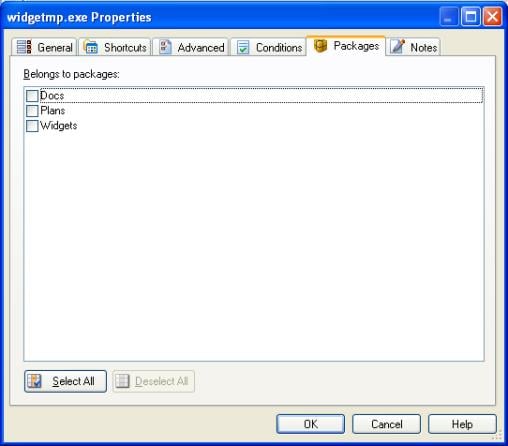
The file will be assigned to the packages that have check marks beside them.
For more information on packages, see Chapter 6.
The Notes tab is where you can type any notes that you want to keep about the file. These are not used by the installer, and are not included in the setup executable at all. The Notes tab is simply a convenient place for you to keep notes about the file for your own purposes. For example, you could list any special instructions involved in preparing the file for the build process, or you could keep track of who last edited the file's properties.

For the most part, Folder References have almost exactly the same properties as files do. In fact, the Conditions, Packages and Notes tabs are exactly the same. Here are some differences worth mentioning:
• On the General tab, folder references have a File Mask setting that allows you to include or exclude a range of files that match a filename pattern, e.g. "*.exe"
• On the General tab, folder references have a "Recurse subfolders" option that controls whether files in subfolders (and their subfolders) should be included as well.
• There is no Shortcuts tab for folder references.
• On the Advanced tab, some of the OLE/ActiveX and Font options do not exist because they cannot be applied to multiple files.
You can use the Multiple File Properties dialog to edit the properties of more than one file (or folder reference) in your project at a time.
To access the Multiple File Properties dialog:
1. Select more than one file on the project window. (You can select multiple files by pressing and holding the Ctrl key or the Shift key while you click on the files.)
2.
Choose Project > File Properties from the menu.
(You can also click the File Properties button, press the Ctrl+Enter key,
or right-click on the files and select File Properties from the right-click
menu.)
This will open the Multiple File Properties dialog, where you can view
and edit the properties of the files you selected.
The Multiple File Properties dialog is similar to the File Properties dialog, but there are some important differences:
• There is no Notes tab.
• You cannot enter text in a field directly; instead, you must click on the Edit button to the right of the field, and use the Edit Multiple Values dialog to change the text. Note that the Edit Multiple Values dialog allows you to completely replace the text for all selected files, append (or prepend) some text to the value for each selected file, or search and replace among the values for all selected files.
•
Check boxes on the Multiple File Properties dialog have three
states:
enabled (  ), disabled (
  ),
and mixed (
),
and mixed (  ). The mixed state preserves the settings
for that check box in all of the selected files.
). The mixed state preserves the settings
for that check box in all of the selected files.
• The Overwrite setting includes an option in the drop-down list to use the original values for each selected file.
For more information on using the Multiple File Properties dialog, please consult the program reference.
Since Setup Factory only records an informational link to each file, and doesn't actually maintain a copy of the file itself, it's possible for files to go "missing" from Setup Factory's point of view. For example, if a file in your project is moved to another folder, Setup Factory will no longer be able to find it at its original location. The same thing happens when a file is renamed or deleted. Setup Factory only knows to look for a file at the place where it was when you "showed" the file to Setup Factory by adding it to your project.
Although Setup Factory might not know where a missing file has ended up, it definitely knows when a file is missing. Whenever a file in your project can't be found at its original location, Setup Factory displays the file's information on the project window in red instead of black. The red color makes it easy for you to see which files in your project are missing.
The file's status will also show as "Missing" instead of "OK" in the Status column on the list view.
Tip: A quick way to determine which files are missing in your project is to click on the Status column header to sort the files in the list view according to their status.
If you find that your files are suddenly playing hide-and-seek with Setup Factory, try to remember if you've made any changes to your files recently. If you moved the files, you can try moving them back. If you renamed the files, you can restore the original names. If you deleted the files, you'll have to replace them.
If Setup Factory still shows the files in red after you've corrected the situation, you probably just need to refresh the display. To do so, simply choose View > Refresh from the menu, or press the F5 key. Refreshing the display causes Setup Factory to re-examine the location of every file in your project.
Note: Setup Factory automatically refreshes the display for you when you open a project or initiate the build process.
If you moved, renamed, or deleted the files on purpose, and you want Setup Factory to use the files at their new locations, remember the files by their new names, or just forget about the past and move on, you'll need to change the local source path on the File Properties dialog for each file. This can easily be done by selecting all the files and then modifying their properties using the Multiple File Properties dialog.
Primer files are just regular files that get extracted from the setup executable before the installation process begins. This means you can use primer files at the very start of the installation process, right after the user runs the setup executable.
You can make any file a primer file simply by adding it to the Primer Files tab on the Resources dialog. The files on this tab will be included in the setup executable when you build the installer.
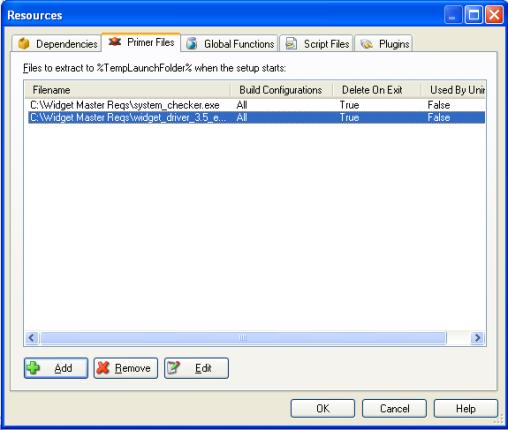
Primer files are automatically extracted to a temporary folder at run time. The path to this folder is automatically stored in a session variable named %TempLaunchFolder%. You should use this session variable in actions when you need to access your primer files.
Primer files make it easy to run a program on the user's system before the rest of your files are installed. Just add the program to the list of primer files, and execute it with a File.Run action early in the installation process.
For example, you might need to execute a custom program or DLL function before your software is installed—perhaps to perform some product-specific, low-level pre-installation tests on the user's hardware, and write the results to the Registry. By adding your custom program or .dll to the list of primer files, you could distribute it "inside" your setup executable and still be able to run it before any of the "normal" files in your project are installed.
Tip: Another way to access files at the start of the installation process is to distribute them "alongside" your installer. For instance, you could store the files "externally" on the same CD-ROM, and access them directly; or, you could download the files from your web site using an HTTP.Download action in the On Startup project event.