Chapter 10: Uninstall
Uninstall
Uninstallation: an inevitability that, though sad, is a fact of life. With Setup Factory, the task of removing your labor of love from a user's system is easy to configure, and in many cases, works with little to no involvement on your part.
Yet if you are performing many advanced tasks, the uninstallation is entirely customizable, from what screens are displayed, to what actions are performed, and when.
In this chapter, you'll learn about:
• What happens during an uninstallation
• What uninstallation tasks you need to implement yourself
• Configuring the uninstaller
• The uninstall configuration file
• Control panel options, uninstall shortcuts, and uninstall log files
• Customizing the uninstall interface
• Uninstall actions and events
The uninstaller is the Ying to the installer's Yang. Everything created, installed, or otherwise modified by the installer is undone by the uninstaller. The best uninstaller leaves no trace of the original software product on the user's system and is easy to use.
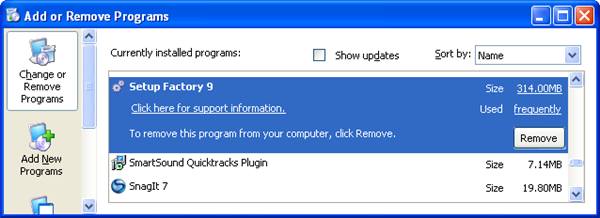
Most programs list their uninstallers in the "Add or Remove Programs" control panel applet, which you access by choosing Start > Control Panel > Add or Remove Programs. Each item in Add or Remove Programs represents an already-installed program that can be uninstalled. (Some programs also provide a shortcut to their uninstaller in the same place where their program shortcuts are found on the Start menu.)
By default, Setup Factory includes an uninstaller with every installation built. This default uninstaller is accessed through the Add or Remove Programs dialog.
In a nutshell, during an uninstallation everything that was done automatically by the installer is undone. Files from your main file list are removed, shortcuts created by the installer are deleted, and folders that were automatically created during the installation are destroyed.
Note: The uninstaller does NOT remove files created or copied using actions, nor does it remove shortcuts, folders, or registry entries created via actions. By default the uninstaller only removes what the installer created automatically. Anything done with actions in the installation will need to be undone with actions in the uninstallation.
Tip: You can use UninstallData actions to add items to the list of files, folders, shortcuts, and registry entries that will be removed by the uninstaller.
By default, every file in your project is removed from the user's system by the uninstaller. However, you can bypass this on a file-by-file basis by adjusting either the shared file or never remove options in the file's properties. Any file for which the never remove option has been enabled will not be removed by the uninstaller.
If a file is specified as a shared file, then in addition to installing it, a usage count is set for the file. For example, if you have two separate products that share a DLL, when the user installs the second product, the usage count for that DLL is increased by one. When one of the products is removed, the usage count is decreased by one. The file is only removed from the system if it has a usage count of zero, which indicates that no other currently installed program needs it.
Unless you have made system changes using actions, the default behavior of the uninstaller should be sufficient. However, if you have made any changes to the user's system using actions, those changes must be reversed using actions during the uninstall.
For example, if you created a bunch of registry keys using Registry actions and made a couple of shortcuts using the Shell.CreateShortcut action, then you have to reverse these changes by using their counterpart actions (for example, Registry.DeleteKey and Shell.DeleteShortcut) in the uninstaller.
Of course, the uninstaller doesn't have to be limited to simply undoing things that were done by the installer. You can make it do anything you want; for example, you could present the user with an option to extend their license at a discount, or submit a message to an authentication system on your web site that will allow that user to install the software somewhere else.
One of the great things about Setup Factory is how customizable it is. Installations can be created for almost any need. The same is true for uninstallations created with Setup Factory. The uninstallation user interface, combined with actions, can be customized to handle any situation.
By default, Setup Factory creates an uninstaller for your project that handles the basics automatically. Any files that are installed (without using actions) are marked to be uninstalled automatically, and there is a standard uninstall interface already set up.
If you need more functionality than Setup Factory's default features provide, then you can fully customize your uninstaller. The uninstaller is in essence a project within your actual project; it has its own startup and shutdown actions and its own screens, complete with all expected events.
Setup Factory utilizes an XML configuration file to keep track of the changes that the installer makes to the user's system during the installation, such as what files were installed and what shortcuts were created. This configuration file is dynamically created by the installer as it proceeds through the installation.
Tip: Although the uninstall configuration file is created during the installation, it can be altered manually at any time during the installation or uninstallation by using UninstallData actions.
The uninstall configuration file contains the following information:
• Path to the uninstall data file
• Paths of all files that were installed
• Session variables and values
• All shortcuts created
• Any folders created by the installation
• Any additional scripts that should run during the uninstallation
Note: The uninstall configuration file does not contain any information about tasks completed with actions. Any files, shortcuts, folders, session variables, etc. created with or modified by actions are not referenced in the uninstall configuration file unless you specifically add them to the file using UninstallData actions.
The uninstall configuration file is basically a list of steps for the uninstaller to follow in order to perform the uninstallation.
Note: The uninstall configuration file is different from the uninstall data file. The uninstall data file is an encrypted binary file containing all of your design time settings—screens, actions, etc.—and cannot be changed outside of the Setup Factory design environment.
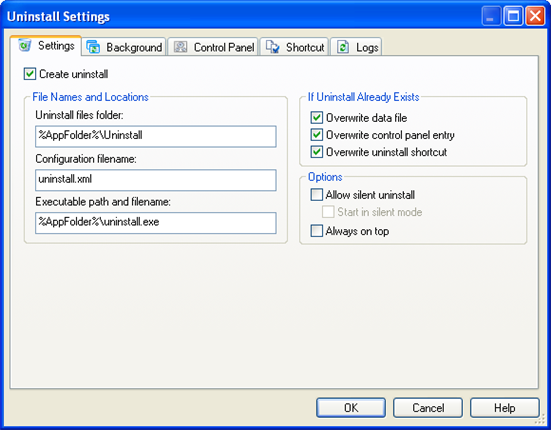
The Uninstall Settings dialog can be accessed by choosing Uninstall > Settings from the menu. Typical uninstall settings can be seen here:
The Create uninstall option basically toggles the uninstall functionality. When this option is checked, your installer will create an uninstaller at runtime. When it is unchecked, no uninstaller will be created.
The File Names and Locations section of the Uninstall Settings dialog allows you to specify: the folder where the uninstall data and configuration files will be stored, the name that should be used for the uninstall configuration file, and where to store the uninstaller's executable.
The If Uninstall Already Exists section of the Uninstall Settings dialog allows you to control how your installer behaves when it finds existing uninstall settings on the user's system from a previous installation. For example, you can choose whether to overwrite the control panel entry with the new uninstall settings, or to leave the existing control panel entry alone.
The Allow silent uninstall option controls whether the uninstaller can be run in 'silent mode' (with no interface showing) using a command line option.
The Always on top option makes the uninstall window always appear on top of all other windows on the desktop. The window will remain on top even if the user switches to another application.
The Show background window option makes your uninstaller run with a window in the background (covering the desktop). The settings for this background window are the same as the background window settings for your installer.
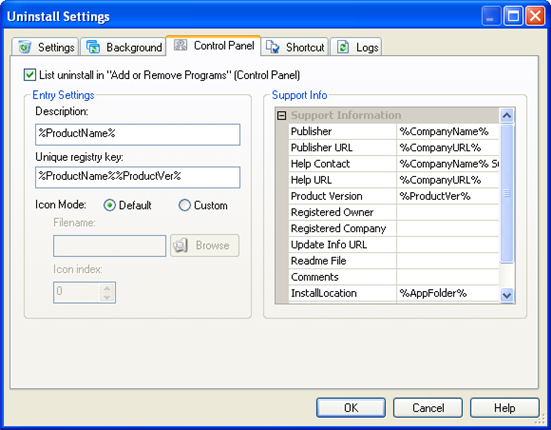
Setup Factory creates uninstalls that are extremely easy to use. One user friendly aspect is a control panel entry—specifically an entry in the Add or Remove Programs dialog—which makes uninstallation a breeze. The settings for this entry are found by choosing Uninstall > Control Panel, which opens the Uninstall Settings dialog directly to the Control Panel tab.
The first setting that you can configure on the Control Panel tab is whether or not to list the uninstall in the Add or Remove Programs dialog. Unchecking this option will prevent your installer from making this entry.
Assuming, however, that you choose to make this entry, the next settings to configure are the Entry Settings. This is where you can specify the description, Registry key, and icon to use for the control panel entry.
After the Entry Settings are configured, only the Support Info settings remain. The information you place here will be available from the Add or Remove Programs dialog and is often used to help the user identify your product.
Tip: For more information on any of these settings, see the program reference.
Typical control panel options:
A typical control panel entry:
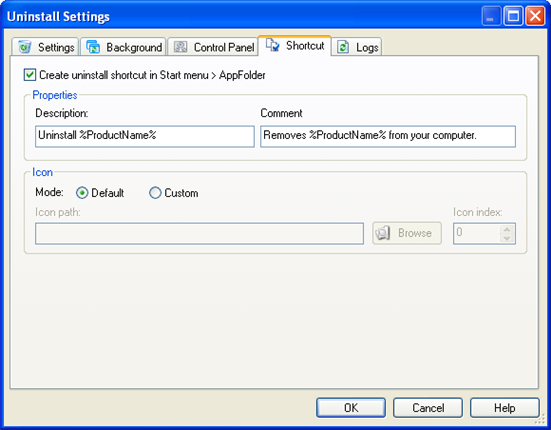
An alternative to creating an entry in the Add or Remove Programs dialog is to include an uninstall shortcut in the start menu. This option is found on the Shortcut tab of the Uninstall Settings dialog, and can be accessed from the design environment by choosing Uninstall > Shortcut. If enabled, this option will create an uninstall shortcut in the start menu alongside the other shortcuts created by your installation.
Typical shortcut options:
In the event that your uninstallation fails, having a log file available to diagnose the problem is often extremely helpful. Knowing exactly where and why your uninstall failed are two very valuable pieces of information. Setup Factory enables uninstallation logging by default.
You can configure the uninstall log file options or turn off this option entirely from the Logs tab of the Uninstall Settings dialog. You can access this dialog from the design environment by choosing Uninstall > Log Files.
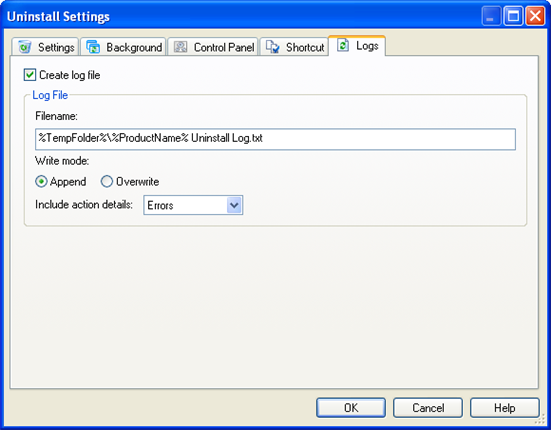
The settings on the Logs tab allow you to configure where the log file is stored, how the data is written, and what data is written to the log file.
Note: Do not disable this feature unless you are absolutely positive that you will never need the log file. Regardless of how much testing you do, there is always a chance that your installer will produce unforeseen behavior on some user's system. The task of diagnosing such problems is made exponentially easier with a log file. If there is a security concern, keep in mind that you can set the log file to include no action details, and then use your own actions to output only the information you deem appropriate.
The uninstall user interface can be configured similarly to how the installer was configured. By default, the uninstaller will use the theme settings from the installer, but these can be overridden on a screen-by-screen basis if you desire.
You can control the look and feel of your uninstaller just as you created your installer by adding, removing and manipulating the screens to be included. The uninstaller uses its own screens, independent of the screens included in the installer. By manipulating the various properties of each respective screen, you can have an uninstaller that reflects the look and feel of the original installer, or you can create an entirely new appearance.
Tip: For more information on configuring screens, please see Chapter 3.
Using Setup Factory, you can quickly and easily create an installer to suit most general requirements. However the real power of Setup Factory lies in the ability to use the free-form scripting engine, combined with a plethora of built-in actions, to perform whatever task you desire.
It is important to keep in mind that whatever tasks you perform using actions during your installation will not automatically be undone by the uninstaller. You must manually make use of the uninstall actions to undo whatever changes the installation actions made to the user's system.
With the above in mind, it is possible to automate some of the uninstallation tasks by making use of the UninstallData actions. These are a group of actions that allow you to interact with the uninstall configuration file directly, during both the installation and uninstallation. So instead of adding actions to the uninstall to reverse what your actions did during the installation, you can use UninstallData actions to modify the uninstall configuration file, and let the uninstaller take care of undoing the changes for you.
One advantage of this is that it allows you to put your "undo" actions in the installer, instead of in the uninstaller. This lets you keep the actions that undo your changes near the actions that made the changes in the first place, making it much less likely that you'll forget to update the uninstall actions whenever the install actions change.
Tip: For more information on actions and how to work with them, see Chapter 4. The command reference is also an excellent resource for learning about actions and the action wizard.
As with the installer, there are five uninstall project events: On Startup, On Pre Uninstall, On Uninstall Error, On Post Uninstall, and On Shutdown. These events are accessible by choosing Actions from the Uninstall menu.
It is up to you to decide where to place your actions based on the task that the actions are performing.
The On Startup event is the first event that is triggered in a Setup Factory uninstallation. This event is one of the first things that occurs and is your first chance to make anything happen in your uninstallation.
The On Startup event occurs before any screens are displayed. This makes it a good place to perform pre-uninstallation tasks, such as making sure the end user is positive that they want to uninstall.
The On Pre Uninstall event is triggered just before the uninstallation enters the uninstall phase and begins uninstalling files from the end user's computer. This event is fired right after the last screen in the Before Uninstalling screen stage is displayed.
The On Uninstall Error event is triggered when an error occurs during the setup's uninstall, allowing you to handle it in a custom way. If you would like to ignore the error that just occurred, you can call the Application.IgnoreLastError action on this event to ignore the last error that occurred.
The On Post Uninstall event is triggered after the uninstall phase of the uninstallation has completed, right before the first screen of the After Uninstalling screen stage is displayed.
The On Shutdown event is the last event that will be triggered in your uninstallation. It occurs after all screens in your uninstallation have been displayed and is your last chance to accomplish anything in your uninstallation. This is an excellent stage to complete any cleanup tasks, such as deleting temp files that you may have created earlier, or directing the user to your website.