This lesson will walk you through the final stage of AutoPlay project development: building and publishing your AutoPlay application.
In this lesson, you'll learn how to:
• Build to a folder on your hard drive
• Build a compressed executable
• Burn a CD-R, CD-RW, DVD±R, DVD±RW or BD-R/RE
This lesson takes approximately
10 minutes to do.
Starting the Lesson
If you're continuing from Lesson 8, you should still have AutoPlay running with the Tutorial project open. If so, you're ready to move on to the next exercise: Building to a Folder.
Otherwise, you'll need to open the project file that you saved at the end of Lesson 8.
When you save a project, AutoPlay automatically creates a project folder for it inside your "My Documents\AutoPlay Media Studio 8\Projects" folder. This project folder is where everything that belongs to the project is stored—including the project file, which contains all of the settings used in the project.
The project folder and the project file always have the same name that you gave to the project when it was created. The project file's name ends with a ".autoplay" file extension.
Since you named this project "Tutorial" in Lesson 1, the name of the project folder will be Tutorial, and the name of the project file will be Tutorial.autoplay. So, the path to the project file should be something like:
...\My Documents\AutoPlay Media Studio 8\Projects\Tutorial\Tutorial.autoplay
To open the project, you just need to open that project file.
The fastest publishing method is to build the project to a folder on your hard drive.
When you publish your project to a folder, AutoPlay uses the settings in the project file to generate an executable for your application. It then copies this executable—along with the entire contents of your project's CD_ROOT folder—to the output folder of your choice.
The only difference between building to a folder, and burning a CD, is where your application ends up. Building to a folder is essentially like preparing the contents of a CD in a folder before burning it.
Note: When you choose Publish > Build, a "Publish Warning" dialog may be shown. See Running on Windows Vista or Later for more information.

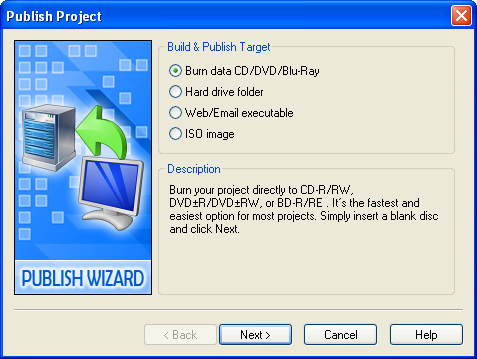
The first page of the Publish wizard lets you choose how you want to publish your AutoPlay application. The option you select on this page determines (a) what options are available when you click Next, and (b) what the end result of the build process will be.
You're going to publish the project to a folder on your hard drive, so select the Hard Drive Folder option.
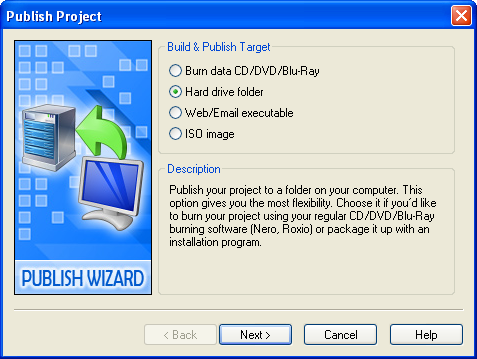
Clicking Next will bring you to the second page of the wizard where you can specify the output folder.
Tip: Even if you're planning to burn your project to a CD, it's a good idea to build it to a folder at least once first. That way, you can test your application without wasting a CD-R, or having to wait for a slow CD-RW burn. Once you've made sure that everything works the way you intended, you can either re-publish the project using a different method, or burn the contents of the output folder using an external CD burning program.
The output folder is simply the location where you want the application to be built. You can use any folder for this purpose, but it's best to create a new folder, since any existing files will be deleted before the application is built.
Warning! Any files in the output folder will be deleted during the build process! Be very careful not to use a folder that contains any files or subfolders you want to keep.
You can also select an output folder by clicking the browse button.
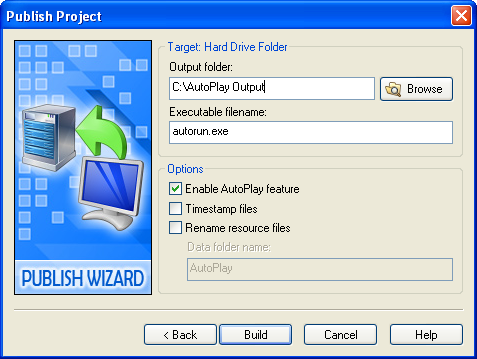
Tip: The output folder you choose doesn't have to be on a local hard drive; you could easily direct the output to a folder on a shared network drive, or even to some other form of storage, such as a USB memory key. The only requirement is that there is enough room on the device for your AutoPlay application.
AutoPlay will build the project and inform you when your application is ready. Since the project is fairly small, and the build process is very fast, you shouldn't have to wait too long. (On a fast system it shouldn't take more than five or six seconds.)
When you close the Publish wizard, AutoPlay will automatically open the output folder for you.
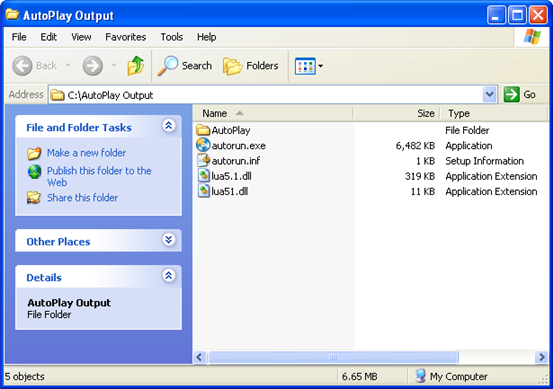
The contents of this folder are exactly what you would see on the root of the CD or DVD if you had burned your project to a disc instead of building it to a folder.
In fact, everything here is built and ready to go. You could select everything in the output folder, drag it into your CD burning software, and burn it onto a CD. Or you could use a tool like Setup Factory to package it up into an installer, so it can be installed on the user's hard drive like any other application. What you do with the project at this point is entirely up to you!
Of course, before you distribute your project, you should always test it thoroughly. To launch it, just double-click on the Autorun.exe file.
Once you've had a chance to try your application out, close the application and return to the AutoPlay design environment.
Now let's try building the project to a compressed executable.
For smaller projects, building a compressed executable is a great way to make the application portable. The entire project will be compressed into a single executable file, with all of the project's contents inside it. When you double-click on this file to launch it, the contents will be extracted to a temporary location on the local hard drive, and the application will run from there. The whole process is very seamless and automatic.
You can even choose to encrypt the contents, to prevent anyone from accessing them without launching the application.
Although you can technically build a compressed executable for a project of any size, it's better to reserve this method for smaller projects. The larger the project is, the longer it takes for the data to be extracted when the user launches your application. (The contents must be extracted each time the application is started.)
Tip: If the application is going to be used repeatedly, or is relatively large, you may want to use a professional development tool like Setup Factory to create a traditional installer for it. That way, the contents can be unpacked once (at install time) and then accessed like any other program, reducing launch times significantly.
Pressing F7 opens the Publish wizard, just like choosing Publish > Build from the program menu.
This time, you're going to publish the project as a single executable file.
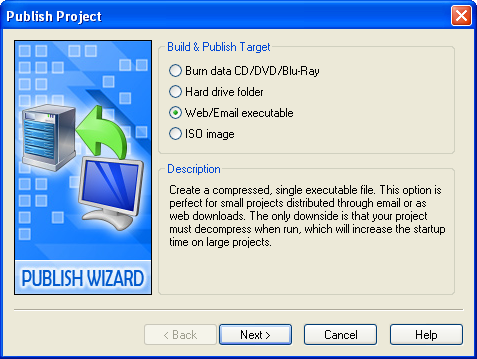
Clicking Next will bring you to the second page of the wizard where you can specify a path and filename for the executable file.
The Filename field lets you specify the full path and filename of the executable file that AutoPlay will build for you. By default, it will be set to build the application in your My Documents\AutoPlay Media Studio 8\Output folder, with the same name as the project file (but ending with .exe).
To change this setting, you can either type a new path into the field, or you can select a folder and filename by clicking the browse button.
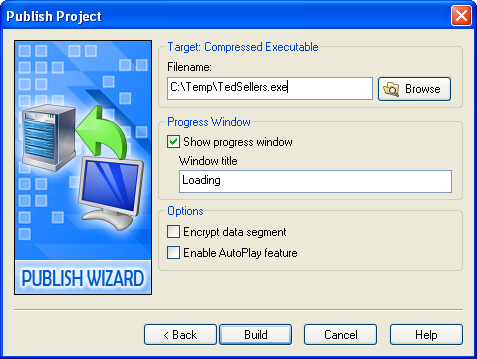
Setting a path and filename for the compressed executable
The Progress Window settings on this dialog let you configure the small popup "Loading" message that appears while the application is extracting the project data onto the local hard drive. For example, you could change the message from "Loading" to "Please wait..." or make it so it doesn't appear at all.
The "Encrypt data segment" option tells AutoPlay to encrypt all of the project data that it stores in the compressed executable. This adds a small layer of security to the application, so that users can't extract the project files directly from the executable using an external zip utility like WinZip.
AutoPlay will build the project and inform you when your application is ready. This build process is almost as fast as the hard drive folder option, so you shouldn't have to wait too long.
When you close the Publish wizard, AutoPlay will automatically open the C:\Temp folder for you. Inside that folder, you should see an executable file called TedSellers.exe.
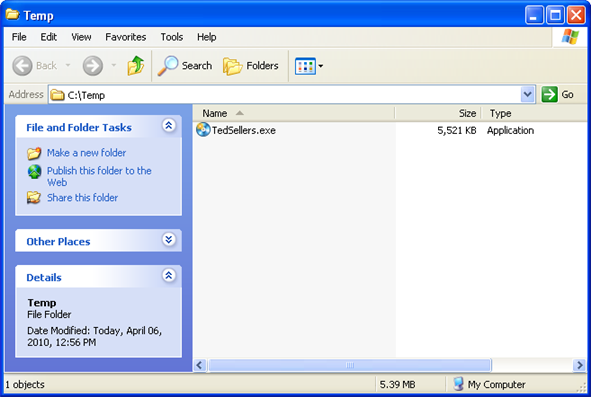
The entire application is contained within that file. When you double-click on it, the "Loading" message will appear as the contents are automatically extracted to a temporary folder on the hard drive, and then the application will run the same as before.
Note: When you build a compressed executable, there is only one file to distribute.
Once you've had a chance to try your application out, close the application and return to the AutoPlay design environment.
Note: A little bit of magic happens behind the scenes after you click the Exit button. As your application exits, it removes the files that it extracted to the temporary folder when you launched it. You don't have to worry about the files being left "exposed" in the user's temp folder, or about taking up space on the user's hard drive. Like any well-behaved program, your AutoPlay application cleans up after itself.
With its built-in burning engine, AutoPlay Media Studio makes publishing your project to a CD-R, CD-RW, DVD±R, DVD±RW, or BD-R/RE a piece of cake.
For this exercise, I'll describe the steps for burning a compact disc, so you don't have to keep reading "CD-R, CD-RW, DVD±R, DVD±RW or BD-R/RE" over and over. But the same principles apply for burning to DVD±R, DVD±RW and BD-R/RE.
Note: You will need a CD-R or CD-RW drive and a blank CD-R or CD-RW disc in order to complete this exercise.
Pressing F7 opens the Publish wizard, just like choosing Publish > Build from the program menu.
Note: We recommend using a CD-RW disc so you can reuse it afterwards.
This time, you're going to burn the project to a recordable CD.
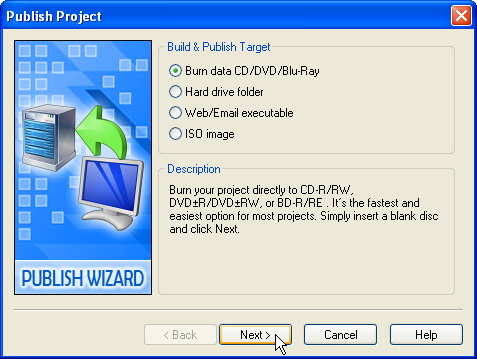
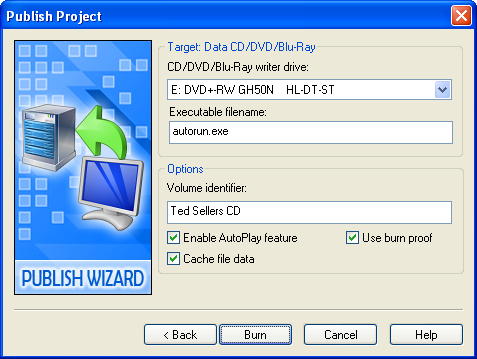
Clicking Next will bring you to the second page of the wizard where you can specify the burn options.
The "CD/DVD/Blu-Ray writer drive" drop-down list is provided in case you have multiple CD/DVD/Blu-Ray drives in your system. Select the drive that you will be using to burn the CD.
The "Volume identifier" field lets you specify the name of the CD as it will appear in the My Computer folder in Windows.
If you're using a CD-RW disc, a warning dialog will appear to ask if you’re sure you want to do so. You aren't burning a "master" disc to send to a duplication service, so just click Yes.
If the CD-RW isn't empty, another dialog will appear asking if you want to erase the disc. If you're sure that there isn't anything on this disc that you wanted to keep, then click OK and AutoPlay will erase the disc for you before burning the project. (If you put the wrong disc in by mistake, just eject it and replace it with a blank one.)
Once the burn is completed, the drive should automatically eject the CD.
After you insert the CD in the drive, you should hear it spin up as the drive begins to read the contents. The drive will look in the root folder of the CD for a file named autorun.inf which tells it the name of a program to load when the CD is inserted.
Note: AutoPlay automatically creates the autorun.inf file for you when the "Enable AutoPlay feature" option is turned on.
Your AutoPlay application should start up automatically. (If it doesn't, then the autorun feature is disabled on your computer. You will need to either re-enable it, or open the CD in My Computer and then double-click on the autorun.exe file yourself.)
Once you've had a chance to try your application out, close the application and return to the AutoPlay design environment.
That's it! You've just published your AutoPlay project to a CD.
You now know everything you need to know to build and publish a project just like this one.
Tip: In the next lesson, we'll start a new project so you can try out some of AutoPlay's scripting abilities.
Lesson 9 Summary
In this lesson, you learned how to:
• Build to a folder on your hard drive
• Build a compressed executable
• Burn a CD-R, CD-RW, DVD±R, DVD±RW or BD-R/RE