Audio is an important part of any multimedia application. Sound effects help make interactive objects like buttons "come alive," and provide useful cues to the user to help them recognize which objects are interactive. Background music can help set the right mood or enhance the emotional impact of your work. And in many cases, audio is an integral part of the application, whether it's in the form of music that you're distributing with an AutoPlay CD, or training materials presented in the form of spoken instructions.
In this lesson, you'll learn the basics of working with audio files, so you can make your applications sing...or talk...or maybe even inspire your users to get up and dance.
In this lesson, you'll learn how to:
• Change the default object sounds for your project
• Set object-specific sound effects
• Add background music
• Pause the background audio while a page is shown
• Load and play an audio file
This lesson takes approximately
35 minutes to do.
Starting the Lesson
If you're continuing from Lesson 7, you should still have AutoPlay running with the Tutorial project open. If so, you're ready to move on to the next exercise: Changing the Default Object Sounds.
Otherwise, you'll need to open the project file that you saved at the end of Lesson 7.
When you save a project, AutoPlay automatically creates a project folder for it inside your "My Documents\AutoPlay Media Studio 8\Projects" folder. This project folder is where everything that belongs to the project is stored—including the project file, which contains all of the settings used in the project.
The project folder and the project file always have the same name that you gave to the project when it was created. The project file's name ends with a ".autoplay" file extension.
Since you named this project "Tutorial" in Lesson 1, the name of the project folder will be Tutorial, and the name of the project file will be Tutorial.autoplay. So, the path to the project file should be something like:
...\My Documents\AutoPlay Media Studio 8\Projects\Tutorial\Tutorial.autoplay
To open the project, you just need to open that project file.
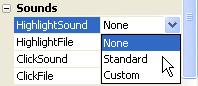
With the exception of the Flash, PDF, RichText, input, listbox, web, progress, combobox, tree and grid objects, all of the objects in AutoPlay can trigger two kinds of sound effects: one for when the user moves the mouse over them (a "highlight" sound), and another for when the user clicks on them (a "click" sound). For each object's sound effect, you have the option of playing either no sound at all, a custom sound specific to that object, or a standard sound defined in the project settings.
The standard sound makes it easy to change the sound effects for all of the objects in your project at once, without having to go to each object and change its sound settings individually.
In order to demonstrate how the default object sounds work, let's temporarily change the standard highlight sound for all objects in the project.
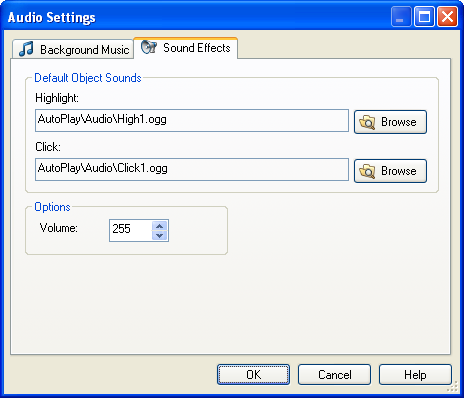
The Sound Effects tab is where you can choose the default highlight and click sound for all objects in the project—or at least, for all of the objects in the project that have their highlight or click sound set to "Standard." Any changes that you make on this tab will immediately affect the whole project.
AutoPlay comes with a number of sample sound effects that you can use in your projects. These sound effects are all in Ogg Vorbis format. Ogg Vorbis is an open-source audio compression format similar to MP3, but capable of greater sound quality and even smaller file sizes. Unlike other audio formats, Ogg Vorbis is patent and license free, making it an excellent choice for the distribution of digital audio.
Note: The MP3 codec is licensed by Fraunhofer IIS-A. If you generate revenue using music in MP3 format, you are responsible for paying them a percentage of each sale.
Ogg Vorbis files end in .ogg.
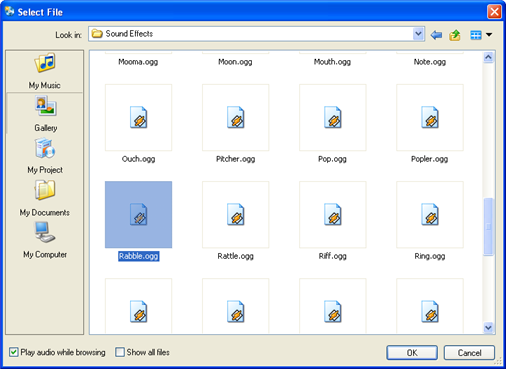
There's a "Play audio while browsing" option at the bottom of the Select File dialog that appears when you're browsing for audio files. It's turned on by default, so when you click on a sound file, it will automatically begin playing in the background. (You can turn the option off if you prefer to browse in silence.)
Note: Make sure you have your computer speakers turned on. If you don't have computer speakers, just hum something catchy, close your eyes and pick a file at random.
To preview the project, press F5. When the application opens, move your mouse over the buttons. The sound you picked as the default highlight sound should play when you move the mouse over each of the button objects.
All buttons have their highlight sound set to "Standard" by default. When you changed the standard highlight sound for the project, you changed the highlight sounds for all of the buttons in the project at once.
When you're ready to exit the preview, just click on the Exit button.
This will make the Email Address object play the standard highlight sound whenever the mouse moves over it. Since we're using this label as an interactive object, like the buttons on the page, making it play the same highlight sound will help the user identify the label as something they can click on.
Note: The Email Address label object is the one with "[email protected]" on it.
To change the highlight sound back to High1.ogg, choose Project > Audio and click on the Sound Effects tab. Click the highlight setting's browse button, and use the Select File dialog to select the High1.ogg file. Click OK on the Select File dialog, then click OK on the Audio Settings dialog, and you're done.
The highlight sounds have all been changed back to the original highlight sound. And since you set the Email Address label object's highlight sound to "Standard," it now has the same highlight sound as well.
Aren't you glad you didn't have to change the sound for all objects in the project one object at a time? And this tutorial is fairly small...imagine working on a hundred-page project with thousands of buttons in it. This feature may not seem that exciting at first glance, but in the long run it can be a real time saver.
Tip: It's a good idea to use the default object sounds wherever possible, because it makes it much easier to change the sounds throughout your project later.
You aren't always going to want every object to use the same sound. Some objects were just made to sound different. Luckily, AutoPlay lets you specify a custom sound for each object's sound setting. In fact, if you wanted, every object in your project could have a unique sound.
Let's give the Email Address label object a custom click sound.
The Email Address label object still needs a sound effect for when the user clicks on it. We could use the standard click sound if we wanted, but since clicking on this object does something a bit different, let's make the click sound a bit different as well.
(When the user clicks on this object, the File.OpenEmail action starts a new message in the user's regular email program. Since this happens "outside" of the application—like clicking on a web link that opens a pop-up page in another window—we'll reflect the difference by giving the object a different kind of click sound.)
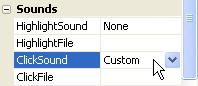
By default, label objects are configured to make no sound at all. When you set the ClickSound setting to "Custom," the object will use whatever file you specify in the ClickFile setting.

Clicking on the browse button opens the Select File dialog so you can select the audio file that you want to use for the object's click sound.
The Sound Effects folder should be where you were browsing the last time you selected an audio file, so you shouldn't have to do anything to navigate into it. If you followed the past few steps, you're already there.
Note: The Select File dialog always opens up at the same place you navigated to the last time you selected that kind of file.
This will give the Email Address label object a "pop" sound when you click on it.
The files in the Sound Effects folder have such cool names
AutoPlay makes it really easy to add a list of songs and have them play in the background. Like a soundtrack in a movie, background music can enhance the mood and add atmosphere and emotion to your application.
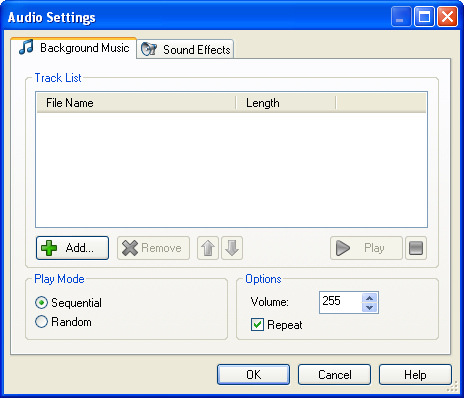
The Background Music tab is where you can put together a list of songs that will be played in sequence while the user is browsing your application.
The songs can be played back sequentially, in the order that they are listed, or you can choose to have them play back at random.
You can also specify the volume at which the background audio will play, and whether the whole list should repeat—which is to say, whether the background music should start over from the beginning when the last track has been played.
The first time you click the Add button on the Background Music tab, the Select File dialog automatically takes you to the Music folder. (From that point on, it remembers what folder you were in the last time you selected a background music audio file.)
As you add songs to the list, they are automatically copied
into your project's Audio folder, so that they will be included when you
publish the project to a folder or burn it to a CD. This song will end
up in the project folder as "CD_ROOT\AutoPlay\Audio\
Acoustic Folk (short).ogg."
You can add all of the sample songs if you want, or just pick and choose the ones you like.
Feel free to add some favorite songs to the mix from your own collection, too.
Note: The songs will be played back in the same order that they appear in on the list.
Once a song has been added, you can change its position or remove it by using the buttons beneath the list.
Tip: You can also rearrange the songs by dragging them up or down with the mouse.
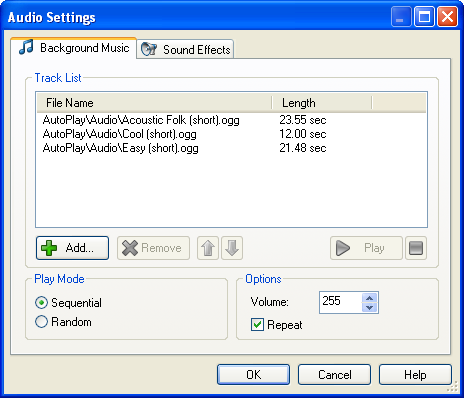
Three sample tunes from the gallery
The background music starts up as soon as the application starts, and keeps playing until it closes. Note that jumping to another page doesn't interrupt the music at all...it just keeps on playing, smooth as always.
Even jumping to the video page doesn't stop the background music. When the video starts playing, its audio plays over top of the background music. The video has its own soundtrack, but it just gets mixed together with the background music of the application.
It sounds pretty bad, because the video's audio track and the background music were definitely not meant to be played at the same time. But we can fix that by pausing the background music while the user is on the video page.
Just click the Exit button or press Alt+F5 to close the application and return to the AutoPlay design environment.
There are times when you'll want the background music to stop playing. For instance, if you have a video object that has its own soundtrack, you probably don't want it to clash with the background music, so you'll want to pause the background music while the video is being shown.
In our case, the video is shown while the user is on the Video page, so we need to turn the music off when they reach that page, and turn it back on when they leave it. This is easy to do with a pair of Audio.TogglePlay actions.
Tip: You can use this same technique to add a toggle button so the user can turn the music on or off—just in case their taste in music is a bit too different from yours.
Before you can add any actions to the Video page's events, you need to switch to the page. To do that, just click on the Video page's tab.
The Audio.TogglePlay action toggles an audio channel's playback between playing and paused. If there is currently audio playing in that channel, the action will pause it; if the audio in that channel is currently paused, the action will un-pause it.
To add the action, double-click on the page surface, and click on the Script tab. In the script editor, click on the On Show tab, and then click the Add Action button to bring up the New Action wizard. Change the category to "Audio," select Audio.TogglePlay from the list, and click Next to edit the action’s parameters.
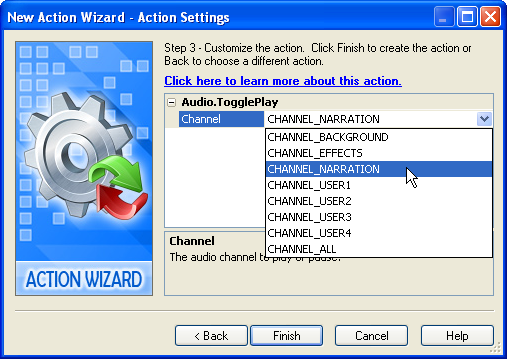
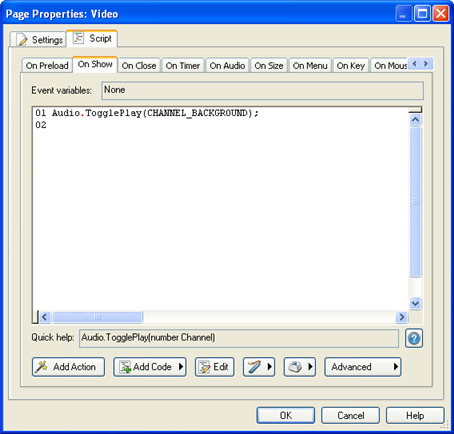
In the action parameters, you can specify the channel that you want the action to toggle. In this case, we want to toggle the playback of the background audio channel, so you need to change the Channel setting to CHANNEL_BACKGROUND.
Once you have the action configured, click Finish to close the wizard. The Audio.TogglePlay action will appear in the script editor.
Note: Don't close the script editor just yet; you need to add an action to the On Close event as well.
The On Show event is triggered whenever the page opens. The background music will still be playing when the user leaves Page1, so this action should pause the music when the user arrives at the Video page.
We want to add another Audio.TogglePlay action to the On Close event for this page, to toggle the background music back on when the user jumps back to the main page. It needs to be just like the action you added to the On Show event, because we want the two actions to balance each other out—one to turn the audio off, and one to turn it back on again.
You could click on the On Close tab and then add another action the same way you did in step 2. But since we want this action to have the same parameters as the first one, you might as well save yourself a bit of time and just copy the text from one tab to the other.
To do so, just select the whole line of text and press Ctrl+C to copy it into the clipboard. Then, click on the On Close tab, and press Ctrl+V to paste the text onto it.
Note that this won't affect the action that you added to the On Show tab at all—the actions you add to one tab stay the same when you switch to another one. You're just making a change to both events at the same time.
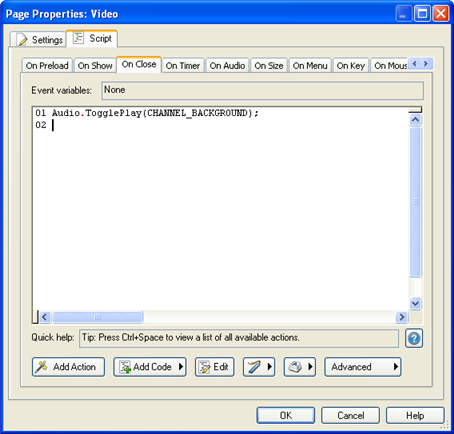
Once you've configured the action for the On Close event, click OK to close the script editor and confirm your changes.
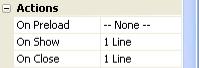
In the properties pane, both events should now show "1 Line" next to them.
Now the background music stops when you arrive at the Video page, and the video's audio plays all by itself.
This is because the Audio.TogglePlay action is pausing the background channel on the page's On Show event.
When you click on the Back button, the background music starts playing again, right where it left off. This time it's the Audio.TogglePlay action on the page's On Close event that is toggling the background audio channel back on.
That's it for this preview, so click on the Exit button (or press Alt+F4) to exit the application and return to the AutoPlay design environment.
Now that you know how to pause the background music, let's tackle playing an audio file in response to an event. For example, you might want to start playing an audio file when the user clicks on a button, or when the user jumps to a specific page.
For this exercise, we'll play a different audio file while the user is on the About Ted page.
Before we start playing a different song, we need to pause the background music. Although we could use an Audio.TogglePlay action to do it, like we did on the Video page, let's use an Audio.Pause action this time.
To add the action, just click on the Add Action button, select the Audio.Pause action from the list, and click Next to get to the action's parameters. Set the Channel parameter to CHANNEL_BACKGROUND, and click Finish.
That will pause the background music. Now we need an action to play a different audio file.
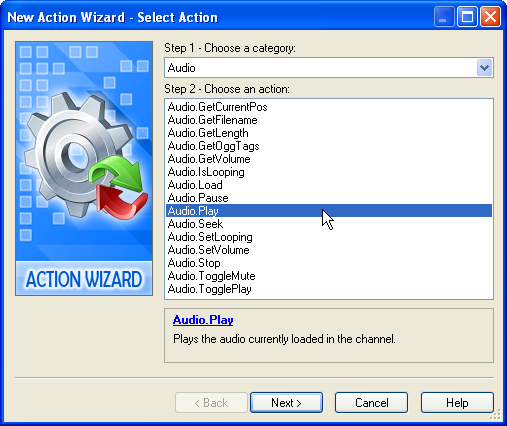
If you were looking through the list of audio actions, and you wanted to play an audio file, you might head straight for Audio.Play. But when you clicked Next to customize the action, you wouldn't see any way to specify an audio file. All you would find is a single parameter letting you select the audio channel that you want to play.
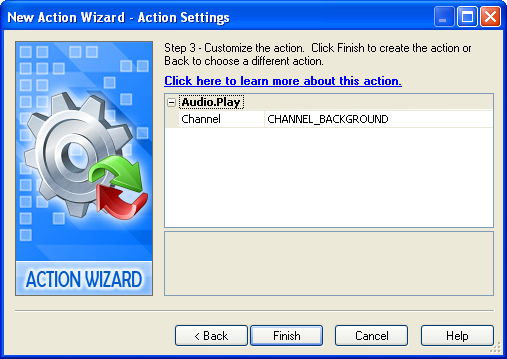
This is because the Audio.Play action is used to start playing a file that has already been loaded into an audio channel.
In fact, the Audio.Play action assumes that you've already loaded an audio file into a channel using an Audio.Load action.
Luckily, the Audio.Load action gives you a way to do both at the same time.
The Audio.Load action certainly has more parameters to play with.
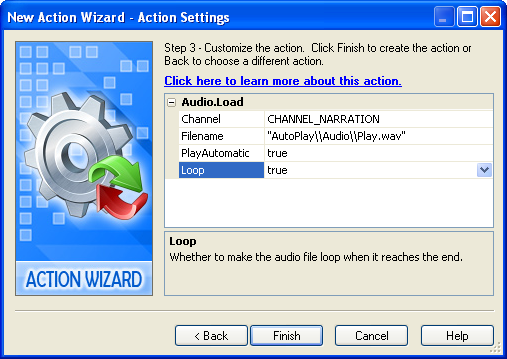
We want the audio file to play in a different channel than the background music, so leave the Channel set to CHANNEL_NARRATION. The name implies that this channel is for "spoken" audio, but that's only one use for it. You're free to use the channel for other forms of audio, which is exactly what we're going to do.
Note: We don't want to use the background audio channel for this, because it's already occupied by a song from the Background Music tab...and we only want to replace that music "locally" on the About Ted page—not everywhere. Since we're only after a temporary change, we need to leave the background audio channel alone.
Setting PlayAutomatic to true tells the action to begin playing the file automatically as soon as it's loaded. Since we don't know how long the user will remain on this page, we want the file to keep playing in the background until the page closes. This means that we need the file to loop when it reaches the end, so make sure Loop is set to true as well.
Note: Don't close the wizard yet—you still need to tell the action which audio file to load.

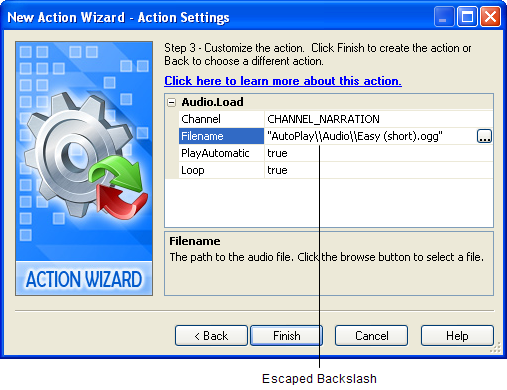
When you click on the browse button, the Select File dialog appears so you can select an audio file. This is the file that the action will load.
Tip: If you'd rather use your own music, click one of the other buttons and look for an audio file somewhere on your system.
Once you select an audio file, AutoPlay will copy it to your project's Audio folder and put the appropriate path into the Filename parameter for you. It also automatically escapes all of the backslashes in the path.
Inside a string like the Filename parameter, a backslash character is used to indicate an escape sequence. For instance, in strings a newline is represented by the sequence \n. Those two characters are the escape sequence that represents the invisible character you type by pressing the Enter key.
Given that a backslash indicates the beginning of an escape sequence, we need some way to represent a normal, actual backslash in a string. As you can see, this is done by using a pair of backslashes. In fact, \\ is an escape sequence that represents a single (normal) backslash.
This may seem a little bit complicated, but don't worry...you can always use the browse button to select a file, and AutoPlay will handle all the double-backslashes for you. But if you ever want to edit a string directly, just remember that you need two backslashes (\\) to represent a regular backslash in a string.
When you close the wizard, the second action will appear on the script editor, just below the first one. The end result should look like this:
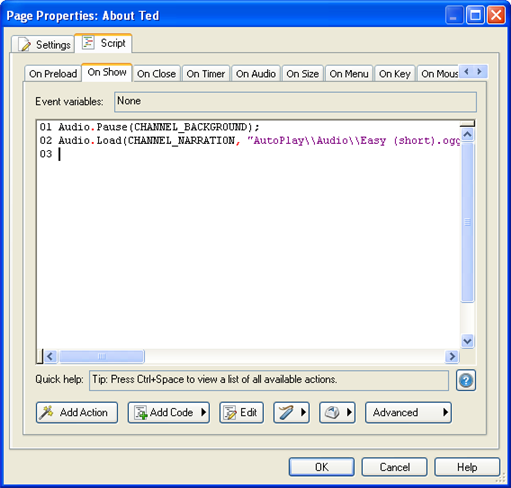
{Of course, the filename may be different if you chose a different file.)
This will add two actions to the On Close event: an Audio.Stop action, to stop the song that is playing in the "narration" channel; and an Audio.Play action, to start playing the background music again.
Note: You could also add these actions by clicking the Add Action button and using the New Action wizard. If you feel more comfortable doing it that way, you can...there's nothing wrong with using the wizard. One way isn't any "better" than the other. In fact, I tend to use both methods myself...typing in the actions that I've become familiar with, and using the wizard to add actions that I'm not so sure about.
We need the Audio.Stop action to stop playing the song that we loaded with the Audio.Load action on the On Show event. We need the Audio.Play action to start playing the "normal" background music that we paused with the Audio.Pause action on the On Show event. The whole progression will go something like this:
Step 1: Page opens
Step 2: Audio.Pause -- pauses the background music
Step 3: Audio.Load -- loads our page-specific song
Step 4: Page closes
Step 5: Audio.Stop -- stops our page-specific song
Step 6: Audio.Play -- unpauses the background music
Clicking OK on the script editor will finish adding the four actions to the two page events, confirming all of the changes that you've made. The properties pane will show that there are "2 Lines" of action script for both the On Show and On Close events.
You now have two actions on the On Show event (Audio.Pause and Audio.Load), and two actions on the On Close event (Audio.Stop and Audio.Play).
As soon as you jump to the About Ted page, the background music will pause, and the audio file that you selected in step 3 will begin playing in its place. This is the result of the two actions on the page's On Show event, firing one after the other in sequence.
As you leave the About Ted page, the audio file that you selected in step 3 will stop playing, and the original background music will continue where it left off. This time, it's the two actions you added to the On Close event at work.
When you're done previewing the project, exit the application and return to the AutoPlay design environment.
That's it for this lesson! Be sure to save your changes before moving on.
Lesson 8 Summary
In this lesson, you learned how to:
• Change the default object sounds for your project
• Set object-specific sound effects
• Add background music
• Pause the background audio while a page is shown
• Load and play an audio file