This lesson is all about interactivity. Interactivity is important-it lifts your AutoPlay application above the limitations of mere pamphlets and traditional business cards that dwell in the lowly realm of paper. Interactivity makes your application seem alive and responsive, and lets it actually perform important tasks for the user, just like any other Windows program.
There are several ways to make your applications interactive, but the three most important tools at your disposal are buttons, actions and pages. Buttons are one of the coolest features of AutoPlay. They look great, are easy to use, and instantly give your application a truly professional polish. Actions, and the events that you add them to, let you make your application do stuff. Pages are the surfaces that you put buttons and other objects on. And since your imagination shouldn't have to fit on one page, we'll show you how to add more pages to your project.
In this lesson, you'll learn how to:
Add interactive buttons
Match the width and height of several objects at once
Change the appearance of the button text
Duplicate multiple objects
Add simple actions like Application.Exit and File.Open
Add a blank page to the project
Duplicate an existing page
Add navigation buttons using Page.Jump actions
Copy objects from one page to another
Send email with a Quick Action
This lesson takes approximately
30 minutes to do.
If you're continuing from Lesson 3, you should still have AutoPlay running with the Tutorial project open. If so, you're ready to move on to the next exercise: Adding Buttons.
Otherwise, you'll need to open the project file that you saved at the end of Lesson 3.
When you save a project, AutoPlay automatically creates a project folder for it inside your "My Documents\AutoPlay Media Studio 8\Projects" folder. This project folder is where everything that belongs to the project is stored including the project file, which contains all of the settings used in the project.
The project folder and the project file always have the same name that you gave to the project when it was created. The project files name ends with a ".autoplay" file extension.
Since you named this project "Tutorial" in Lesson 1, the name of the project folder will be Tutorial, and the name of the project file will be Tutorial.autoplay. So, the path to the project file should be something like:
...\My Documents\AutoPlay Media Studio 8\Projects\Tutorial\Tutorial.autoplay
To open the project, you just need to open that project file.
Buttons are special interactive objects. They respond automatically to the user by changing their appearance when you move the mouse over them or click on them. In fact, each button has four different appearances, or "states," built into it: Up, Down, Highlight, and Disabled.
There's a different image for each state built right into the button file. By switching between these images, a button can appear animated and interactive-glowing when the user moves the mouse over it, for instance, and appearing pushed in when the user clicks on it. With full support for alpha transparency and variable opacity, buttons can even come with built-in drop shadow effects and have smooth, rounded edges.
Buttons are a great place to put actions, since they usually look like something you would want to click on. And to help the user know what the buttons will do, each button can have custom text on it, just like a label object. The text can even change color in each of the different states, so it fits in with each states appearance perfectly.
Buttons come in all shapes, sizes and colors. The professionally-designed buttons that come with AutoPlay resize well and even look great when they're stacked on top of each other, thanks to the built-in drop shadows which give our buttons a nice, three-dimensional appearance.
In short, buttons rock.
Tip: If you need more buttons, you can purchase add-on packs from Indigo Rose. Or just build your own buttons using the AutoPlay Media Studio Button Maker, which you can access by choosing Tools > Button Maker.
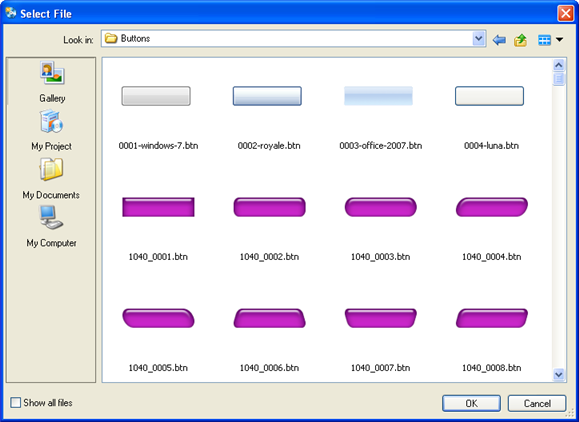
Choosing Object > Button opens the Select File dialog so you can select a button file to add.
Tip: You can also add a button object by clicking the New Button Object button.

To select the 0001-windows-7.btn file, just find it in the list of button files and click on it. (You may have to scroll the list to find it. As you're scrolling, have a look at the other buttons that are included. There are a lot of cool buttons in there.)
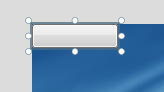
When you click OK on the Select File dialog, the dialog closes and the button is added to the project. Like all objects that you add in this way, it starts out positioned in the upper left corner.
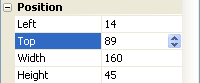
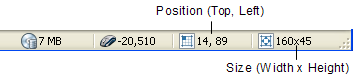
To resize the button object, you can either drag the resize handles, or set the width and height directly in the Position category of the properties pane.
To position the object, either move it into place by dragging it, or edit its Top and Left settings directly.
Tip: If you prefer
the drag method, you can use the position and size readouts on the status
bar to set the object's size and position precisely.
Now let's change the text to something that better describes what this button does. (Or in this case, what the buttons going to do, once we add an action to it later in this lesson.)
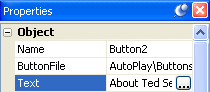
The Text setting is found inside the Object category. This should be the first category at the top of the properties pane.
Note: If the Object category isn't visible, then the button object isn't selected - in that case, click once on the button object to select it.
To change the text that is displayed on the button object, highlight the contents of the Text setting and type the new text in. (In this case type in the words Ted Sellers Online.)
Tip: A quick way to select all of the text in a setting is to double-click on the name of the setting in the left-hand column of the properties pane. In this case, that means double-clicking on the word Text itself. Whenever text in a field is highlighted, anything you type will instantly replace the highlighted text.
When you're done typing the new text in, press Enter.
Note: Don't worry if the text is to big to fit on the button...we'll change the buttons font size in a moment.
(Later in this lesson, well add an action to this button to make it open Teds website.)
In Lesson 2, you opened the Project pane by choosing View > Panes > Project Browser. It should still be tabbed on the right side of your screen, together with the Gallery pane. In that case, all you need to do is click on the Project panes tab to bring it to the front.
If the Project pane isn't visible anywhere on your screen, choosing View > Panes > Project Browser will toggle it on. (There will be a check mark next to Project Browser in the View > Panes menu when the Project pane is visible. If that check mark is already there, it means the Project pane is actually somewhere on the screen already.)
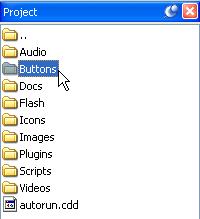
Double-click on the Buttons folder
Double-click on the Buttons folder in the Project pane. This will show you a list of all the button files that have been added to your project so far. Since you've only added one kind of button, there should only be one item in this list: the 0001-windows-7.btn file that you added earlier.
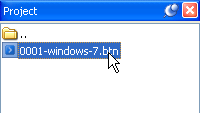
Selecting the button file
Note: This was explained more fully in Lesson 2, but here are the basics to refresh your memory. Every project you create has its own folder, called the project folder. Each project folder is divided into subfolders. When you add a button file to your project, a copy of the file is placed inside the Buttons subfolder. You can use the Project pane to navigate to this subfolder.
When you click on the 0001-windows-7.btn file on the Project pane, a fully working preview of the button appears on the Preview pane. (If the Preview pane isn't visible, use the View > Panes > Resource Preview menu item to toggle it back on.)
You can use the Preview pane to see how the button will respond to the mouse in your completed application.
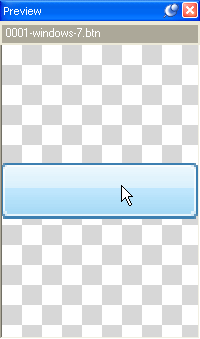
Trying it out in the Preview pane
Move the mouse over the button in the preview area. See how it changes its appearance slightly? This is the buttons highlight state. (Buttons become highlighted when you move the mouse over them.)
Click on the button in the preview area, and it changes its appearance again. This time, you're seeing the buttons down state. (Buttons are typically pressed down when you left-click on them.)
Move the mouse away from the button in the preview area, and it returns to normal. This is the buttons up state.
Note: The Preview pane allows you to try a button before you add it to your project.
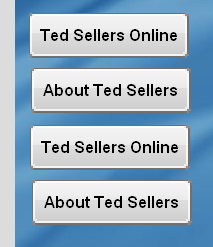
To add the button to the page, just drag the 0001-windows-7.btn file from the Project pane onto the page. A new button object will be placed at the spot where you drop the file. Move the new button object to just below the first one.
Tip: You can also drag a button directly from the Preview pane.
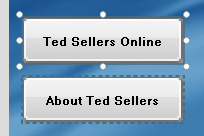
When you change the Text setting, About Ted Sellers appears on the button object. (Later on, we'll make this button jump to another page that has information about Ted on it.)
The new button object that you added doesn't have the same width and height as the first one. This is because the new object still has its default width and height - it hasn't been resized yet like you resized the Ted Sellers Online button.
You could resize the About Ted Sellers object the same way you resized the Ted Sellers Online button, but theres an even faster way to do it. Using the alignment tools, you can get one object (or many objects!) to match another objects width or height in no time flat.
The first step in matching an objects width or height is to select the objects that you want sized the same, with the object that is already sized correctly as the dominant object. We want the size of the new About Ted Sellers button to match the size of the Ted Sellers Online button, so the Ted Sellers Online button needs to be the dominant object.
This makes the About Ted Sellers button the same width as the Ted Sellers Online button...
...and now the About Ted Sellers button is the same height as the Ted Sellers Online button, too.
Tip: You can also just choose Align > Make Same Size to match the width and height together in one step.
Much like label objects, button objects give you a great deal of control over the appearance of the text that appears on them. You can change the font family and size, make the text bold or italic, and also change the color.
In fact, each button has a different text color for each state the button can assume. This allows the text color to change as the appearance of the button changes. Not only does this contribute to the interactive appearance of the object - making the text brighten as the mouse moves over the button, for example - but it allows the text color to be adjusted to complement the changing color of the button itself. (Black text on a blue button would disappear if the buttons down appearance was also black.)
Lets change the text settings on these buttons a bit so the text will change color when the user interacts with the button.
The default font size of 9 points is a bit small for these buttons. To change the size, change the FontSize setting from 9 to 12.
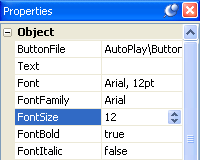
Changing the font size for both buttons at once
To change the font family, just click on the Family setting, click the select button, and select Arial from the list.
Note that, since two button objects are selected, the properties pane only shows the settings that can be changed for both objects at once.
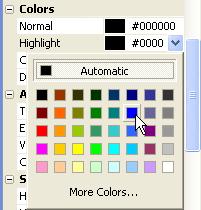
This is the text color that will be used for the buttons Highlight state, which is shown when the mouse pointer moves over the button.
You wont be able to see this effect until you actually see the project running, though; while you're working on the project, the button is always in its Normal state, so the words Ted Sellers Online will still be black.
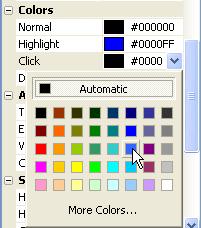
This text color will be used when the button is in its Click state, which is shown when the left mouse button is clicked on the object.
Hey, it works! Each button changes its appearance and text color as you interact with it. Pretty cool, huh?
Note: If you have your computer speakers turned up, you may hear sound effects as you move the mouse over the buttons and click on them. I'll show you how to change these default sounds in Lesson 8. In the meantime, don't be freaked out by the beeps and clicks. (If you hear voices, though, you have my permission to be as freaked out as you want to.)
To exit from the preview application, either click the close button on the applications title bar, or press Alt-F4 while the application is selected.
When you exit from the application, you should be returned to the AutoPlay design environment. If not, use Alt-Tab to bring AutoPlay back to the foreground.
Once you have a couple objects set up the way you want, its easy to add more objects with the same exact settings. Just duplicate em!
Both objects are duplicated instantly. Welcome to button cloning! Note that you can easily duplicate multiple objects at once.
The new button objects have the same settings as the originals, with only two exceptions: the names are different (because they have to be), and they're positioned a bit down and to the right (so its easier to see the new objects).
You can't see the object names in the properties pane at the moment - object names are hidden when you have multiple objects selected. But they are different.
Note also that the new button objects are selected, and the originals aren't. This makes it easy to move the new objects somewhere else - you don't have to bother with deselecting the old ones first.
Tip: When you need to add lots of similar objects, you can keep pressing Ctrl+D to add more and more clones to the page.
Just drag the two objects down together so the four buttons form a sort of column on the page.
Before you change the text on the third button, you need to deselect the other button first. Otherwise, you'll end up changing the text on both buttons.
To deselect the other (fourth) button, just ctrl-click on it. This will remove it from the current selection, leaving only the third button selected. Or, if you prefer, you can click on the page surface to deselect everything, and then click on the third button (Button3) to re-select it alone.
Once you have Button3 selected by itself, change the Text setting from Ted Sellers Online to Video Presentation by double-clicking on it and changing the text field.
This button will be used to jump to a page with a short video on it. (Well add the action to perform this magic later.)
Double-clicking on a button object opens the Button Properties dialog and automatically highlights all of the text in the Text setting for you.
When you type in the word Exit, it replaces the existing text.
Tip: A quick way to change the text in a button object is to double-click on it, type in the new text, and click OK.
As you've probably guessed, this button will be used to exit the application.
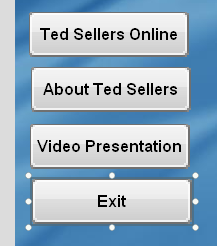
Before we add any actions to these buttons, lets line them up nicely on the left side of the page.
To confirm an objects position, just select it (by clicking on it) and either look at the position readout on the status bar, or look at the Left and Top settings in the Position category of the properties pane.
Note: 14, 89 is shorthand for 14 pixels from the left, and 89 pixels from the top.
To move the Button4 button object, either drag it into place (using the position readout on the status bar as a guide), or set its Left and Top settings to 14 and 270, respectively.
Right-clicking on the top button object will make it the dominant object. When you choose Align > Left, all four buttons are lined up with that object.
When you choose Align > Distribute Vertical, the two middle objects will be repositioned so there is an equal distance between all four of the objects.

Now lets make the buttons do something.
In AutoPlay, getting an object to do something means adding an action to one of the events that the object can respond to.
Events are just things that can happen when your application is running. For example, most objects have an On Click event, which is triggered when the left mouse button is clicked on that object. To make something happen when the object is clicked, you simply add an action to its On Click event.
Actions are just commands that tell the application to do something. There are actions to do all sorts of things, like changing the text in a label object, running external program files, telling a video object to start playing, or jumping to another page.
Quick Actions are special easy-to-use actions that take care of simple tasks without any scripting. For example, most objects let you configure a single Quick Action that will be performed when the object is clicked. Adding a Quick Action is an easy way to make something happen when you click on an object.
Every object has its own events, and each event can have its own actions. The actions that you add to an objects event are only performed when that specific event is triggered - in other words, events are object specific. This means that your application can do completely different things when the user clicks on different objects. For example, you could make clicking on one object start playing an audio file, while clicking on another object makes the application jump to another page. Each click would trigger the specific objects On Click event, causing that events list of actions to be performed.
In order to add an action to the Exit button, you need to have that button object selected by itself. Clicking on the page surface deselects all of the objects, so you can select the Exit button object on its own.
The Actions category is the last category in the properties pane. When you have an object selected, all of the places where actions can be defined for the object are listed in this category.
Tip: You might need to scroll to the bottom of the properties pane in order to see all of the items in the Actions category.
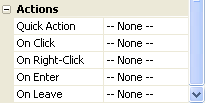
These places generally correspond to the events that the object can detect and that you can respond to. (The lone exception is the Quick Action, which is essentially a simpler version of the On Click event.)
It looks like this button object has five places where actions can be defined:
Quick Action, which is where you can choose from a list of the most common responses to a mouse click on the object and "program" it using a streamlined configuration interface
On Click, which is triggered when you click on the button
On Right-Click, which is triggered when you right-click on the button
On Enter, which is triggered when the mouse moves onto the button (when the mouse pointer enters into the objects space)
On Leave, which is triggered when the mouse moves off of the button (when the mouse pointer leaves the objects space)
Note: Any transparent parts of the object are ignored as far as On Enter and On Leave are concerned. The mouse has to actually enter or leave a non-transparent part of the button for the event to be triggered.
Right now, all six items have -- None -- next to them, which indicates that no actions will be performed when these events are triggered for this object.
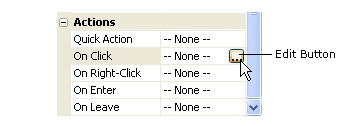
Clicking the edit button opens the script editor.

The script editor is where you can add actions to each of the objects events. There are four tabs on the script editor - one for each of the events that this button object can respond to.
Note: There is always one tab on the script editor for each event an object can respond to. If you select an object that has five events, there will be five tabs in the script editor.
When you click the edit button in the properties pane, you're automatically taken to the corresponding tab on the script editor. For instance, since you clicked the edit button for the On Click setting, the script editor opened directly to the On Click tab. If you had clicked on the On Leave setting instead, and then clicked the edit button, the script editor would have opened to the On Leave tab.
The New Action wizard will walk you through the process of adding an action to the script editor. The first step is to choose a category using the drop-down list. (In this case, it isn't really necessary, since the action we want to add is already visible in the default All Actions category. But it doesn't hurt to become familiar with the way the wizard works.)
When you choose the Application category from the drop-down list, all of the actions in that category will appear in the list below.
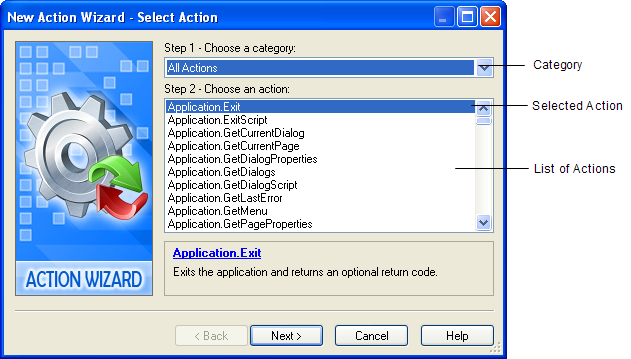
To select an action from the list, just click on it.
When you select an action in the list, a short description appears in the area below the list. In this description, the name of the action will appear in blue.

Click the action name to access action-specific help
You can click on this blue text to get more information about the action from the online help. (Go ahead and click on the blue Application.Exit to see the online help topic for this action. When you're done, just close the online help window and return to the AutoPlay design environment.)
Some actions have one or more settings that you can configure in step 3 of the action wizard. When that is the case, you can click the Next button to advance to step 3, where you can customize the action.
In this case, the Application.Exit action allows you to specify a return code that will be returned by your AutoPlay application after it exits. (This allows you to pass information back to the program or batch file that launched the application, for example if an error occurred you could return an error code so the batch file could proceed accordingly.)
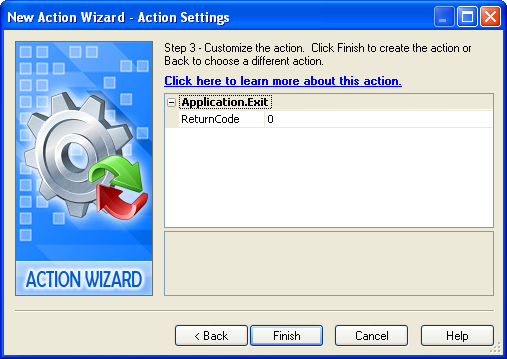
For our purposes, the default return code of 0 is fine. (This is the standard return code that programs use to indicate that everything's okay.)
Clicking Finish on the New Action wizard will close the wizard and add the action to the script editor.
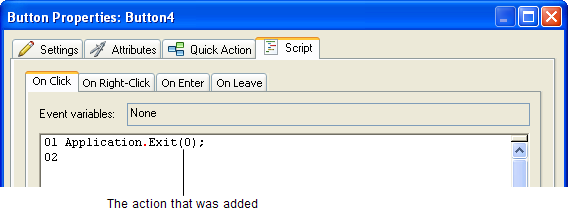
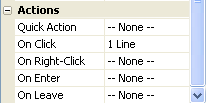
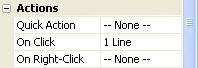
When you click OK on the script editor, the script editor will close, and the On Click setting in the properties pane will have 1 Line next to it. The properties pane always shows how many lines of script there are in each of the selected objects events.
It works! Clicking on the Exit button triggers that objects On Click event, which causes the On Click script to be performed. Since you put an Application.Exit action in the script for that event, the application closes.
Note: The Application.Exit action causes an immediate exit from the application.
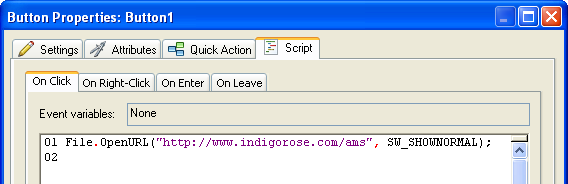
Adding a File.OpenURL action to the Ted Sellers Online button object (the one named Button1) is a lot like adding an Application.Exit action to the Exit button object. Just select the button object, click on the On Click setting, and click the edit button to bring up the script editor.
When the script editor opens, click the Add Action button to open the New Action wizard. Choose the File category from the drop-down list to see the list of File actions, and then click on File.OpenURL.

Once you have the File.OpenURL action selected, click Next to move on to step 3 of the New Action wizard. This is where you can configure the actions parameters.
Parameters are just values that get passed to an action. They tell the action the information it needs to know in order to do what we want it to do. For instance, in the case of our File.OpenURL action, the action needs to know what URL we want it to open. So, the first parameter lets you specify the URL of a website.
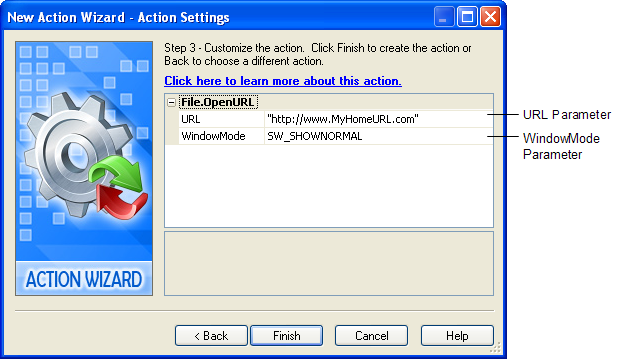
Since Ted doesn't actually have a website, well use the AutoPlay Media Studio website for this parameter, just for testing purposes. To do that, simply double-click on the URL setting and type "http://www.indigorose.com/ams" into the text field. (Feel free to substitute another websites URL if you want.) When the action is performed, it will open the users default web browser and navigate to this URL.
Note: Make sure you include the quotes! Text strings need to be quoted in action parameters.
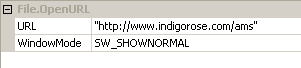
The other parameter, WindowMode, lets you specify how the users default web browser should open up - either normally, minimized, or maximized. Its set to SW_SHOWNORMAL by default, which is fine for our purposes.
Tip: The File.OpenURL action can also be used to open local HTML files. Just click on the URL parameter, click the browse button, and use the Select File dialog to select a file. The file will be copied into your projects Docs folder and accessed from there. (Note that if the local html file has any links to other local html files, you will need to copy those files into the Docs folder on your own, or the links wont work.)
Once you've set the actions parameters, click Finish to close the New Action wizard. The File.OpenURL action will appear in the list on the script editor. Note that the parameters you provided are listed between parentheses after the actions name, in the same order they appeared in on the New Action wizard, separated by a comma.
Finally, click OK to close the script editor.
The File.OpenURL action opens whatever URL that you specify in the program that is registered as the default web browser on the users system. In most cases, this will be some version of Internet Explorer or Mozilla Firefox, but it could also be Netscape Communicator, or even Opera. The important thing is that it will open the website in the web browser that the user is familiar with.
Note that the preview application remains running in the background while you browse the website. The File.OpenURL action is an excellent way to let someone visit a web page without losing their place in your application.
The other two buttons are going to jump to other pages in the application, so lets start off by adding those pages.
When you choose Page > Add, a new page is added to the project.
You can see that a new page has been added by looking at the top of the work area, where a second page tab has appeared.

When you add a new page, it is automatically selected, so the new pages name also appears in the properties pane. This new pages name is Page 2. (The first page was named Page1, and the new page gets the next available number.)
To change the page name, just highlight the text in the Name setting and type in the new text.

(Remember to press Enter when you're done to confirm the change to the Name setting.)
When you edit the Name setting, the name of the page also changes on the page tab.
Tip: You can click on the page tabs to switch between pages.
If you remember from Lesson 2, whenever you add an image to your project, a copy of the image file is kept in the projects Images folder. You can access these cached images by using the Project pane.
Since the Project pane remembers where it was the last time you used it, it should still be in the Buttons folder. (We navigated to the Buttons folder earlier in this lesson.) You'll need to navigate out of that folder, and then navigate into the Images folder.
Remember that you can navigate out of a folder by double-clicking on the special up folder (the one with two dots next to it). This moves you up one level in the folder hierarchy.
Once you're in the Images folder, all of the image files that you've used in the project will be listed on the Project pane. This includes the file named 630B1151.jpg which you used for the background image on Page1. To use this image as the background image for the new About Ted page, just drag it onto the page surface. When asked if you want to set this image as your page background, click Yes.
Tip: If you don't want to be asked this question in the future, click on the Don't ask me again checkbox. If you do that, the same answer will automatically be used in the future - either Yes or No, depending on which button you click.
Like duplicating objects, you can duplicate the current page. When you duplicate a page, all of its settings and objects are duplicated as well. The only thing that is different on the new page is its name.
Note: If you're wondering why the new page is called Page2, and not Page3, its because AutoPlay always gives new pages (and objects) the smallest available number when it names them. So, when you renamed Page2 to About Ted, the name Page2 became available again.
Tip: You can also duplicate a page by right-clicking on the page tab and choosing Duplicate.
In the properties pane, rename Page2 to Video.
Tip: You can also change a pages name by double-clicking on the page surface and editing the Name setting on the Page Properties dialog.
Now that we have three pages in the project, we need a way for the user to go from one page to another - in other words, to navigate the application. This is incredibly easy to do: you just add a Page.Jump action to whatever event you want to use as the trigger for the change.
For this project, well use button objects to trigger the page changes - specifically, the On Click events of two buttons on Page1, and of one button each on the About Ted and Video pages.
Note: You don't need to use buttons for this...you could use label objects instead, or paragraph objects, or any combination of objects that have On Click events. For this example, though, well use buttons because they're cool.
Heres how its going to work: on Page1, were going to make the About Ted Sellers button (Button2) jump to the page named About Ted, and the Video Presentation button (Button3) jump to the page named Video.
On the About Ted page, well add a button that will jump back to Page1, and well add one on the Video page, too.
Lets start with the two buttons on Page1.
When you click on the Page1 icon, Page1 reappears in the work area. Clicking on a page in the project explorer switches to that page, just like clicking on the page tab.
Double-clicking on a button object opens the Button Properties dialog.
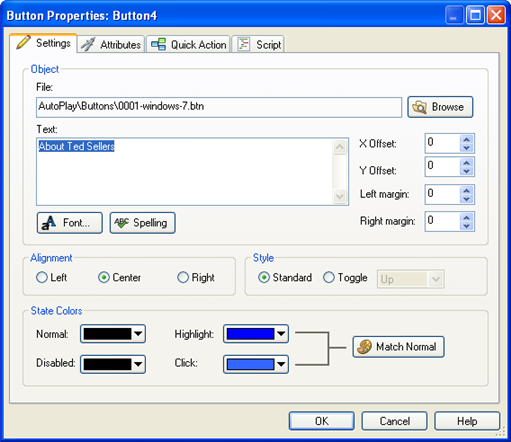
Each Button Properties dialog has four tabs: a Settings tab, for object-specific settings; an Attributes tab, for settings that most objects have in common; a Quick Action tab, where you can specify a single simple action that will be performed when the object is clicked; and a Script tab.
The Script tab is, in fact, where the script editor is located.
Note: The script editor is just another way of saying the Script tab on the Properties dialog. One refers to what it is, and the other refers to where it is.
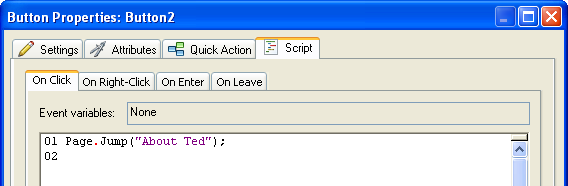
Since button objects can respond to five different events, there are five tabs on the script editor (or, depending on how you want to look at it, five tabs on the Script tab). Clicking on the On Click tab displays the action script for the objects On Click event, which at the moment is empty.
Note: This is the exact same place you are taken to when you click on the On Click event in the properties pane and then click the edit button.
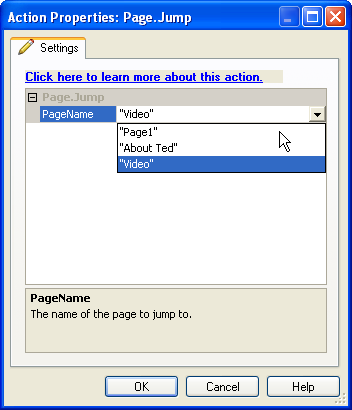
The Page.Jump action will cause the application to close the current page and open another one. You just need to tell the action which page you want it to open, which you do by setting the PageName parameter.
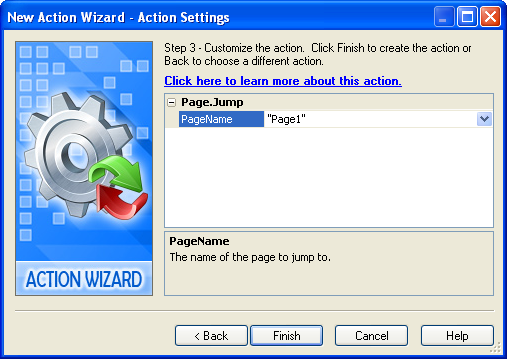
An easy way to change the PageName parameter to "About Ted" is to click on the PageName field, and then click the select button to bring up a list of all the page names in the project. (Note that since page names are text strings, and string parameters must be quoted, all of the page names in the drop-down list are quoted for you.) Choose "About Ted" from the list, and you're done.
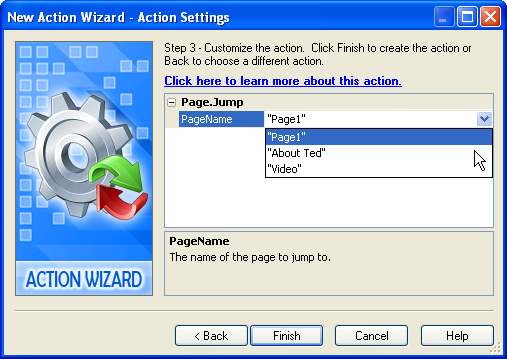
You can also just type "About Ted" into the PageName field if you want.
Once you click Finish, the wizard will close and the action will appear on the script editor.
Clicking OK closes the script editor and confirms the changes that you've made in it.
In the properties pane, 1 Line will appear next to the On Click event, to indicate the number of lines that are currently in that events action script.
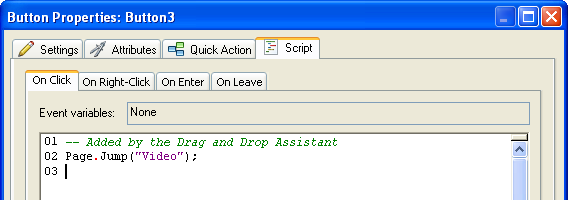
This time, we've taken advantage of the drag and drop assistant to add the page jump for us. When you drag a page icon from the page manager and drop it on an object that has an On Click event (like a button or a label), AutoPlay asks if you want to add an action to that event to jump to the page you dragged.
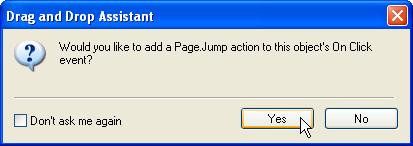
When you click yes, AutoPlay adds the following Page.Jump action to the objects On Click event:
-- Added by the Drag and Drop Assistant
Page.Jump("Video");
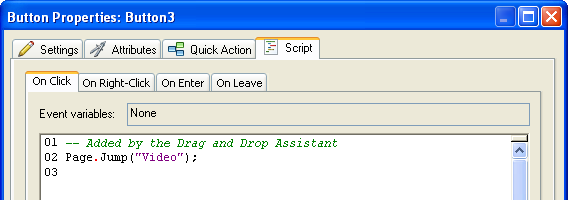
Double-clicking on the button object will open the Button Properties dialog to the same tab that you used last time you had the dialog open. In this case, it was the Script tab, home of your friendly neighborhood script editor.
On the On Click events tab, you can see the action that the drag and drop assistant added for you.
That takes care of the two navigation buttons on Page1. Now we just need a way to get back to Page1 from the other two pages. Instead of adding a new button to each page, and having to set up their highlight and click colors from scratch, lets copy one of the buttons from Page1 for a bit of a head start.
You'll often find yourself wanting to use the same object on more than one page, or set up a new object on one page that is just like an object on another page. In order to copy an object from one page to another, you need to copy it into the clipboard, and then paste it back into the project.
Note: You can make copies of objects on the same page by duplicating them, but if you want to duplicate an object to another page, you need to copy and paste it.
Tip: You can also move an object from one page to another by cutting it instead of copying it. To cut an object, just press Ctrl-X, or choose Edit > Cut. Cutting an object is just like copying one, except that the original object doesn't remain behind - its removed.
When you press Ctrl+C, the currently selected item is copied into the clipboard. (The clipboard is just the place in your computers memory where Windows puts stuff while you copy and paste them.) You can copy and paste objects, just like copying and pasting text in a word processor.
Tip: You can also copy the currently selected object by choosing Edit > Copy.
To switch to the About Ted page, just click on its page tab at the top of the work area.
When you press Ctrl+V, a new (copied) button object appears on the page, in the same position as the original. All of the settings are carried over from the original. In this case, since there are no other button objects on this page, even the objects name is copied. (Just like the original, the new button objects name is also Button3.)
Remember the first rule of object naming? No two objects can have the same name, on the same page. When you copy and paste an object, AutoPlay first checks to see if that name is already taken by another object on the page; if it isn't, then it lets the object keep the same name as the original. If the name is already in use on the page, then the object is given a new name, just like it would if you added it from scratch.
Tip: You can also paste an object from the clipboard by choosing Edit > Paste.
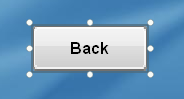
This button is going to be used to go back to Page1, the main table of contents page of our application. We want to leave enough room for the other stuff were going to put on this page, so we've made the button small and put it on the left side.
To center the object on the page, first make sure you're in Align to Page mode. Then, right-click on the object and select Align > Center Vertical.
This object already has a Page.Jump action on its On Click event, but its currently configured to jump to the Video page. (The action was copied along with the objects other settings.) Since our Back button is already on the Video page, we need to modify the action so it will jump somewhere else. In this case, we want the action to jump back to Page1.
Open the script editor and access the objects On Click event. (There are two ways to do this: you can either double-click on the object, click on the Script tab, and click on the On Click tab...or, you can click on the On Click setting in the properties pane, and then click the edit button.)
You should see the existing Page.Jump action.
You could remove the existing action and then add a new one, but since you'd end up adding another Page.Jump action anyway, you might as well just edit the existing action. (Only the parameter needs to change.)
To edit the action, just double-click on it. Double-clicking
on the action opens the Action Properties dialog, where you can modify
the actions current parameters.
Click on the PageName parameter, click the select button, and choose Page1
from the drop-down list.
Tip: You can also just edit the actions text directly.
Changing the PageName parameter from "Video" to "Page1"
Finally, click OK to finish editing the action, and then click OK to close the script editor and confirm the change.
Tip: Theres another action you could use to jump back to Page1: a Page.Navigate action with the JumpType parameter set to PAGE_FIRST would jump to the first page listed in the project explorer...which in this case happens to be Page1.
Pinning the object prevents it from being moved or resized, so you wont have to worry about moving it by accident. (We already have it right where we want it.)
When you pin the object, its bounding box changes from blue to red (so you can tell that its pinned), and the resize handles disappear.
Of course, if you ever change your mind, you can always just unpin the object and move it somewhere else.
Tip: You can also pin an object by selecting it and pressing Ctrl+P.
To copy the object, just select it (it should already be selected), press Ctrl+C, switch to the Video page (by clicking on its page tab), and press Ctrl+V.
The new object will end up in the same position as the original, with all of the same settings - including the Page.Jump action. Since the original object was pinned, the new object is pinned as well.
Note: You can copy and paste objects when they're pinned.
That's it for this page. You don't even have to adjust the objects Page.Jump action, since its already configured to go to Page1, which is what we want the Back button on this page to do as well.
Now that we have all this cool navigation built into the project, lets see how it works.
Of course, before we test anything, we should save the project just in case anything goes wrong.
Saving the project should be second nature to you by now, so go ahead and choose File> Save, or press Ctrl+S, or click the Save button on the Standard toolbar.

It doesn't matter which method you use. Heck, if you're really cautious, use all three, and then write Saved in triplicate in your work log. (Or scribble it on your napkin at lunch. Then fold the napkin and giggle...but not too loudly, or someone will think you're odd. Believe me, I know.)
Now its time to see these actions in action!
Tip: If you're feeling impatient, choosing Publish > Preview may be too slow. You need results now! In that case, just press the F5 key on your keyboard.
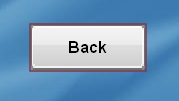
When the application appears, try clicking on the About Ted Sellers button. The application jumps to the About Ted page, with the lonely little Back button on the left. Click on the Back button, and you're instantly taken back to Page1.
The same thing happens if you click on the Video Presentation button. Note that although the Video page looks exactly like the About Ted page, you're actually going to two different pages. (In lessons 6 and 7, well add some objects to those pages so they don't look the same any more.)
When you're done navigating the application, return to Page1 and click on the Exit button. (Or, just press Alt+F4 to exit the application.)
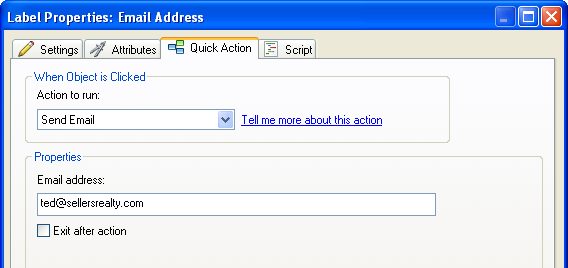
Before we move on to the next lesson, theres one more action we need to add: our Email Address label object needs an action to make it actually send an email.
A quick action is a simpler alternative to placing script on an objects On Click event. To add a quick action, double-click the object you want to add it to (in this case, the Email Address label object). When the Properties dialog appears, click on the Quick Action tab, and select Send Email from the Action to run drop-down list.
Notice that when you select Send Email, the properties specific to that quick action are displayed below. Change the Email address property to [email protected]. Be sure to leave the Exit after action option unchecked.
Tip: You can automatically fill in the emails subject field, too. Just put "?subject=" (without quotes) after the email address, followed by the text that you want in the subject line. For example:
"[email protected]?subject=Please send me real estate market info"
...would send an email to [email protected] with Please send me real estate market info as the subject line.
If you're a web monkey like me, you're probably thinking that this is just like a mailto: link in HTML. If so, you're right...and yes, that means you can specify the default body text, and everything else that you can do in a regular mailto: link, too.
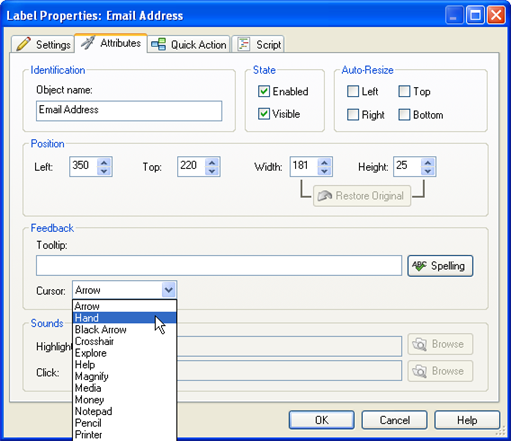
You can use the Cursor setting to change the type of cursor that will be used when the mouse moves over an object in your application.
By default, label objects have their Cursor setting set to Arrow, which is the same type of cursor that appears when the mouse is over the page surface. Changing it to Hand helps show that the object is clickable. (The Hand cursor is the one that is used for button objects. Its also the cursor that appears when you hover over hyperlinks in a web browser.)
Note: Cursor is just another name for the mouse pointer.
Once you've changed the Cursor setting, click Ok to close the Properties dialog.
See how the mouse pointer changes from the arrow to the hand? That's the Cursor setting at work.
Note: You should always save your work after you've made a change that you want to keep.
If your system is properly configured, this will start a new email message using your default email program.
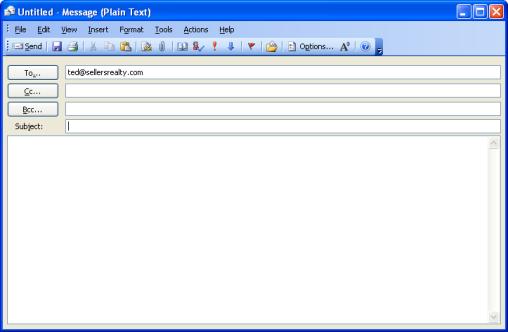
Notice how the email address that we supplied is already entered into the To: field. To send this message, you would just need to fill in the subject, type in your message, and click Send.
Since [email protected] isn't a real email address, you don't want to actually send this message, so just close the email (cancel it).
Finally, click on the Exit button to exit from the preview application, and return to the AutoPlay design environment.
Lesson 4 Summary
In this lesson, you learned how to:
Add interactive buttons
Match the width and height of several objects at once
Change the appearance of the button text
Duplicate multiple objects
Add simple actions like Application.Exit and File.Open
Add a blank page to the project
Duplicate an existing page
Add navigation buttons using Page.Jump actions
Copy objects from one page to another
Send email with a Quick Action