There are all sorts of things you can do with multiple objects, like move them all at once, line them up, group them together, or even change some of their properties in one fell swoop.
This is something you'll do a lot, and as you'll see in this lesson, it's really easy once you know how.
In this lesson, you'll learn how to:
Select multiple objects
Move more than one object at a time
Change the settings of several objects at once
Align objects to each other
Align objects to the page
Arrange objects in the z-order
Remove unused files from the project
Group objects together
Pin objects (so they can't be moved or resized)
Distribute objects evenly
Lock objects (so they stay out of your way)
This lesson takes approximately
35 minutes to do.
Starting the Lesson
If you're continuing from Lesson 2, you should still have AutoPlay running with the Tutorial project open. If so, you're ready to move on to the next exercise: Selecting Multiple Objects.
Otherwise, you'll need to open the project file that you saved at the end of Lesson 2.
When you save a project, AutoPlay automatically creates a project folder for it inside your "My Documents\AutoPlay Media Studio 8\Projects" folder. This project folder is where everything that belongs to the project is stored including the project file, which contains all of the settings used in the project.
The project folder and the project file always have the same name that you gave to the project when it was created. The project file's name ends with a ".autoplay" file extension.
Since you named this project "Tutorial" in Lesson 1, the name of the project folder will be Tutorial, and the name of the project file will be Tutorial.autoplay. So, the path to the project file should be something like:
...\My Documents\AutoPlay Media Studio 8\Projects\Tutorial\Tutorial.autoplay
To open the project, you just need to open that project file.
The first step to doing anything with multiple objects is to select the objects you want to work with.
Note: If you're used to selecting multiple files in Windows, you probably already know how to select multiple objects in AutoPlay. Just like in Windows, you either ctrl-click, shift-click, or drag-select. The only difference is that when you're working with objects in AutoPlay, ctrl-clicking and shift-clicking both do the same thing.
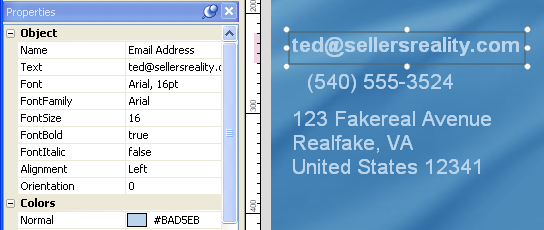
When you click on the label object, the bounding box appears, and its settings show up in the properties pane.
Before you move on to the next step, notice the way the object's bounding box looks, and take a quick peak at the properties pane to see the number of settings that are visible. (Both of those things will change when you have more than one object selected.)
Ctrl-clicking (pronounced "control-clicking") adds an object to the current selection. In this case, the current selection consists of a single label object named Email Address.
Note: This is just like ctrl-clicking in Windows to select multiple files or folders.
When you ctrl-click on the Phone label object, it becomes selected in addition to the Email Address label object. The end result is that both objects are selected.

One of the objects has a normal bounding box, with solid edges and little white resize handles. But the other object has a bounding box made up of blue dashes, with no resize handles on it at all.
The object with the normal bounding box is called the dominant object. The dominant object is used as a point of reference when you align and resize objects using the tools in the Align menu. (We'll use those tools a bit later in this lesson.)
The other object is just part of the current selection. The dashed-line bounding box means that the object is selected but not dominant. As for the missing resize handles, you can only ever resize one object at a time with the mouse. When you have more than one object selected, the dominant object is the only one you're allowed to resize. So, the resize handles only appear on the dominant object.
Most of the settings are still listed on the properties pane, but some of them are blank, with no values in them at all. And the Name setting, which used to be at the top of the properties pane, isn't even there any more.
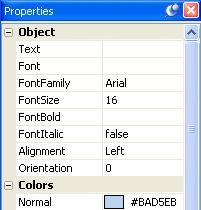
If a setting is blank, it means that the setting has different values between the selected objects. A setting will only show a value if all of the selected objects have that same value for the setting.
For example, because our two label objects have different text in them, the Text setting is blank. But, since they both have the same Alignment setting, the value of the Alignment setting is visible.
The Name setting is missing because you can't give the same name to more than one object at once. (As you'll see in this lesson, you can actually use the properties pane to change the settings for multiple objects.)
Tip: Feel free to shift-click instead if you prefer. When you're working with objects in AutoPlay, shift-clicking and ctrl-clicking are exactly the same.
The Mailing Address label objects are added to the selection. Notice that now the last object clicked has the solid bounding box, and the object that was dominant before the Phone label object has a dashed-line bounding box instead.

Note: When you add an object to the selection, it becomes the dominant object. (The dominant object is always the last object you clicked on.)
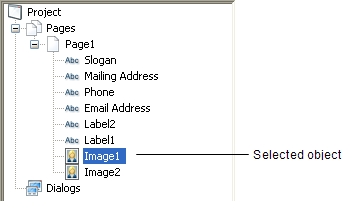
When you add the image object to the selection, most of the settings will disappear from the properties pane. This is because there are two different kinds of objects selected-namely, label objects and image objects.
Whenever there are multiple objects selected, the properties pane only shows the settings that all of those objects have in common. In this case, you only see the settings that exist in both label objects and image objects.
In fact, all that's left are a handful of settings in the various categories which exist across all of the selected objects.
If you ctrl-click on an object that is already selected, it is removed from the current selection. This is also known as "deselecting" the object.
Clicking on the page surface deselects any objects that are currently selected, and selects the page instead. (You can tell the page is selected because the page settings appear in the properties pane.)
This is known as drag selecting. It basically involves drawing a temporary "box" around the objects that you want to select, by dragging the mouse from one point to another while the left mouse button is held down.
Note: To drag select a bunch of objects, position the mouse pointer somewhere on the page surface near the objects. (Don't position it on an object, or you'll just end up moving that object instead.) Click the left mouse button and, while holding it down, begin to move the mouse. A temporary drag-select rectangle will appear to outline the selection area. "Stretch" this rectangle by dragging the mouse until the selection area includes all of the items you want to select, then let go of the mouse button. When you release the mouse button, any items within (or touching) the selection area will be selected, and the drag-select rectangle will disappear.


When you drag-select objects, the object that is closest to the mouse pointer when you release the mouse button becomes the dominant object. So, if you started dragging from above the Email Address label object, and ended up with the mouse pointer just below the Mailing Address label object, the Mailing Address label object would be the dominant object.
Tip: If you already have a bunch of objects selected, you can add more objects to the selection by drag-selecting them with the ctrl key (or shift key) held down. Holding the ctrl or shift keys down while drag-selecting adds objects to the current selection.
When you have multiple objects selected, you can move them easily by dragging them with the mouse.
Moving multiple objects is just like moving a single object. When you drag one, all the other selected objects come with it.
So, just click on one of the selected objects, and, while holding down the mouse button, drag the objects where you want them to go.
Note: When multiple objects are selected, they all move together.
When you choose Edit > Undo, the last change that was made to the project is undone. In this case, the three label objects jump back to where they were before you moved them.
Tip: An even faster way to undo the last change is by pressing Ctrl+Z.
When you choose Edit > Redo, the last change that you undid is redone. Its kind of like undoing the undo.
Tip: You can also redo the last thing that you undid by pressing Ctrl+Y.
If you're wondering what all this undoing and redoing has to do with moving objects, well, there is a point to it.
Moving objects and then undoing the move can be a very useful technique. You often wont know exactly where you want your objects to go until you've moved them around a bit. Knowing that you can just undo the move if you don't like where the objects end up frees you to try different ideas. (Sure, you could just move the objects back by hand, but using undo gets them back to that same exact spot a lot faster.)
It also doesn't hurt to know how to go back a step if you happen to make a mistake, like moving the wrong object by accident.
As for undoing and redoing, this can be helpful when you're trying to decide between two different positions. Just move the objects from one place to another, and then use the undo and redo commands to go back and forth between the two options. Do the objects look better over here, or over there? Hmmm...here...no, definitely there.
This kind of undo/redo dance lets you do a quick before-and-after comparison for any change that you make to the project.
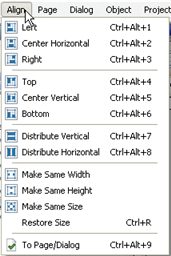
When multiple objects are selected, a number of alignment tools become available. You can use these tools to line the objects up horizontally, vertically, or both.
When you have multiple objects selected, clicking on one of them makes it the dominant object. There can only be one dominant object at a time, so if the object you click on isn't already the dominant object, it becomes the dominant object instead of the one that was dominant before.
Note: The dominant object is the one with the normal bounding box.
When you choose Align > Center Horizontal, all of the selected objects are centered horizontally with the dominant object.
In other words, the objects line up so that the horizontal midpoint of each object is in line with the horizontal midpoint of the dominant object.
Notice that the dominant object didn't move, but the other ones did. The dominant object serves as the anchor for any alignment operations that you perform.
Clicking on the Email Address label object makes it the dominant object, so when you choose Align > Left, the Email Address label object stays put, and the other objects are aligned to it.
Note: The key to performing object alignments is knowing what the objects will line up with. Luckily, its quite simple: the objects are always aligned to the dominant object.
Don't worry about positioning them carefully; we just want to get them out of the way for a while.
Note: You can drag objects onto the work area, but only the objects (or parts) that are located on the page will be visible in the finished application. If any objects extend onto the work area, a warning will occur when you preview or build the project.
When you click on Label1, it becomes the only selected object. The other objects aren't selected any more, because you didn't ctrl-click on Label1 to add it to the selection - you only clicked on it to select it.
Clicking on an object that isn't selected deselects any objects that currently are. Its essentially like saying I want to select this object now, and only this one.
Remember: when you're working with objects in AutoPlay, shift-clicking is exactly the same as ctrl-clicking. (You can use whichever key you prefer.)
Tip: When selecting multiple objects, use the last-clicked object is dominant rule to your advantage. Plan the order you ctrl-click on stuff so that the object you want to align to is the last one you click on.
When you have multiple objects selected, right-clicking on one of the objects makes it the dominant object. It also opens the right-click menu.
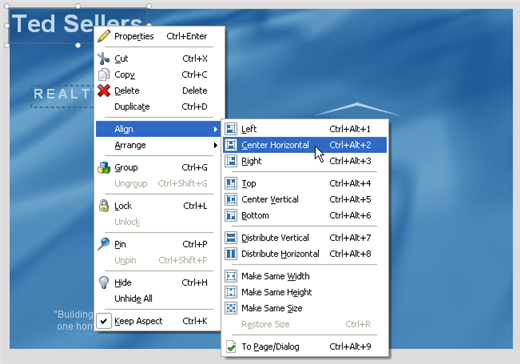
As you can see, right-clicking on an object gives you easy access to the same alignment tools that are in the Align menu.
Tip: The right-click menu is a very fast way to access the alignment tools.
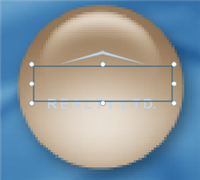
Now that you have these two label objects selected, lets use them with the image object to create a simple logo.
All of the alignment tools are available on a toolbar, which we have appropriately named the Alignment toolbar. (Don't look at me, I wanted to name it George.)

You can use the Alignment toolbar to access the same alignment features that are available in the Align menu.
Tip: When I'm working with the alignment toolbar, I like to drag it down so it floats over the top part of the work area. That way, its closer to the objects, and doesn't take up as much vertical space in the design environment.

You'll probably need to move the two label objects individually in order to bring them closer together. Try to position the objects without moving the image object at all.
Tip: Feel free to play around with the alignment tools before moving on to the next exercise. They're a lot of fun to use, and being familiar with them makes it a lot easier to design attractive layouts.
In addition to lining objects up with each other, you can also align them to the page surface itself.
Our goal for this exercise will be to try moving our newly created logo to the exact center of the page.
In other words, select the image object along with Label1 and Label2.
Tip: You can use the drag-select method to select all three objects at once.
Choosing Align > To Page/Dialog makes the objects align to the page surface, instead of to the dominant object. It essentially makes the page surface act like the dominant object, so you can use the alignment tools to align objects to the page.
Note: The To Page/Dialog menu item acts as a toggle. If you choose Align > To Page/Dialog twice, it toggles the feature on, then off again.
Clicking the Align to Page/Dialog button does the same thing.

Tip: If the alignment toolbar isn't visible, you can choose View > Toolbars > Alignment to make it visible.
You can tell which mode the alignment tools are in by looking at the Align to Page/Dialog button on the Alignment toolbar. If the button has a blue border around it, then Align to Page/Dialog mode is on.


Without the Alignment toolbar, you'll have to check the Align menu in order to know whether Align to Page/Dialog mode is on, which is why I like to make the Alignment toolbar visible whenever I plan on aligning any objects to the page.

All three objects should now be centered horizontally on the page. Notice that they only moved horizontally, and didn't move up or down at all.

Whoa! The objects are centered vertically on the page all right...but now they're overlapping, with one object on top of the other.

This isn't exactly what we wanted, but if you think about it, it makes sense. We had three objects selected, and we told AutoPlay to center them vertically on the page. So that's exactly what it did. Each one was centered on the page, independently.
If you wanted the three objects to keep their positions relative to one another, and be centered vertically as a single unit, you'd have to group them first. Well try that a bit later in this lesson, but for now, lets take advantage of the situation to cover another useful skill: arranging objects.
While we have these three objects overlapping, lets perform a quick experiment to illustrate a point.
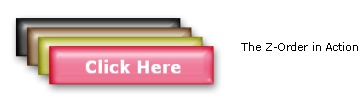
As you can see, objects are drawn on top of each other. When objects overlap, the object in front essentially hides any objects that are behind it. (Depending on the object, you might be able to see other objects through the one that's on top. For example, our label objects don't hide each other very much, because label objects are fully transparent except for the text.) So what if you want a different object to be in front? Easy: just arrange the objects.
Arranging objects involves changing their positions in something called the z-order. The z-order is what determines which objects will be closer to the user, and which objects will be closer to the page.
Its called the z-order because it deals with how objects are arranged along a pages z axis.
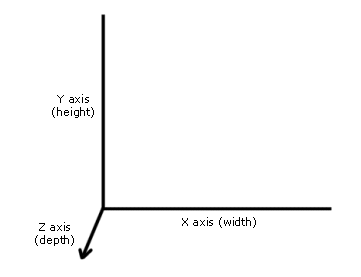
In AutoPlay, changing the z-order involves moving individual objects along the z axis - either forward (further from the page) or back (closer to the page).
Note: Some object types are unable to appear behind other kinds of objects. For example, if you try to place a label object in front of a video object, it wont work; the video object will still show up in front. This is because the video object exists in its own little mini-window that floats on top of the page surface.
Pressing Ctrl+Z undoes the last change that you made to the project, which in this case was to center the three objects vertically on the page.
Note: This is the same as choosing Edit > Undo.
By default, AutoPlay remembers the last 10 changes that were made, so at any given moment you should be able to step back like this up to 10 times in a row.
Tip: You can give AutoPlay a longer undo memory by choosing Edit > Preferences, clicking on the Document category, and setting Undo/Redo Levels to a higher value.
Saving the project is important, because it creates a point that you can come back to if you make a mistake or want to undo your changes. (Well actually use this feature later in the lesson, to return the project to the state its in right at this very moment.)
Choosing Image from the right-click menu opens the Select File dialog, allowing you to select an image file.
In this case, we want to temporarily add another image file to demonstrate how the arrange tools work. A good image for this purpose is Icon-003.png, located in the Gallery\Images\Elements folder. (Some of our image files have such romantic names.)
Since you're selecting a file for an image object, the Select File dialog automatically starts at the last location where you browsed for an image file. Unless you've browsed to a different location since we added the first image object in Lesson 2, the Select File dialog should open directly to the Gallery\Images\Elements folder. Simply click on the Icon-003.png file, and click OK. The new image object will appear on the page.
Using the mouse, resize the image object so its big enough to cover the entire logo. Then drag it on top of the logo, so it covers all three of the logos objects.

Tip: You can resize the object proportionally by holding the Shift and Ctrl keys down while dragging one of its resize handles.
Abracadabra! The logo objects reappear.

Choosing Arrange > Send to Back moved the new image object to the very back of the z-order, putting it at the bottom of the stack of objects on the page. (Note that this includes all of the objects on the page, and not just the four objects that happen to be overlapping.)
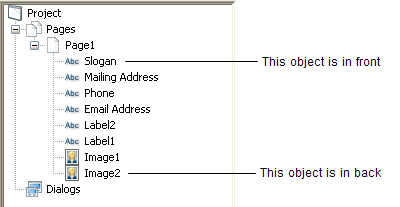
You can actually see the z-order in the Project Explorer. The objects in the project explorer tree are listed according to the z-order, with the front object at the top of the tree, and the back object at the bottom of the tree. When you sent the image object to the back of the z-order, it was moved to the bottom of the tree.
Tip: The other commands in the Arrange menu let you move an object forward or back by one position in the z-order stack, or send it straight to the front of the pile.
Choosing Edit > Select > Next Object Above selects the object that is one level higher in the z-order, in other words, the object that is one step further from the page.
Note: If you look at the project explorer, you can see which object you have selected and what position it occupies in the z-order.
You can also select the next object higher in the z-order by pressing Shift+Tab.
Tip: You can cycle through all of the objects on the page by pressing Tab and Shift+Tab. Pressing Tab selects one level forward in the z-order, and pressing Shift-Tab selects one level back.
You should now have the Label1 object selected (the one with Ted Sellers on it).

Poof! The Label1 object is sent to the back of the z-order, and disappears behind the Image2 object.
Note that the Label1 objects bounding box is still visible:
The bounding box is still visible because the Label1 object is still selected. When an object is selected, its bounding box is displayed in the foreground, on top of any objects that happen to be in the way. This gives you the same access to the object as when its on top, you can resize the label object by resizing the bounding box, or move it around by dragging it with the mouse, just like you would if it wasn't hidden.
If you make the Label1 object large enough, it will become visible beyond the edge of the Image2 object.

Because the bounding box appears in the foreground, you can resize or reposition an object when its selected, even if you cant see the object itself.
You have to click outside the Label1 objects bounding box in order to select the image object. Once an object is selected, clicking anywhere inside its bounding box wont deselect it, even if another object is in front.
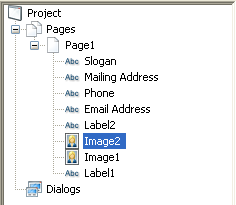
When you bring the Image2 object forward one step in the z-order, the Image1 object disappears behind it. The only object from the logo that is still visible on top of the Image2 object is the Label2 object with R E A L T Y L T D . on it.
In the project explorer, the image objects name has moved one position higher in the list.
You can also arrange objects by dragging their names up or down in the project explorer. This is especially useful when you have many objects and you want to move one of them to a specific position in the z-order.
Tip: You can also arrange objects using four buttons on the Align toolbar.
Clicking on the name of an object in the project explorer selects the object, even if theres another object in front of it.
Note: You can use the project explorer to select objects that are hidden behind other objects on the page.
Double-clicking on an objects name in the project explorer opens the Properties dialog for that object. Its just like double-clicking on the object itself.
Changing the objects opacity from 100 to 50 makes it 50% opaque (or, conversely, 50% translucent). In other words, it makes the object partially transparent.

Tip: The Opacity setting can be used to produce all kinds of neat effects. AutoPlay even lets you change an image objects opacity dynamically at run time! (This can be done by using the Image.SetOpacity action which lets you set opacity on the fly.)
No, this isn't an exercise in how to hide last nights overdone pot roast. Instead, its a quick mention of a very handy tool that's built into AutoPlay: the resource optimizer.
If you're anything like me, you probably have to try a bunch of different files before you find the one that fits your project. You might add one image, decide it doesn't look quite right (chartreuse is so passé this year), and then go through five or six others until you find one that you're happy with (they say orange is the new blue).
Remember how AutoPlay keeps a local cache of everything, by automatically copying any files that you use into the project folder? Well, those files are left behind even after you delete the objects that caused them to be copied in the first place. After a while, those leftover files can begin to add up.
Which isn't a problem, exactly...your project will continue to work fine, even with those extra files inside it. They'll never actually break your project. However, they do take up space...and when you're trying to fit every last bit of data onto a CD, or if you're building a single-file executable that's going to be downloaded by half a kazillion people, it can truly pay to trim off any excess fat.
The resource optimizer is an easy way to get rid of all the files that have been left behind. Its like a hypersonic push broom sweeping through your project, clearing away the debris of the design process.
Our tutorial project hasn't been around long enough to accumulate much in the way of unused resources, but we do have at least one file that we aren't using any more. Or, we will once we delete the only object that uses it.
You can select the Image2 object any way you want - click on it, use the project explorer, cycle through the objects on the page by pressing Tab, etc. The important thing is to make sure its the only object that is selected, and then press the Delete key to remove it from the project. Bye-bye Image2!
The Project pane should be tabbed with the Gallery and pane on the right side of the design environment. Clicking on the Project panes tab switches to that pane.
The Project pane is like a window into the project folder. Within it you'll find all of the files that have been added to your project, neatly organized into sensible categories. All of the image files that are added to the project end up in the Images folder. Once you navigate into that folder, you should see the Icon-003.png file (along with all the other image files that have been used so far).
Note that deleting the Image2 object, which was the only object in the project that used that file, didn't delete the file from the Images folder. Once a file has been added to the project, its up to you to remove it. Of course, this is where the resource optimizer comes in.
The Remove Unused Resources dialog lets you configure exactly which folders you want AutoPlay to search through - just in case there are some folders in the project that you don't want optimized.
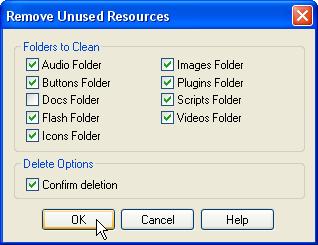
Note: The Docs folder isn't searched by default, because that's where you normally put any external files that you want to distribute with your project. If you decide to optimize the Docs folder, be careful not to delete any files that you wanted to keep.
Its a good idea to leave the Confirm deletion option enabled, so you'll have a chance to override AutoPlay's choices before the files actually do get deleted.
As soon as you click OK, the resource optimizer will begin scanning the project directories, looking for files that aren't referenced anywhere in the project.
The resource optimizer is very, very fast, so the Confirm Delete dialog will appear almost instantly.
Clicking OK will delete all of the files in the list that have check marks next to them. Make sure you examine the list carefully - once a file is deleted, you cant get it back.
As you can see, the Icon-003.png was successfully removed in the previous step.
Tip: Use the resource optimizer to clean up any unnecessary files before publishing your project.
Now that we've covered optimizing and arranging, lets get things back to the way they were before we set off on this little detour.
When asked to confirm that you want to proceed, click Yes.
You should end up with the image object and the two label objects back where they were before you centered them vertically on the page.
Choosing File > Revert puts everything in the project back to the way it was the last time you saved the project. This includes all of the object settings and project settings that were saved with the project.
However, it does not include any changes to the files that your project references. In other words, if the files themselves are deleted or modified, choosing File > Revert will not undo those changes.
If you delete a file that your project used the last time it was saved, choosing File > Revert will not restore the file. It will restore any settings that refer to that file, but not the file itself. (If any objects need to display that file, they would display a placeholder message instead, alerting you that the file is not there.)
Tip: The File > Revert feature allows you to undo any number of changes, regardless of the current Undo/Redo level.
Now, what if you wanted to center the logo in the middle of the page, without having any of its objects overlap? In order to do that, you need to group the three objects together. Grouping the objects will allow them to be aligned as though they were a single object.
Objects that are grouped maintain their positions relative to one another when you use the alignment tools on them. They essentially act as though they were a single object, allowing you to align them as a group.
When you group the objects together, their bounding boxes turn green instead of blue. This is just to let you know that the objects are part of a group. (If it wasn't for the green bounding boxes, it would be impossible to tell they were grouped just by looking at them.)
Note: You can ungroup objects by selecting a group and choosing Edit > Ungroup.
Grouping objects makes it easy to access them all at once. That might seem a bit obvious, but its a really useful feature that can save you a lot of time. When you click on an object that is part of a group, all of the objects in the group are selected automatically.
Tip: If you find yourself always wanting to select and work on a particular bunch of objects, just group em. You can always ungroup them later if you want to work on them individually again.
When you're working in Align to Page/Dialog mode, the Align to Page/Dialog button will be highlighted, like this:

If it isn't, either click on the button, or choose Align > To Page/Dialog to toggle the feature back on.
Voila! This time, the whole group is centered on the page, with the three objects maintaining their positions relative to one another.

Whenever you align a group to the page (or to other objects, for that matter), the entire group is positioned as though it were a single object.
Note: A group is just a bunch of objects that are always selected together, and that maintain their positions relative to one another when you use the alignment tools on them. Its almost like the group becomes a single object.
In the default workspace layout, the project explorer is on the left side of the design environment, above the properties pane. The project explorer contains a list of all the pages, objects, etc. on the current page. You can use the project explorer to select objects by name.
When you click on Label1 in the project explorer, the Label1 object is selected by itself. This is because the project explorer lets you select individual objects even if they're part of a group.
This can be helpful when you want to change the settings of a single object within a group. By selecting the object in the project explorer, you can make the changes without having to ungroup the objects and then group them back together again when you're done.
Note: Selecting a grouped object in the project explorer doesn't remove that object from the group...it just selects the object on its own, without selecting the other objects in the group.
Note that the Label1 objects bounding box is still green to remind you that it does belong to a group, even if the other objects in the group are not selected.
Once again, using the project explorer to select the object by itself lets you change its position without affecting the other objects in the group.
While were at it, we might as well move the Label2 object as well.
Changing the Left and Top values is the only way to move a grouped object without moving the other objects in the group. Even if you selected the object in the project explorer, moving the object with the mouse would move the entire group.
When you click on the image object, the whole group is selected again.
Note: Clicking on a grouped object on the page selects all of the objects in the group.
Once you have objects placed where you want them, sometimes its nice to pin them so they cant be moved or resized accidentally.
This fixes the position and size of the three objects in the group. Note that when you pin an object, its bounding box turns red.

Pinned objects are surrounded by red bounding boxes by default
Note that the bounding box for the dominant object doesn't have any resize handles on it any more, since you cant resize pinned objects with the mouse.
You might need both hands on the mouse to get them to move...
Heh, just kidding. You cant move or resize objects when they're pinned.
To unpin the objects, you would either right-click on one of them and choose Pin again, or choose Edit > Unpin to unpin all of the selected objects on the page at once.
For now, though, just keep the objects pinned so you don't have to worry about moving them by accident.
Distributing objects just means adjusting their positions so that they're spread out evenly between two points, or across the page. Its an incredibly useful technique for getting things placed neatly, with equal distances between the objects.
When Align to Page/Dialog mode is on, the Align to Page/Dialog button appears selected, like this:
You want the button to be unselected, like this, instead:
If you need to toggle it off, just click the button, or choose Align > To Page/Dialog.
You can also check the Align to Page/Dialog mode by looking at the icon in the Align menu.
You may notice that the object snaps into place as you move it near the upper left corner of the page. This is because AutoPlay's snap-to-page feature is enabled by default. (You can toggle this feature on or off by choosing View > Snap to Page/Dialog.) The snap-to-page feature causes objects to automatically line up with the page edge when you move them within a few pixels of it.
Tip: You can hold the Shift key while moving objects to suppress snapping.
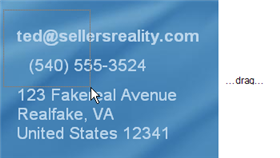
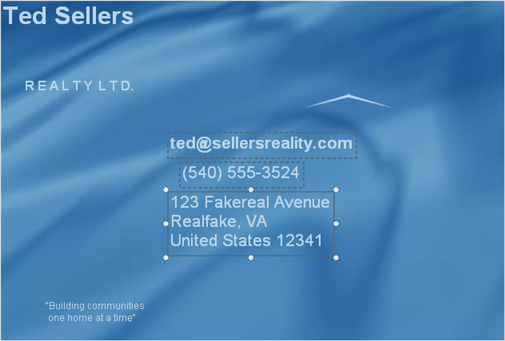
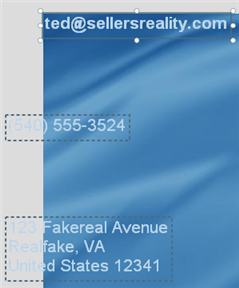
The Email Address, Phone, and Mailing Address label objects should be positioned vertically, with the Mailing Address and Phone label objects close together, and the Email Address label object off by itself.
Don't worry about lining things up carefully; you'll use the alignment tools to take care of that later. (Its actually easier to see what's going on if the objects aren't lined up so well.)
To select the three objects together, either drag-select them, or just click on one and then ctrl-click on the other two.
Tip: You can also select multiple objects by clicking and ctrl-clicking on their names in the Object Browser pane (View > Panes > Object browser).
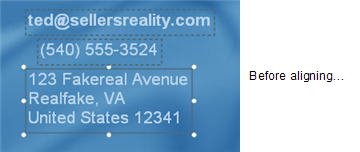
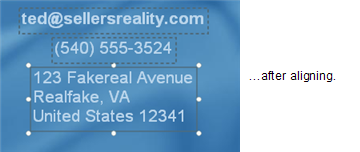
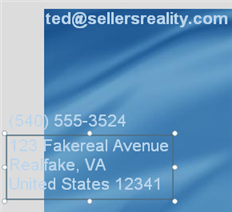
Choosing Align > Distribute Vertical distributes the three objects evenly between the top and bottom ones, so there is an equal distance between all three of them.
In this case, the top and bottom objects stay put, and the Phone object (the one in the middle) moves up so its placed exactly in between.
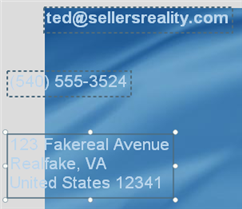
In other words, move the Mailing Address label object right up under the Phone label object.
Note: You'll need to select the object on its own in order to move it.
Once again, the middle object moves so the selected objects are spaced evenly apart.
When you have multiple objects selected, you can change a setting for all of them at once just by editing it in the properties pane. Since all three of the label objects are set to use a 16-point font size, the value 16 is visible in the FontSize setting.
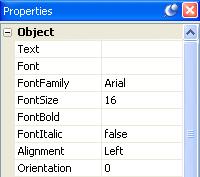
When you change this value from 16 to 11, all three label objects will switch to using an 11-point font size. (You will actually see the text in the label objects get smaller.)
Note: Any changes that you make in the properties pane are applied to all of the objects that are selected.
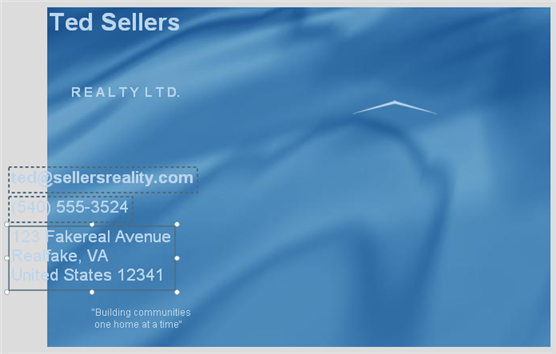
We want the email address to stand out a bit from the other label objects. Making the email address a bit bigger should do the trick.

Start off by eyeballing it, moving the objects closer together and dragging them down to the lower right side of the page, using the above image as a guide.
Once you have the objects more or less in place, select all three label objects and use Align > Left to align them along their left edges. Then use Align > Distribute Vertical to even things up.
Earlier I showed you how to pin objects so they cant be moved or resized accidentally. Pinning objects prevents the objects from being moved or resized with the mouse, but still lets you access their properties and align other objects to them.
Sometimes, though, it would be nicer if the objects would just get out of the way. For example, if you have a large object on the page with other objects on top of it, or lots of objects in close proximity, it can be difficult to drag select specific objects without accidentally selecting some you don't want to. You could ctrl-click on all the objects that you want to select, one at a time, but it would be better if you could just drag select the objects you're working on and have any finished objects be ignored.
This is where locking objects comes in. When you lock an object, it becomes completely unselectable. Its like the object becomes part of the background. you can click on it or even drag-select around it, but it wont become selected at all. Its almost like it isn't there.
Note: Locking an object has no effect on how the object behaves at run time. The user will still be able to interact with the object the same way, whether its locked or not. It only affects how the object behaves while you're working on the project.
If you're wondering how you would ever get the object back, don't worry...you can unlock an object by right-clicking on it and choosing Unlock from the right-click menu.
To illustrate this, lets lock all of the objects on the page, except for one label object that you will be working with in another lesson.
When you press Ctrl+A, all of the objects on the page are selected.
Note: This is the same as choosing Edit > Select > All.
All of the objects become locked. Since locked objects cant be selected, their bounding boxes disappear.
Go ahead. Bet you cant select any.
No, really...you can't. Locked objects don't respond to left mouse button clicks at all. You cant even select them using the project explorer.
Its like the objects aren't even there. But they still are, of course...they're just locked.
When you right-click on a locked object, a menu appears enabled so you can unlock it. Note that the object also contains a locked icon in the Project Explorer to indicate it is currently locked.
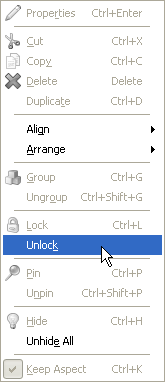
Choosing Unlock from this menu toggles the objects locked status off - in other words, it unlocks the object. It also automatically selects the object for you, so you can see that it has been unlocked.
Tip: You can unlock all of the locked objects on a page at once by choosing Edit > Unlock All.
Be sure to save the project so the work you've done in this lesson isn't lost.
Lesson 3 Summary
In this lesson, you learned how to:
Select multiple objects
Move more than one object at a time
Change the settings of several objects at once
Align objects to each other
Align objects to the page
Arrange objects in the z-order
Remove unused files from the project
Group objects together
Pin objects (so they cant be moved or resized)
Distribute objects evenly
Lock objects (so they stay out of your way)