Every journey begins with a first step. In this lesson, I'll walk you through the creation of a new project, and introduce you to the AutoPlay program interface.
In this lesson, you'll learn how to:
• Create a new project
• Make sure you have the latest version of AutoPlay Media Studio
• Recognize the different parts of the program interface
• Customize the workspace
• Load a pre-configured workspace layout
• Take advantage of self-help resources
• Change the project's window title
• Set the page size for the project
This lesson takes approximately
20 minutes to do.
Starting the Lesson
Since this is the first lesson, there isn't anything you need to do before you get started. So let's dive right in and start learning AutoPlay!
Everything has to start somewhere, and in AutoPlay, the design process starts with the creation of a new project.
A project is just the collection of files and settings and everything else that makes up an AutoPlay application. A typical project will consist of several pages, with different objects on each page. Each page, and each object on it, has individual settings that you can edit and adjust to make the application do what you want it to. These settings are all stored in a single file, called the project file.
This file, along with any images, videos, or other files that you add to your project, are collected inside a special folder called the project folder. The project folder contains everything that belongs to the project, including the project file. Each project has its own project folder, which serves as a container for the project.
Throughout this tutorial, you'll be working on a single project. This project will start out simple and then gradually become a fully working example as you learn more of AutoPlay's advanced features.
But before you can start adding cool things to your application, you need a project to work on. So let's open the AutoPlay Media Studio program and start a new blank project.
Use the Start menu to launch the AutoPlay Media Studio program.
Start > All Programs > Indigo Rose Corporation > AutoPlay Media Studio 8
The Welcome dialog appears whenever you run AutoPlay Media Studio.
It easily lets you create a new project, open an existing one, or restore the last project that you worked on. (Restoring the last project automatically opens the project you had open the last time you ran AutoPlay.)
When you click on "Create a New Project," the Welcome dialog closes and the Create New Project dialog appears.
The Create New Project dialog lets you name your project and choose what kind of project you'd like to start.
At the top of the Create New Project dialog, there is a scrollable list with a bunch of thumbnail images on it. Each thumbnail image represents a different project template. A project template is a ready-made "starter project" that you can use to get your own project off the ground. As you can see, the project templates come in many different styles and themes.
You want to replace the default text "My Project" with the correct name for this project, so highlight all of the text in the Name your project field and type Tutorial.
This will be the name of the project folder, which is the folder that will be used to keep all of the project's files together, and of the project file, which is the file that contains all of the settings and options that make up your project. (This is the file that you will "open" whenever you want to load this project into AutoPlay.)
Every project needs a name, and that name has to be unique. You can't give two projects the same name (and in fact AutoPlay won't let you).
You'll be starting the tutorial project from scratch, so select the Blank Project template.
Note: To select a template, just click on its thumbnail.
When you click OK, the Create New Project dialog closes, AutoPlay sets up the project folder and project file with the name you chose, and the project is loaded into the design environment.
Note: The AutoPlay Media Studio program interface is also known as the design environment.
Since you selected the Blank Project template, your project consists of a single blank page, with no objects on it or anything. A clean slate for you to build on!
Tip: Once you’re in the design environment, you can start a new project by choosing File > New.
The easiest way to work with AutoPlay is with the program window maximized so it covers the whole screen. This way, you have the whole desktop area to work with, and you won't have any other programs or windows in the background to distract you.
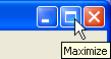
To maximize the window, click on the little Maximize button, which is the second button from the right on the AutoPlay title bar (right next to the Close button).
If the maximize button looks like this:
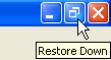
...then you already have the program window maximized. (That button is actually the Restore button, which takes the place of the Maximize button while the window is maximized. If you click the Restore button, the window will return to the size and position it had before you maximized it.)
AutoPlay has the built-in ability to check the Internet to see if there is an update available and the status of your maintenance subscription. Before we start exploring the program interface, let's use this feature to make sure you have the latest version of the program.
The TrueUpdate wizard will open. TrueUpdate is an Internet update technology developed by Indigo Rose Software that makes it easy to add automatic updating capabilities to any piece of software.
When you click Next, the TrueUpdate wizard will connect to the Indigo Rose website and determine whether a newer version of AutoPlay is available for you to download and the status of your maintenance subscription.
Note: If you are running any Internet firewall software such as ZoneAlarm, it may ask you whether to permit the TrueUpdate Client to connect. You will need to allow the client to connect in order for the update to work.
Click Finish to exit the TrueUpdate wizard.
Now that you have AutoPlay started and you've made sure that you're using the latest version, it's time to get comfortable with the program interface itself.
The AutoPlay program window is divided into a number of different parts.
At the top of the window, just under the title bar, is the program menu. You can click on this program menu to access various commands, settings and tools.
Below the program menu are a number of toolbars. The buttons on these toolbars give you easy access to many of the commands that are available in the program menu.
Tip: You can create your own custom toolbars or edit the existing ones by choosing Tools > Customize.
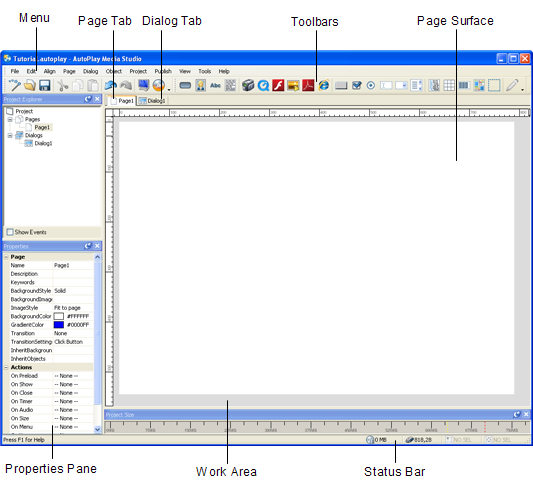
In the middle of the program window, the surface of the current page is visible in the work area, measured in pixels by a pair of rulers.
At the very bottom of the window, a status bar reflects your interaction with the program and offers a number of informative readouts.
The rest of the program window is made up of individual sub-windows known as panes. Each pane can be docked, tabbed, pinned, resized, dragged, and even made to float on top of the design environment.
Tip: To show/hide panes, use the View menu (View > Panes).
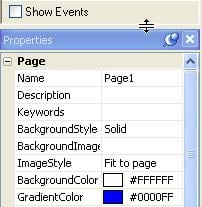
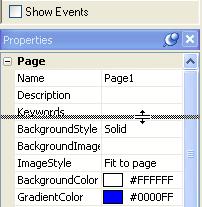
One very useful pane is the properties pane. By default, it's located to the left of the work area, along the left side of the screen. This is where you can see and edit the settings for the currently selected object or page.
The settings on the properties pane are organized into categories. You can expand or collapse these categories by double-clicking on the category heading, or by clicking on the little + or - symbols that appear in the column to the left.

Properties pane
You can close a pane by clicking on the little x on its title bar.
All of the panes can be toggled on or off in the View menu. When you choose View > Panes > Properties, the properties pane is restored to the same position it occupied before you closed it.
You can resize the panes by dragging their edges. In this case, you want to drag the part "between" the two panes...the little bit of pane above the properties pane and below the project explorer pane. As you begin to drag the edge of a pane, a line will appear to show where the edge will move to when you release the mouse button.
Resizing the properties pane
When panes are docked alongside each other, dragging an edge will resize both panes at the same time—making one taller and the other shorter, for instance. As a matter of fact, when you make the properties pane smaller, you will be making the project pane taller at the same time.
You can move panes around by dragging them by their title bars. As you move a pane, an outline shows you the general area where the pane will end up. If you drag the pane near the edge of the screen, or near another pane, the outline will "snap" to show you how the pane can be docked, tabbed, or otherwise combined with the target area.
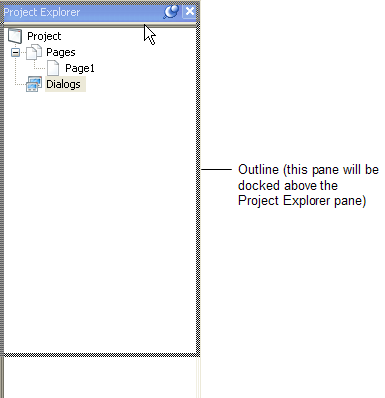
Docking a pane
Note that when panes are tabbed, dragging the title bar moves all of the tabbed panes at once. You can "tear" a tab away by dragging it away from the others. You can also reorder the tabs by dragging them left and right.
Tip: When you're dragging panes, it's the position of the mouse cursor that determines how the pane's outline snaps into place. For example, to dock a pane below another one, drag the pane so the cursor is near the bottom edge of that pane. To "tab" one pane with another, drag the pane so the cursor is on top of the other pane's title bar.
Docked panes can also be "pinned" or "unpinned." Pinned panes remain open when you're not using them. (All of the panes in the default layout are pinned.) Unpinned panes stay out of the way until you click on them or hover the mouse over them. Whenever you need them they "slide" open, on top of everything else, and then slide closed when you’re done.
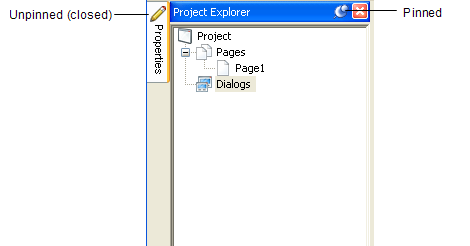
Pinned and unpinned panes
You can pin or unpin a pane by clicking the little pin icon on the pane's title bar.


Pinned Unpinned
Panes remember their positions even after you unpin them. If you unpin a pane, and then pin it again, it will return to the position it had before it was unpinned.
Note: Tabbed panes are pinned or unpinned together. If you unpin a pane that is tabbed, all of the other panes that are tabbed with it are unpinned too.
AutoPlay comes with a number of pre-configured workspace layouts that you can access from the View menu. The "AutoPlay Menu Studio 7.0" models the design environment after one of AutoPlay's predecessors.
Tip: You can create your own workspace layouts by arranging the panes to your liking and then choosing View > Panes > Save Layout. Any layouts you save are added to the list in the View menu, and can be selected just like any of the pre-configured layouts.
This returns the design environment to the default workspace layout, which is the one you will use throughout this tutorial.
Tip: Feel free to make the properties pane a bit wider by dragging their inside edges towards the page surface a little.
A layout grid appears on the page surface. This grid can be helpful when you want to line up objects visually on the page.
Tip: You can make objects "snap" to the grid as you move them by choosing View > Snap to Grid.
Choosing View > Grid again toggles the grid back off.
If you still have any questions after you complete all the lessons in this user's guide, there are many self-help resources at your disposal.
Here are some tips on how to quickly access these self-help resources.
The online help is only a key press away! AutoPlay Media Studio comes with an extensive online program reference with information on every object, action, and feature in the program.
In fact, whenever possible, pressing F1 will actually bring you directly to the appropriate topic in the online help. This context-sensitive help is an excellent way to answer any questions you may have about a specific dialog or object.
Note: You can also access the online help system by choosing Help > AutoPlay Media Studio Help.
There are three ways to navigate the online help system: you can find the appropriate topic using the table of contents, or with the help of the keyword index, or by searching through the entire help system for a specific word or phrase.
To exit from the online help, just click the Close button on the help window's title bar.
AutoPlay Media Studio is used by thousands of users worldwide, many of whom enjoy sharing ideas and tips with other users. The online forums can be an excellent resource when you need help with a project or run into a problem that other users may have encountered.
Choosing Help > User Forums opens your default web browser directly to the online user forums at the Indigo Rose website.
Exit from your web browser and switch back to the AutoPlay Media Studio program.
Alternatively, you can press Alt+Tab to switch back to AutoPlay while leaving the web browser open in the background.
This takes you to the Indigo Rose support web site, where a variety of online technical support resources are available to you, including a large knowledge base with answers to some common questions.
This is also where you can find information about the support and maintenance plans.
When you're done browsing the technical support information, return to the AutoPlay design environment to continue with the lesson.
There are a number of preferences that you can configure to adjust the AutoPlay design environment to suit your work style. Let's have a look at some of them.
This will open the Preferences dialog, where all of AutoPlay's preferences can be found.

Build preferences
The preferences are arranged into categories. The categories are listed on the left side of the dialog. When you click on a category, the corresponding preferences appear on the right side of the dialog.
Tip: If this is the first time you've opened the Preferences dialog, the Build category will already be selected. One of the Preview options in this category is worth noting. The Show debug window option allows you to display debug information in a separate window whenever you preview the project. Turning this option on can help you see what's going on "under the hood" during a preview, which can be helpful if you run into any problems while you're testing your project.
The Environment preferences allow you to change the way the design environment looks. For example, you can change the colors that are used when objects are selected, or change the background color of the entire work area. You can even change the color of the "shadow" that appears behind the page surface (or turn it off completely).
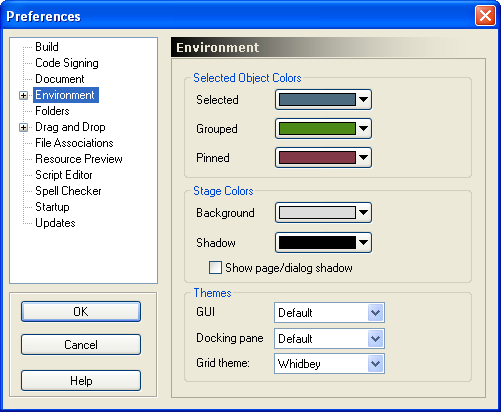
Environment preferences
Tip: Turning off the page shadow can make it easier to visually line objects up with the bottom and right edges of the page.
You can also expand the Environment category by clicking on the little plus symbol to the left of it.
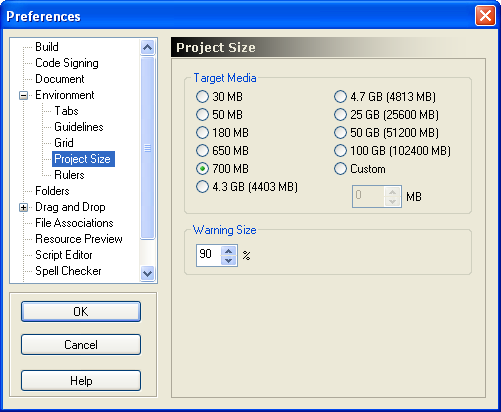
Project Size preferences
The Project Size preferences are where you can set the target media size, which determines the scale of the meter on the Project Size pane.

Project Size pane
If you set this target media size to match the size of the media you're using, you'll have a visual indicator of how much space is left in your project as the project grows in size.
Note that this preference doesn't affect the project in any way; the target media size only affects the size meter on the Project Size pane. It also doesn't matter how big the disc in your burner is…if you want the size meter to match the size of the media you're using, you'll need to change the target media size manually whenever you switch from one media size to another.
There are many other preferences that you can set, such as the number of undo levels for the program (in the Document category) and what happens when you drag a file onto the page (in the Drag and Drop category). Take some time to look through the categories and familiarize yourself with the different options that are available.
Remember that you can click Help or press F1 to get more information about any of the settings in a specific category.
The project settings affect the appearance and behavior of your application at run time.
Note: Each project has a number of settings that can be configured on a per-project basis. These project-wide settings can be accessed from the Project menu.
This opens the Project Settings dialog.
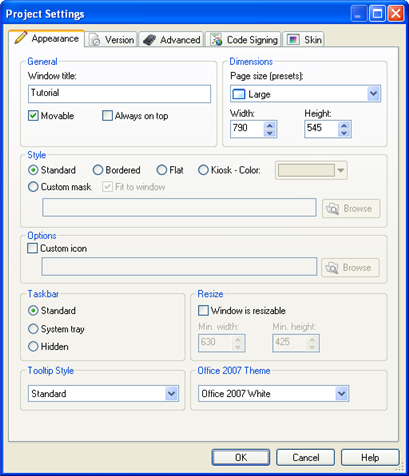
Project Settings dialog
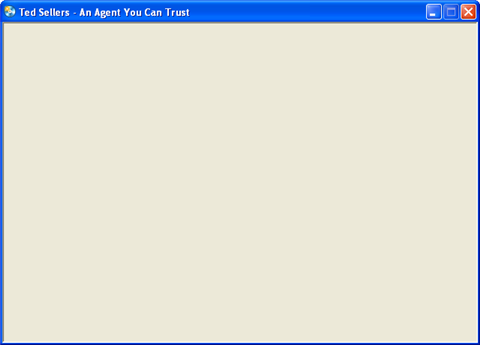
By default, the window title is the same as the name of the project. This project is going to be a CD business card for a (fake) real estate agent named Ted Sellers, so let's make the title something more appropriate.
To change the window title, replace the text in the Window Title field with Ted Sellers - An Agent You Can Trust.
Note: This text will appear in the application’s title bar when the user runs your application.
Setting the page size to "Medium" sets the Width and Height settings to 630 and 425, respectively. This is a good "safe" size for an application, since it will fit on every common Windows screen resolution from 640x480 and up.
Note: This sets the width and height for all of the pages in your project.
The rest of the settings are fine, so click OK to close the Project Settings dialog and return to the main program window.
AutoPlay's preview feature lets you take a "sneak peek" at your application, without actually building or burning the project. At this point, there isn't much to see, since the project still consists of a single blank page. But the text you entered for the window title does appear in the title bar, and if you could measure the page, you'd find that it is indeed 630 pixels wide by 425 pixels tall.
When you exit the preview, you're returned to the AutoPlay program window.
When you save the project, all of the changes that you've made to it are stored in the project file. You can open that project file at any time to continue working on the project.
Lesson 1 Summary
In this lesson, you learned how to:
• Create a new project
• Make sure you have the latest version of AutoPlay Media Studio
• Recognize the different parts of the program interface
• Customize the workspace
• Load a pre-configured workspace layout
• Take advantage of self-help resources
• Change the project's window title
• Set the page size for the project