One of the powerful features of AutoPlay Media Studio is its scripting engine. This document will introduce you to the new scripting environment and language.
AutoPlay scripting is very simple, with only a handful of concepts to learn. Here is what it looks like:
a = 5;
if a < 10 then
Dialog.Message("Guess what?", "a
is less than 10");
end
(Note: this script is only a demonstration. Don’t worry if you don’t understand it yet.)
The example above assigns a value to a variable, tests the contents of that variable, and if the value turns out to be less than 10, uses an AutoPlay action called “Dialog.Message” to display a message to the user.
New programmers and experienced coders alike will find that AutoPlay Media Studio is a powerful, flexible yet simple scripting environment to work in.
Here is a short tutorial showing you how to enter a script into AutoPlay Media Studio and preview the results:
1. Start a new project.
2. Create a new button object.
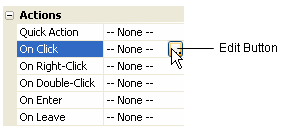
3.
In the Actions category of the properties pane, click on the On
Click event. A small edit button should appear next to the word “-- None
--” on the right.
4. Click the edit button to open the script editor. Note that it opens directly to the On Click tab.
5.
Type in the following text:
Dialog.Message("Title", "Hello World");
It should look like this when you’re done:
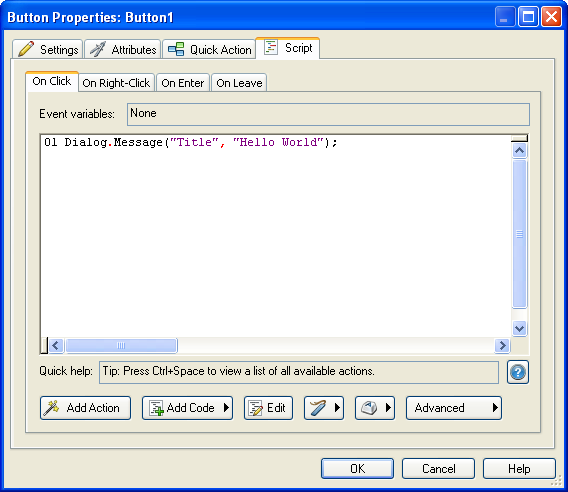
6. Click OK to close the script editor.
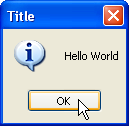
7. Choose Publish > Preview from the menu.
8.
Once the application is running, click on the button that you created.
This will trigger the button’s On Click event, so that the script you entered
will be performed. You should see the following dialog appear:
Congratulations! You have just made your first script. Though this is a
simple example, it shows you just how easy it is to make something happen
in your AutoPlay application. You can use the above method to try out
any script you want in AutoPlay Media Studio.