
This lesson will teach you some of the basics of scripting in AutoPlay. Although you can accomplish a lot in AutoPlay without any knowledge of scripting at all, even a little bit of scripting practice can make a big difference. You can accomplish far more in a project with a little bit of scripting than you ever could without it. Scripting opens the door to all sorts of advanced techniques, from actions that are only performed when specific conditions are met, to functions that you can define, name and then call from anywhere else.
In this lesson, you'll learn how to:
• Display a message
• Use a variable
• Add an if statement
• Test numeric values
• Set a button object's text
• Concatenate strings
• Compare strings
• Use a for loop
• Create functions
This lesson takes approximately
30 minutes to do.
Starting the Lesson
For this lesson, we're going to create a new project from scratch. If you're continuing from Lesson 9, you should still have AutoPlay running with the Tutorial project open.
If not, you'll need to open AutoPlay Media Studio first.
Choosing File > New will open the Create New Project dialog.
Once it opens, move on to step 3.
You'll find AutoPlay Media Studio under:
Start > Programs > Indigo Rose Corporation > AutoPlay Media Studio 8
Once the program launches and the Welcome dialog appears, click on the "Create a new project" option. This will open the Create New Project dialog.
You want to replace the default text with a unique name for this project, so highlight all of the text in the Name your project field and type Lesson 10.
This name will be used for the project folder and the project file.
When you click OK, the Create New Project dialog closes, AutoPlay sets up the Lesson 10 project folder and project file, and the new blank project is loaded into the design environment.
You're now ready to learn some basic scripting.
Okay, first things first. Before we get to any of the fancy stuff, let's make a script that does something really simple, like displaying a message to the user.
First, though, we need a place to put our script. For convenience, let's use a button object's On Click event.
One quick way to add a button object is to right-click on the page and choose Button from the right-click menu. Then just select the button you want to use from the list of button files on the Select File dialog, and click OK.
Note: It doesn't matter what button you choose, so pick whichever one you like.
You want to add an action to the object's On Click event, so open the object's Properties dialog, switch to the Script tab, and make sure you're editing the script for the On Click event.
This script consists of a single Dialog.Message action which passes "Every day I wake up and say..." as the string to display in the title bar, and "Hello World!" as the string to display on the dialog. The script should look like this when you're done:

Note: Although this script only has a single action, scripts can be much longer. In fact, there's no limit to how long scripts can be.
Clicking on the button triggers its On Click event and performs any script that has been added to it. In this case, the script consists of a single call to the Dialog.Message action, which displays the following message:
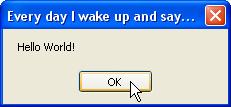
Click OK on the message to close it, and then exit from the preview and return to the design environment.
Tip: You can exit from the preview by pressing Alt-F4.
One of the most powerful features of scripting is the ability to make use of variables. Variables are essentially just "nicknames" or "placeholders" for values that may need to be modified or re-used in the future. Each variable is given a name that you can use to access its current value in your script.
Note: We say that values are "assigned to" or "stored in" variables. If you picture a variable as a container that can hold a value, assigning a value to a variable is like "placing" that value into a container.
You place a value into a variable by assigning the value to it with an equals sign. For example, the following script assigns the value 10 to a variable called "amount."
amount = 10;
You can change this value at any time by assigning a different value to the variable. (The new value simply replaces the old one.) For example, the following script assigns 45 to the amount variable, replacing the number 10:
amount = 45;
...and the following script assigns the string "Woohoo!" to the variable, replacing the number 45:
amount = "Woohoo!";
Note that you can easily replace a numeric value with a string in a variable. Having a number or a string in a variable doesn't "lock" it into only accepting that type of value—variables don't care what kind of data they hold.
This ability to hold changeable information is what makes variables so useful.
Just edit the script on the button object's On Click event so that it looks like this instead:
Dialog.Message("Every day I wake up and say...", strMsg);
This will make the Dialog.Message action display the current value of the strMsg variable when it is performed. Before we try it out, though, we need to assign a value to that variable somewhere.
Note: A common practice among programmers is to give their variables names with prefixes that help them remember what the variables are supposed to contain. One such prefix is "str," which is used to indicate a variable that contains a string. Other common prefixes are "n" for a numeric value (e.g. nCount, nTotal) and "b" for a Boolean true/false value (e.g. bLoaded, bReadyToStart).
Once you've modified the On Click script, click OK to accept your changes and close the Properties dialog.
The script should look like this when you’re done:

This will assign the string "Hello World!" to the variable named strMsg during the page's On Preload event. The On Preload event is triggered as soon as the page has been created in memory, just before it actually appears on the screen. This makes it a good place to put any initialization script, such as setting up default values or preparing variables that will be used once the page is shown.
The Dialog.Message action displays the message box, just like before.
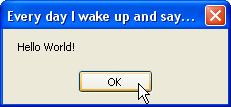
Note that the variable's name, strMsg, is nowhere to be found...instead, the value that is currently in the variable is displayed. In this case, it's the value that was assigned to the variable in the page's On Preload event.
Double-click on the page, and edit the script in the On Preload event so it looks like this instead:
strMsg = "Good Morning!";
This time, the message looks like this:
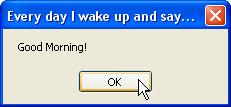
As you can see, you've just changed the message without even touching the Dialog.Message action.
Now imagine if you had such Dialog.Message actions on fifty pages throughout your project, and you decided you wanted to change the text. With variables and a little planning, such changes are a piece of cake.
The if statement gives your scripts the ability to make decisions, and do one thing or another in different circumstances.
Each if statement consists of a condition (or "test"), followed by a block of script that will only be performed if the condition is found to be true.
The basic syntax is:
if condition then
do something here
end
For example:
if age < 18 then
Dialog.Message("Sorry!", "You must be
18 to access this CD.");
Application.Exit();
end
The above script checks to see if the value in a variable named "age" is less than 18. If it is, it puts up a message saying "You must be 18 to access this CD," and then immediately exits from the application.
For example, if we set age to 17 first:
age = 17;
if age < 18 then
Dialog.Message("Sorry!", "You must be
18 to access this CD.");
Application.Exit();
end
...the block of script between the "then" and "end" keywords will be performed, because 17 is less than 18. In this case, we say that the if statement's condition "passed."
However, if we set age to 20:
age = 20;
if age < 18 then
Dialog.Message("Sorry!", "You must be
18 to access this CD.");
Application.Exit();
end
...the block of script between the "then" and the "end" isn't performed, because 20 isn't less than 18. This time, we say that the if statement's condition "failed."
Note: An if statement's condition can be any expression that evaluates to true or false.
Let's modify the script on our button object's On Click event to only display the message if it is "Hello world!".
Use a tab character to indent the original "Dialog.Message..." line to the right a little. (It's good practice to indent any lines inside an if statement in order to help make the logic easier to follow.) To insert a tab character at the start of the line, place the cursor to the left of the "D" and press the Tab key.
Tip: You can indent one or more lines at once by highlighting them and pressing Tab to increase the indent (to the right), or Shift+Tab to decrease the indent (to the left).
The script should look like this when it's done:
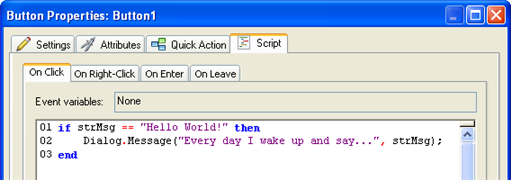
The double equals compares for equality, so this if statement's condition will only be true if strMsg contains "Hello World!" with the exact same capitalization and spelling.
Tip: An easy way to add an if statement on the script editor is to highlight the line of text that you want to put "inside" the if, click the Add Code button, and then choose Quick Scripts > "if statement" from the menu. An if statement "template" will be added around the line that you highlighted. You can then edit the template to fit your needs.
This time, nothing happens, because strMsg is still set to "Good Morning!" in the On Preload event. "Good Morning!" doesn't equal "Hello World!" so the if condition fails, and the block of code between the "then" and "end" keywords is skipped entirely.
The script should look like this when it's done:
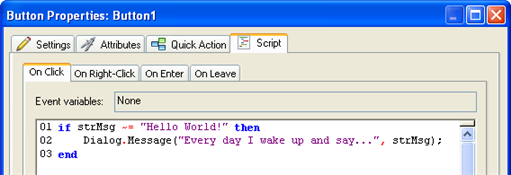
The tilde equals (~=) compares for inequality, so this if statement's condition will only be true if strMsg contains anything but "Hello World!" with the exact same capitalization and spelling.
This time, because strMsg contains "Good Morning!", which is definitely not equal to "Hello World!", the message will appear.
The == and ~= operators are fine when you want to check strings for an exact match. But what if you’re not sure of the capitalization? What if the variable contains a string that the user typed in, and you don't care if they capitalized everything correctly?
One solution is to use an old programmer's trick: just convert the contents of the unknown string to all lowercase (or all uppercase), and do the same to the string you want to match.
Let's modify our script to ask the user for a message, and then display what they typed, but only if they typed the words "hello world" followed by an exclamation mark.
The first line uses a Dialog.Input action to pop up a message dialog with an input field that the user can type into. Whatever the user types is then assigned to the strMsg variable.
Note: This new value replaces the value that was assigned to strMsg in the page's On Preload event.
In the if statement's condition, we use a String.Upper action to convert the contents of strMsg to all uppercase characters, and then compare that to "HELLO WORLD!".
We've added an "else" keyword after the first Dialog.Message action. It basically divides the if statement into two parts: the "then" part, that only happens if the condition is true; and the "else" part, that only happens if the condition is false. In this case, the else part uses a Dialog.Message action to tell the user that they didn't type the right message.
Depending on what you type, you'll either see the "hello world!" message, or "You didn't type Hello World!".
Note that if you type some variation of "hello world!", such as "hello world!", or "hEllO WorlD!", the capitalization that you type will be preserved in the message that appears. Even though we used a String.Upper action to convert the message string to all uppercase letters in the if statement’s condition, the actual contents of the variable remain unchanged.
When the String.Upper action converts a value to all uppercase letters, it doesn't change the value in the variable...it just retrieves it, converts it, and passes it along.
Now you know how to compare two strings without being picky about capitalization. Programmers call this a case-insensitive comparison, whereas a comparison that only matches perfect capitalization is considered case-sensitive.
Tip: You can also use a String.CompareNoCase action to perform a case-insensitive comparison.
Another common use of the if statement is to test a numeric value to see if it has reached a certain amount. To demonstrate this, let's create another button that displays a message after you click on it 5 times.
It doesn't matter what button you choose, or where you put the button on the page. We just need something to click on, so we can trigger an On Click event and perform some actions.
Double-click on the new button you added, then click on the Script tab and type the above script into the On Click event.
It should look like this when you're done:
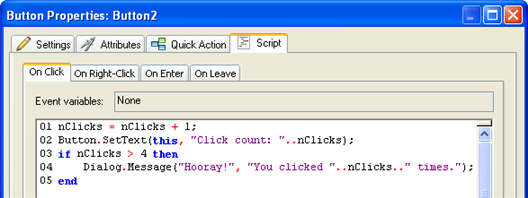
The first line adds 1 to the current value contained in a variable named nClicks. (We'll add some script to the page's On Preload event in the next step, to set this variable to 0 when the page loads.)
The second line uses a Button.SetText action to change the button object's text to "Click count: n", where n is the current value of nClicks.
The Button.SetText action takes two parameters. The first parameter is a string containing the name of the object that you want it to operate on. In this case, we used the special variable this, which contains the name of the object that the On Click event was triggered on. This is essentially the same as using the name of the object, like so:
Button.SetText("Button2", "Click count: " .. nClicks);
The Button.SetText action’s second parameter is a string containing the text that you want to display in the button object. We used the concatenation operator to join the current value of nClicks to the end of the string "Click count: ". Note that this string has a space at the end of it, so there will be a space between the colon and the value of nClicks. (The resulting string just looks better that way.)
The concatenation operator consists of two periods, or dots (..). In fact, it's often referred to as the "dot-dot" operator. It is used to join two strings together to form a new, combined string. It's kind of like string glue.
Note: Technically, the value inside nClicks isn't a string—it's a number. That doesn't really matter, though. When you're doing concatenation, AutoPlay will automatically convert a number into the equivalent string, as required.
The rest of the script is just an if statement that tests whether the value of nClicks is greater than 4, and displays a message when that's true. (A couple more concatenation operators are used in the Dialog.Message action, to create the string for its second parameter. Note that you can easily include the contents of a variable in the "middle" of a string as well.)
Once you're done editing the button's On Click script, click OK to close the script editor.
We need to initialize nClicks before the button is clicked, so that our script in the button's On Click event will start counting up from 0. Note that we can't just set nClicks to 0 in the button's On Click event, or it would be reset to zero every time the button was clicked.
To add the line to the page's On Preload event, just double-click on the page surface, then click on the On Preload tab of the Script editor, and add the nClicks line to the existing script. Once you're done, it should like something like this:

It doesn't matter if you put the nClicks = 0; line before or after the existing line...the order of the individual lines in this script isn't important.
Each time you click on the button, its text will change to show how many times you've clicked on it so far. After you've clicked on the button 5 times, it will also display a message telling you how many times you've clicked.
There you go. You've just created a pretty sophisticated little program.
Tip: If you feel adventurous, see if you can modify the script to stop announcing the number of clicks once you've clicked 10 times.
Here's a hint: you'll need to use a logical operator like "or" and "and" to test more than one thing at once in the if statement's condition. For example, you could make the test only be true between 3 and 7 by using a condition like this:
if
(nCount > 2) and (nCount < 8) then
-- only true if greater than 2 and less than 8
end
The second line in the above script is a comment. (It doesn't actually do anything.) Everything on a line after two dashes (--) is completely ignored by AutoPlay. You can use such comments wherever you'd like to add "internal" notes to your scripts.
Sometimes it's helpful to be able to repeat a bunch of actions several times, without having to type them over and over and over again. One way to accomplish this is by using a for loop.
The basic syntax of the for loop is:
for variable = start, end, step do
do something here
end
For example:
for n = 10, 100, 10 do
Dialog.Message("", n);
end
The above script simply counts from 10 to 100, going up by 10 at a time, displaying the current value of the variable n in a dialog message box. This accomplishes the same thing as typing:
Dialog.Message("", 10);
Dialog.Message("", 20);
Dialog.Message("", 30);
Dialog.Message("", 40);
Dialog.Message("", 50);
Dialog.Message("", 60);
Dialog.Message("", 70);
Dialog.Message("", 80);
Dialog.Message("", 90);
Dialog.Message("", 100);
Obviously, the for loop makes repeating similar actions much easier.
Let's use a simple for loop to add all of the digits between 1 and 100, and display the result.
The script should look like this when you're done:
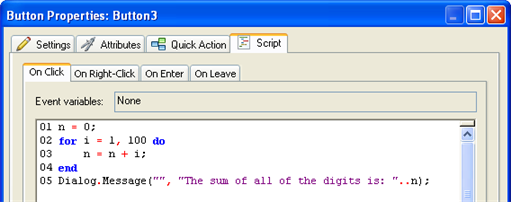
The first line creates a variable called n and sets it to 0. The next line tells the for loop to count from 1 to 100, storing the current "count" at each step in a variable named i.
During each "pass" through the loop, the script between the "do" and the "end" will be performed. In this case, it consists of a single line that adds the current values of n and i together, and then stores the result back into n. In other words, it adds i to the current value of n.
This for loop is the same as typing out:
n = n + 1;
n = n + 2;
n = n + 3;
n = n + 4;
...all the way up to 100.
The last line of our script just displays the result of the calculation to the user in a dialog message box.
Tip: You can use the Add Code button to insert an example for loop, complete with comments explaining the syntax. You can then edit the example to fit your own needs.
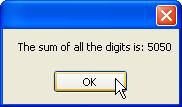
When you click on the button object, the for loop will blaze through the calculation 100 times, and then the Dialog.Message action will display the result.
It all happens very fast.
You probably won't find yourself using for loops as often as you'll use if statements, but it's definitely worth knowing how to use them. When you need to repeat steps, they can save you a lot of effort.
Of course, when it comes to saving you effort, the real champions are functions.
A function is just a portion of script that you can define, name and then call from somewhere else.
You can use functions to avoid repeating the same script in different places, essentially creating your own custom "actions"—complete with parameters and return values if you want.
In general, functions are defined like this:
function function_name (arguments)
function script here
return return_value;
end
The "function" keyword tells AutoPlay that what follows is a function definition. The function_name is simply a unique name for the function. The arguments part is the list of parameters that can be passed to the function when it is called. It's essentially a list of variable names that will receive the values that are passed. (The resulting variables are local to the function, and only have meaning within it.) A function can as many arguments as you want (even none at all).
The "return" keyword tells the function to return one or more values back to the script that called it.
The easiest way to learn about functions is to try some examples, so let's dive right in.
This opens the Global Functions dialog.
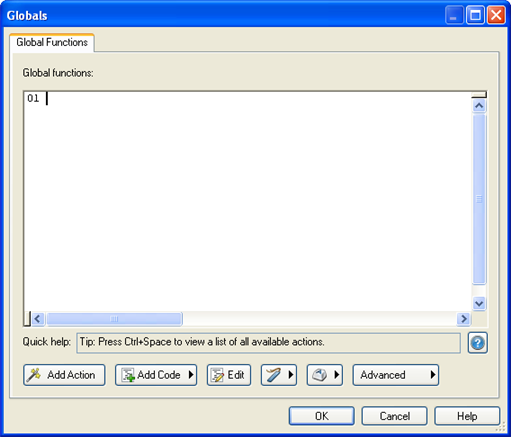
The Global Functions dialog is a convenient place to put any functions or variables that you want to make available throughout your project. Any script that you add on this dialog will be performed when your application is launched, right before the project's On Startup event is triggered.
This script defines a function named SayHello that takes a single argument (which we've called "name") and displays a simple message.
Note that this only defines the function. When this script is performed, it will "load" the function into memory, but it won't actually display the message until the function is called.
It should look like this when you're done:

Once you've entered the function definition, click OK to close the Global Functions dialog.
This script calls the SayHello function that we defined on the Global Functions dialog, passing the string "Mr. Anderson" as the value for the function's "name" parameter.
When you click on the button object, the script on the object's On Click event calls the SayHello function, which then displays its message.
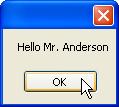
Note that the SayHello function was able to use the string that we passed to it in the message it displayed.
The end result should look like this:
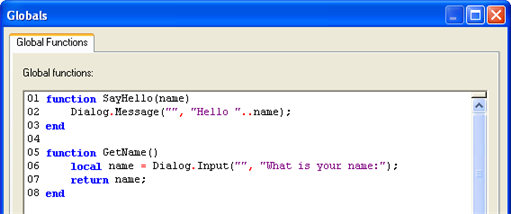
This script defines a function called GetName that does not take any parameters. The first line inside the function uses a Dialog.Input action to display a message dialog with an input field on it asking the user to type in their name. The value returned from this action (i.e. the text that the user entered) is then stored in a local variable called name.
The "local" keyword makes the variable only exist inside this function. It's essentially like saying, "for the rest of this function, whenever I use 'name' I'm referring to a temporary local variable, even if there's a global 'name' variable which may happen to exist." Using local variables inside functions is a good idea—it prevents you from changing the value of a global variable without meaning to. Of course, there are times when you want to change the value of a global variable, in which case you just won't use the "local" keyword the first time you assign anything to the variable.
The second line inside the function returns the current value of the local "name" variable to the script that called the function.
Tip: We could actually make this function's script fit on a single line, by getting rid of the variable completely. Instead of storing the return value from the Dialog.Input action in a variable, and then returning the contents of that variable, we could just put those two statements together, like so:
function
GetName()
return Dialog.Input("", "What is your
name:");
end
This would make the GetName function return the value that was returned from the Dialog.Input action, without storing it in a variable first.
It should look like this when you're done:

The first line calls our GetName function to ask the user for their name, and then stores the value returned from GetName in a variable called strName.
The second line passes the value in strName to our SayHello function.
When you click on the button object, an input dialog will appear, asking you to enter your name.
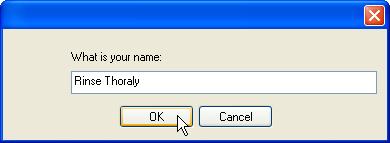
After you type in your name and click OK (or press Enter), a second dialog box will appear, greeting you by the name you entered.

Pretty neat, huh?
This version of the script does away with the strName variable altogether. Instead, it uses the return value from our GetName function as the argument for the SayHello function.
In other words, it passes the GetName function's return value directly to the SayHello function.
Whenever a function returns a value, you can use a call to the function in the same way you would use the value, or a variable containing the value. This allows you to use the return value from a function without having to come up with a unique name for a temporary variable.
The script should work exactly the same as before: you'll be asked for your name, and then greeted with it.
This is just a simple example, but it should give you an idea of what an incredibly powerful feature functions are. With them, you can condense large pieces of script into simple function calls that are much easier to type and give you a single, central location to make changes to that script. They also let you create flexible "subroutines" that accept different parameters and return results, just like the built-in AutoPlay actions.
And despite all that power, they are really quite simple to use.
Well, that’s the last lesson. I hope you've enjoyed learning about AutoPlay, and have found this user's guide both useful and helpful.
Feel free to join your fellow AutoPlay Media Studio users in our online forums, where assistance and camaraderie abound. You can join in the fun by choosing Help > User Forums right from the AutoPlay program menu.
While you're at it, be sure to check out the online program reference and the helpful list of "How do I...?" questions as well.
There is a lot more that you can learn about this product, if you ever find the need or desire to. Chances are, if there's something you want to do with AutoPlay, there's at least one way to do it, and probably more.
As one of our wisest users once said, AutoPlay is easy to learn, but difficult to master.
Lesson 10 Summary
In this lesson, you learned how to:
• Display a message
• Use a variable
• Add an if statement
• Test numeric values
• Set a button object’s text
• Concatenate strings
• Compare strings
• Use a for loop
• Create functions